Server Backup and Recovery
12006Learning Objectives
- Understand the importance of server backups
- Learn to schedule database backups using mysqldump
- Learn to schedule database backups using xtrabackup
- Learn to schedule file backups using the rsyncd plugin
Importance of Server Backups
During the operation of a server, we may encounter various issues such as hardware failures, system crashes, data loss, or malicious attacks. These problems can lead to data loss, which can severely impact our business. Therefore, it is crucial to regularly back up server data.
By backing up, we can quickly recover data after loss, minimizing the damage caused by data loss. Additionally, backups can help us swiftly restore the system after a crash, reducing downtime.
Thus, learning how to perform server backups and recovery in the Jianghu panel, as well as how to set up scheduled backup tasks, is an essential skill for every server administrator.
Generally, the content that needs to be backed up on a server includes databases and files, each of which has its own backup tools. Next, we will learn how to perform server backups and recovery in the Jianghu panel, mainly including:
- Database Backup:
- mysqldump backup
- xtrabackup backup, including both full and incremental backup methods.
- File Backup:
- Using the rsyncd plugin for file synchronization.
All of these backup tasks can be set to execute automatically on a schedule.
1. Database mysqldump Backup and Recovery
mysqldump is a tool in the MySQL database management system used to create backups of databases or database tables. It generates an SQL script that can be used later to restore the original database structure and data.
Manually performing mysqldump backup:
The Jianghu panel provides the functionality to generate a mysqldump backup for a specified database:
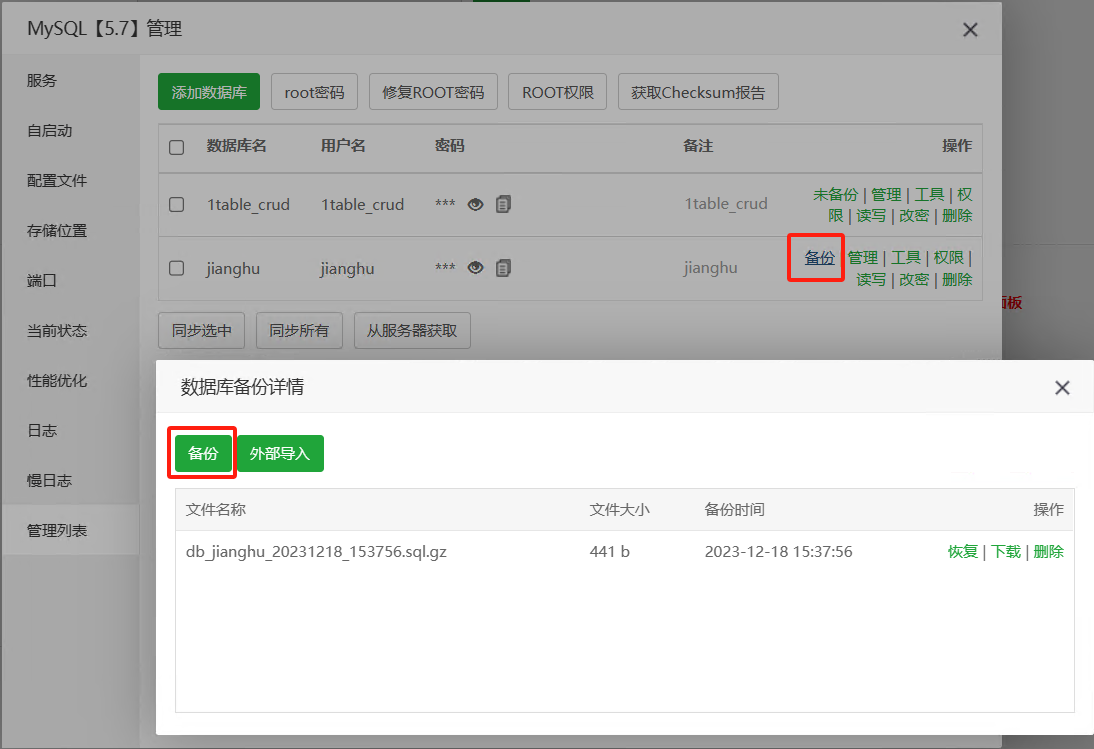
- On the left side of the Jianghu panel page, click "MySQL" to open the MySQL management interface.
- In the "Management List," find the corresponding database and click "Backup."
- In the pop-up database backup detail window, click "Backup."
- The generated SQL script will be automatically compressed into a
.gzfile and stored in the/www/backup/databasedirectory.
Setting up a scheduled task for mysqldump backup:
Manually performing mysqldump backups clearly cannot meet our need for timely data backups. The Jianghu panel provides the functionality to set up scheduled tasks that can automatically execute mysqldump backups:
- In the Jianghu panel, click the "Scheduled Tasks" on the left sidebar.
- In "Add Scheduled Task," select the task type "Backup Database."
- Set the execution cycle, backup database, and backup cleanup rules. Generally,
- Set "Execution Cycle" to "Every 120 minutes."
- For "Backup Database," it is recommended to select "All."
- The "Backup Cleanup Rules" can use the default settings.
- Click "Add Task," and the scheduled backup task will be successfully created, with the system executing the specified database backup operation on schedule.
- The backed-up database files are stored in the
/www/backup/databasedirectory.
Restoring data from a specified database using mysqldump backup:
If a backup needs to be restored, you can find the corresponding database in the MySQL plugin - Management List, click "Backup," and in the pop-up database backup detail window, click the "Restore" button corresponding to the backup file to perform the restoration.
2. Database Xtrabackup Backup
Xtrabackup is an open-source MySQL database backup software that can perform hot backups of databases using the InnoDB and XtraDB storage engines. Xtrabackup is an important complement to mysqldump backups for MySQL databases. In cases where the MySQL database encounters issues, especially overall corruption, Xtrabackup can help us quickly restore the entire database. Xtrabackup can back up databases through both full and incremental backup methods.
Xtrabackup Backup and Recovery:
- In the Jianghu panel, click "Software Management," enter
Xtrabackupin the search box in the upper right corner, and install the plugin. - Open the Xtrabackup plugin, click "mysql backup" on the left sidebar, input the scheduled backup execution time and cleanup rules in the right sidebar, and click create to establish the Xtrabackup scheduled backup task. Generally, it is set to perform Xtrabackup backups once a day.
- Click the "Backup" button below to manually perform a database backup.
- When recovery is needed, click the "Restore" button corresponding to the backup file below to perform the restoration.
Note: When using the Xtrabackup plugin to restore the database, all databases, users and passwords, functions and events, and other configurations on the MySQL server will be replaced with the contents from the Xtrabackup backup. Therefore, caution is required!
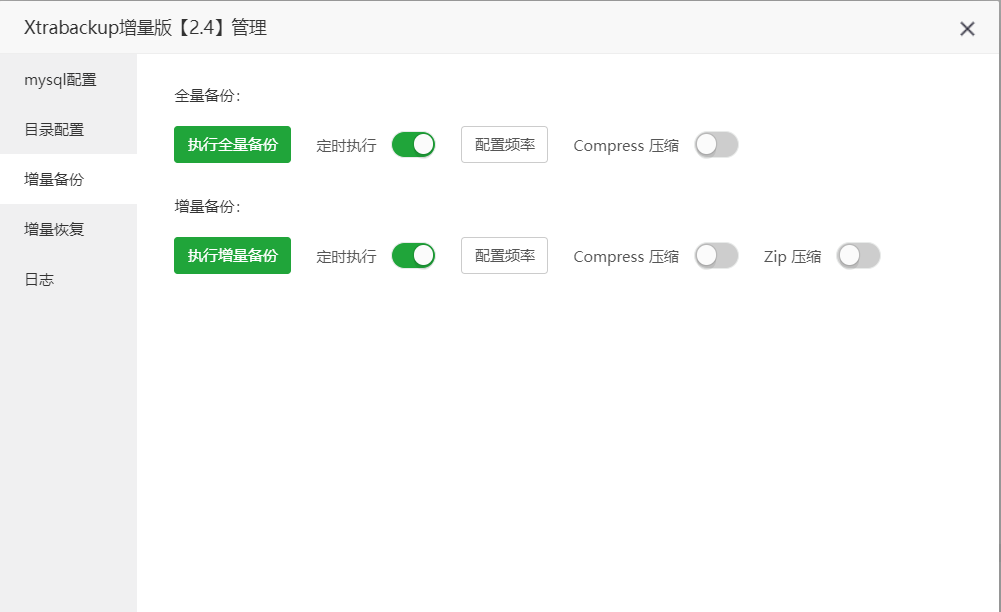
Xtrabackup Incremental Backup:
Full backups and incremental backups are two different data backup strategies:
- Full Backup refers to backing up all selected data in the system. Regardless of whether a backup has been performed previously, it will copy all specified files and information.
- Incremental Backup only backs up data that has changed since the last backup (whether full or incremental). This means it only copies files that have been newly changed or added since the last backup.
Compared to full backups, incremental backups are faster and more efficient. Using incremental backups allows for a more complete preservation of data changes between two full backups.
The Jianghu panel provides a plugin "Xtrabackup Incremental Version" for performing incremental backups of databases:
- In the Jianghu panel, click "Software Management," enter
Xtrabackup Incremental Versionin the search box in the upper right corner, and install the plugin. - Open the Xtrabackup Incremental Version plugin, click "Incremental Backup" on the left, and here click "Configure Frequency" to set up scheduled tasks for full and incremental backups:
- Full Backup: Set to "Daily."
- Incremental Backup: Set to "N minutes," with the value set to 30 minutes.
- Click "Execute Full Backup" and "Execute Incremental Backup" to manually perform a database backup.
- Backup files are stored in the
/www/backupdirectory:
- Full Backup:
/www/backup/xtrabackup_data_base - Incremental Backup:
/www/backup/xtrabackup_data_incremental
- When recovery is needed, click "Incremental Recovery" on the left sidebar - "Execute Incremental Recovery" button to perform the recovery.
3. Relationship Between Different Database Backup Methods
The three different backup methods above together form a complete database backup solution:
- Xtrabackup Backup: Perform a full backup of the database once a day as a fallback backup mechanism.
- Xtrabackup Incremental Backup: Improve backup efficiency through incremental methods to track data changes within a day.
- mysqldump Backup: Using Xtrabackup can only back up or restore all databases; when we only need to restore one or part of the databases, we can use the corresponding mysqldump backup.
4. Using the rsyncd Plugin for File Synchronization and Backup
The method for backing up files on a server typically involves copying user data files or project files to another directory for storage. The Jianghu panel uses the "rsyncd" plugin for file synchronization and backup.
rsyncd is an open-source tool for file synchronization and backup that can copy and synchronize files either locally or between different machines. rsyncd uses a technique called "incremental copying," which only copies the changed parts of files rather than the entire file. This makes rsyncd very efficient when handling large files or a large number of files. We often use rsyncd to back up important files on the server to prevent data loss.
- In the Jianghu panel, click "Software Management," enter
rsyncdin the search box in the upper right corner, and install the plugin. - Open the rsyncd plugin, click "Send Configuration" on the left -> "Create Send Task," input the following information, and click submit to establish a scheduled synchronization task:
- Server IP: The IP of the target server; if synchronizing to a directory on the same server, you can enter
127.0.0.1. - Synchronization Directory: The directory to be synchronized, ensuring to keep the trailing
/symbol. - Synchronization Cycle: Depending on the functionality and characteristics of the directory to be synchronized, choose "Scheduled Synchronization" or "Real-time Synchronization." See the next section "rsyncd Scheduled Synchronization VS Real-time Synchronization."
- Scheduled Cycle: If "Scheduled Synchronization" is selected, set the scheduled cycle.
- Speed Limit: Can be set to 1000000KB/s.
- Connection Method: Generally select "SSH."
- SSH Port: The SSH port of the target server.
- Key File: The key file required for SSH connection; configuration method is described in section 6 of this lesson.
- Target Directory: Ensure to keep the trailing
/symbol.
- After adding, you can click the "Filter" in the operation column to set the files or folders to be filtered during synchronization; by default, directories like node_modules, logs, run, etc., will be filtered out.
- You can click "Synchronize" to perform a manual synchronization once, and then click "Logs" to view the log files to ensure that the synchronization task is working properly. (The normal synchronization log should contain entries like "sending incremental file list," etc.)
5. rsyncd Scheduled Synchronization VS Real-time Synchronization
The rsyncd plugin in the Jianghu panel has built-in the lsyncd tool to achieve real-time synchronization of directories and files. lsyncd (Live Syncing Daemon) is a real-time synchronization tool that uses the Linux inotify mechanism to monitor file changes in specified directories and uses rsync for data synchronization.
Generally, for directories and files that do not change much, we usually use scheduled synchronization for backups to reduce resource consumption on the system. However, for directories and files that change frequently, real-time synchronization is more suitable to ensure that every file change can be backed up in a timely manner.
In our server system, there are several types of directories and files that need to be backed up:
/www/wwwroot: Stores the code and configuration files of websites and projects on the server, which usually do not change much, so "Scheduled Synchronization" can be used./www/backup: Mainly stores database backup files, which change more frequently, so "Real-time Synchronization" can be used./www/wwwstorage: In application projects where users upload a lot of data, we usually migrate the directory that saves user-uploaded data,upload, to the/www/wwwstoragedirectory. Therefore, changes in the/www/wwwstoragedirectory will also be more frequent, making it suitable for "Real-time Synchronization."
6. Using Jianghu Panel Script Tool to Configure SSH Key for rsyncd Synchronization
The rsyncd plugin connects to the target server for file synchronization via SSH. Typically, when connecting to the target server, we log in as the root user. This requires us to provide proof of identity for the root user on the target server. If password login is used, we would need to manually enter the password every time a connection is established, which is clearly impractical. Therefore, we need to use an SSH key to connect to the target server, allowing for automatic login after initial configuration.
The Jianghu panel provides a script tool to generate the SSH key specifically required for rsyncd synchronization:

- Click "Files" on the left side of the Jianghu panel page to enter the file management interface. Click the "Terminal" icon to open the local terminal.
- In the command line, enter
jh 22and press Enter. - Follow the prompts to sequentially input the corresponding numbers, select "2. Generate SSH Key" -> "2. Generate Server Synchronization SSH Key" to start generating the SSH key.
- Sequentially input your email (you can use the default email), the IP of the target server, SSH port, and root user password to generate the SSH key and add the generated key to the target server's
/root/.ssh/authorized_keys.
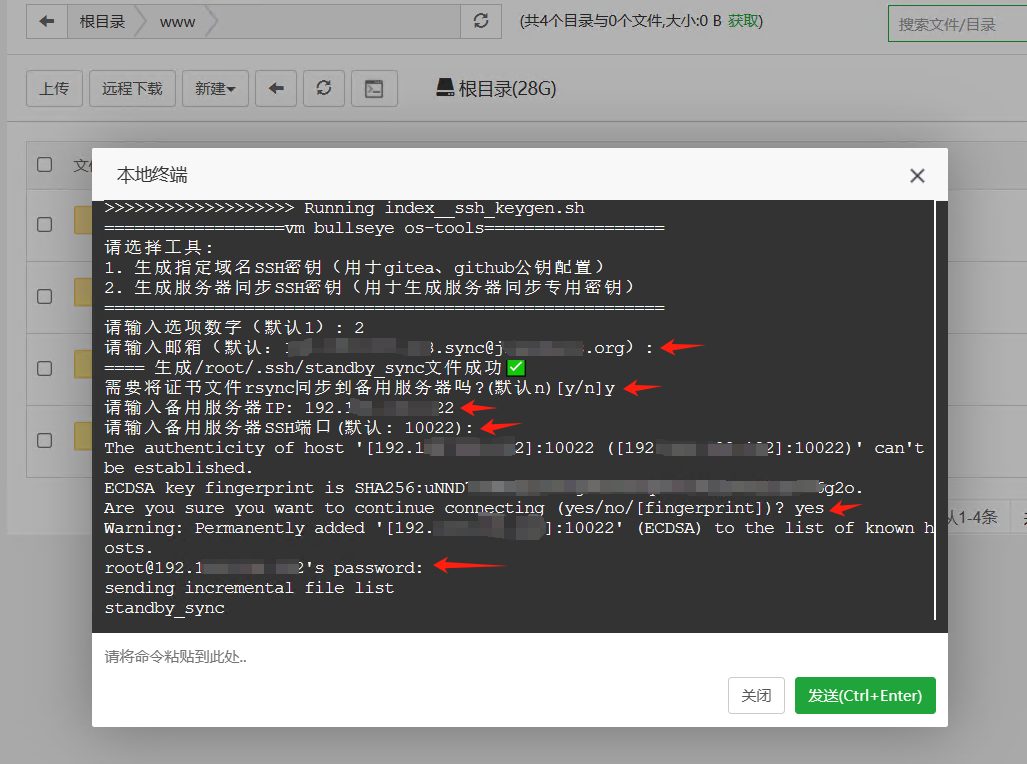
After successful configuration, you will see the following success message:
sending incremental file list
standby_sync
          2,622 100%    0.00kB/s    0:00:00 (xfr#1, to-chk=1/2)
standby_sync.pub
            588 100%  574.22kB/s    0:00:00 (xfr#2, to-chk=0/2)

sent 3,382 bytes  received 84 bytes  239.03 bytes/sec
total size is 3,210  speedup is 0.93
================ Key Information ================
Email: <previously entered default email>
Key File Location: /root/.ssh/standby_sync
- The certificate file has been synchronized to the following server:
  - Server IP:
  - Target Server SSH Port:
=========================================
<<<<<<<<<<<<<<<<<<< Run index__ssh_keygen.sh success✔!
The key generated by the script tool above will be automatically named standby_sync and stored in the /root/.ssh directory. When configuring the SSH connection in the rsyncd plugin, the plugin will automatically check for the existence of this key file; if it exists, it will automatically configure to use this key; otherwise, the user will need to specify which key to use and ensure that the key has been added to the target server.
7. Principles for Storing Backup Files
- User data (uploaded files, etc.) and backup data (database backup files, etc.) will continue to increase, so it is recommended to store these two types of files separately in designated directories for timely backup or cleanup.
- Off-site Backup: It is best to store backup files on another server or storage device (such as NAS, external hard drive) to avoid losing backup content if the current virtual machine is damaged.
- Version Control: If historical versions need to be retained, directories that need to be preserved can be compressed and packaged, but be sure to set up scheduled cleanup tasks.
Assignment
Based on the content of this article, set up the following three scheduled backup tasks:
- Create a scheduled task to back up "all" databases.
- Install the xtrabackup plugin, manually perform a backup recovery, and create a scheduled backup task.
- Use the rsyncd plugin to synchronize files from
/www/wwwroot/to/backup/wwwroot/.