Adding, Modifying, and Deleting Data in MySQL Database
12002Course Introduction
This lesson will continue to explore the basic operations of data management in relational databases, including adding, modifying, and deleting data. We will introduce two methods of operation: using the Navicat graphical interface and executing SQL statements. In previous lessons, we focused on SQL statement operations; now we will guide you through executing these operations via the Navicat graphical interface to enhance your understanding of data management.
1. Adding Data to a Table
Example: In the "student" table, we need to add a student's information.
Student ID (SId): 14,
Name (Sname): Wang Xiaohua,
Date of Birth (Sage): 2012-03-01,
Gender (Ssex): Female
Adding Data Using Navicat
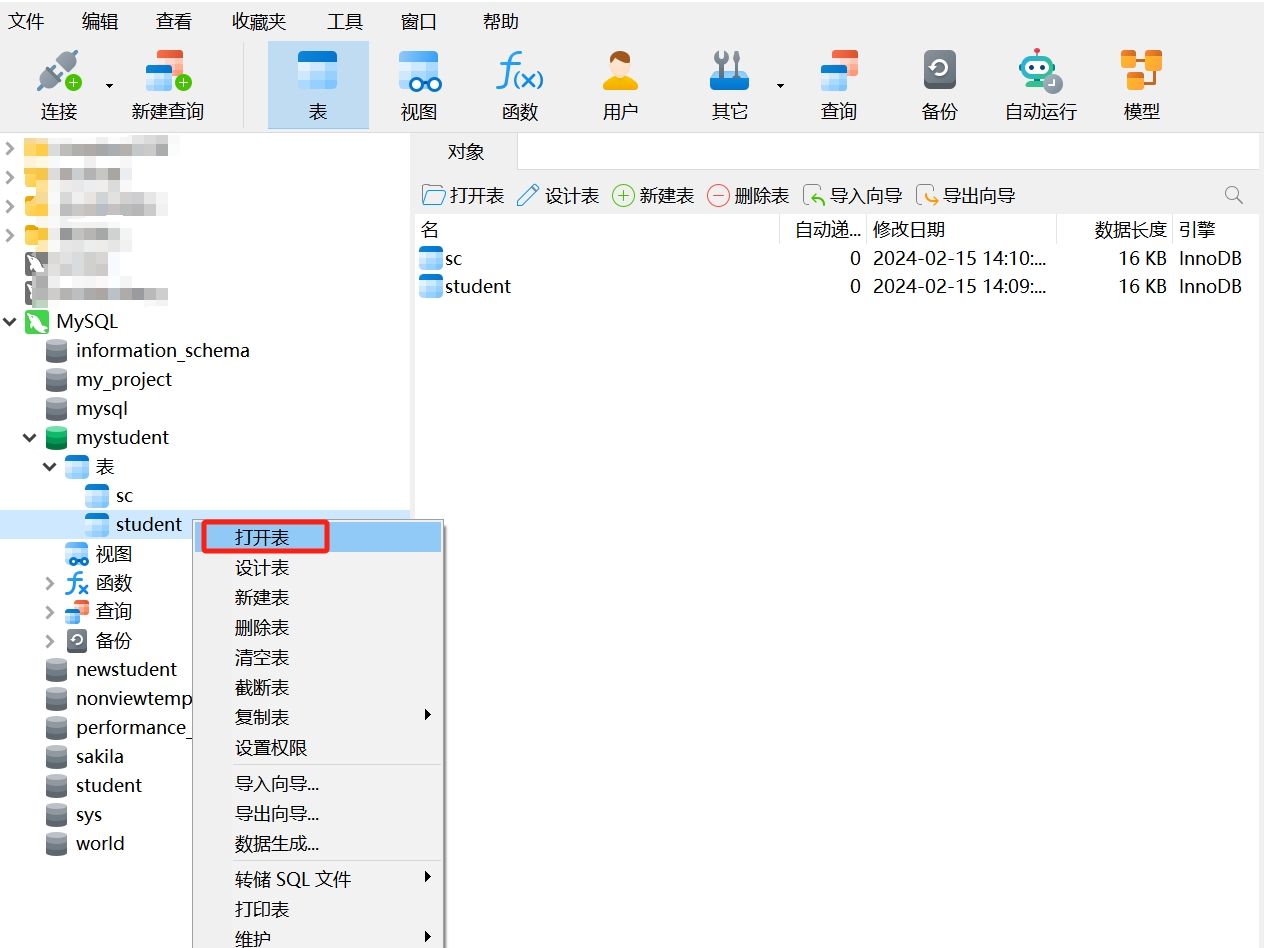
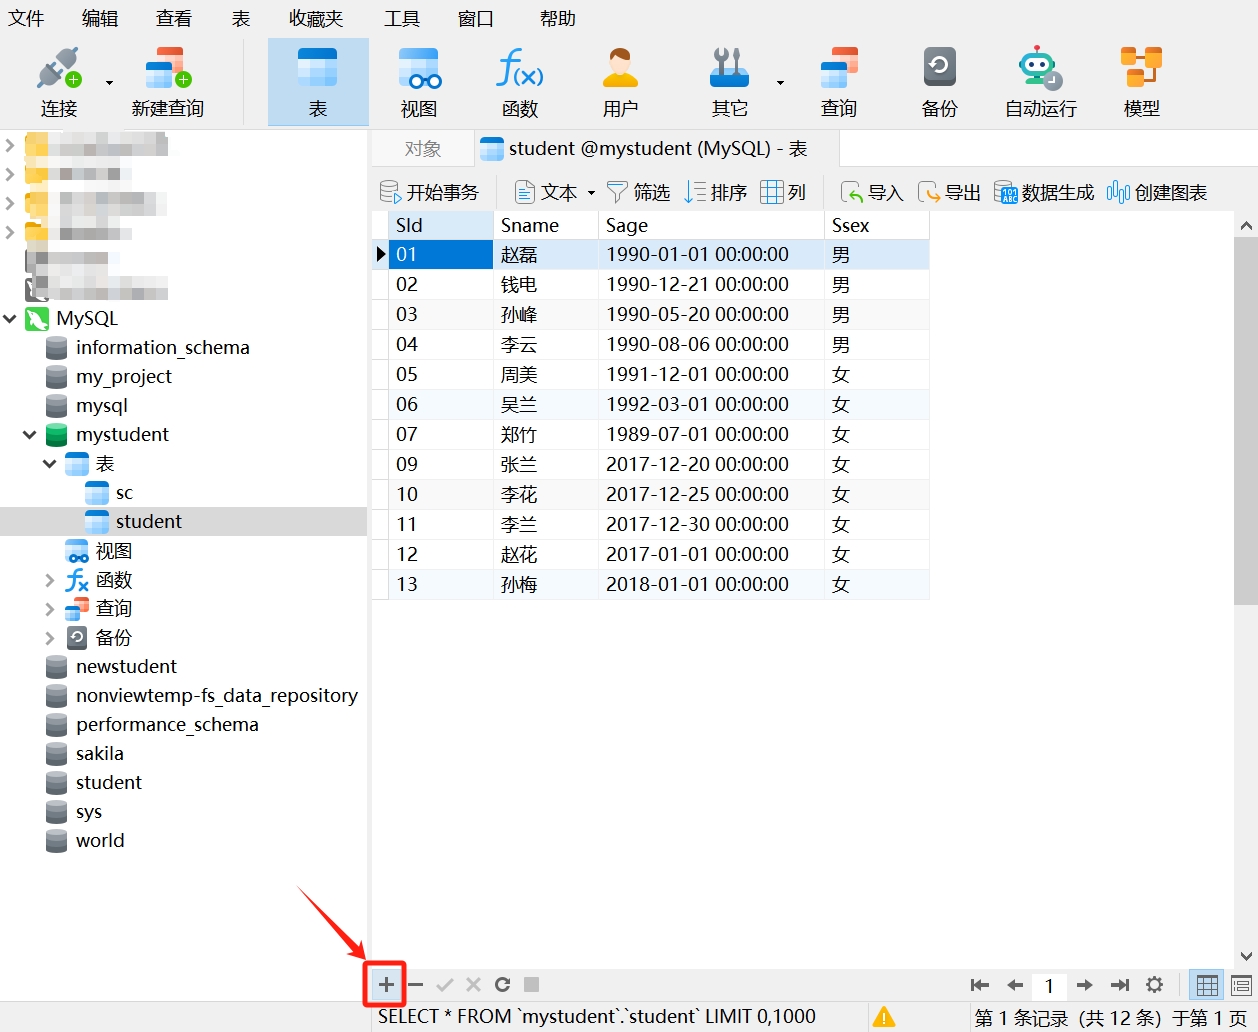
- Select the "student" table, double-click or right-click and choose "Open Table".
- Once opened, click the " + " in the lower left corner of the table to add a new row.
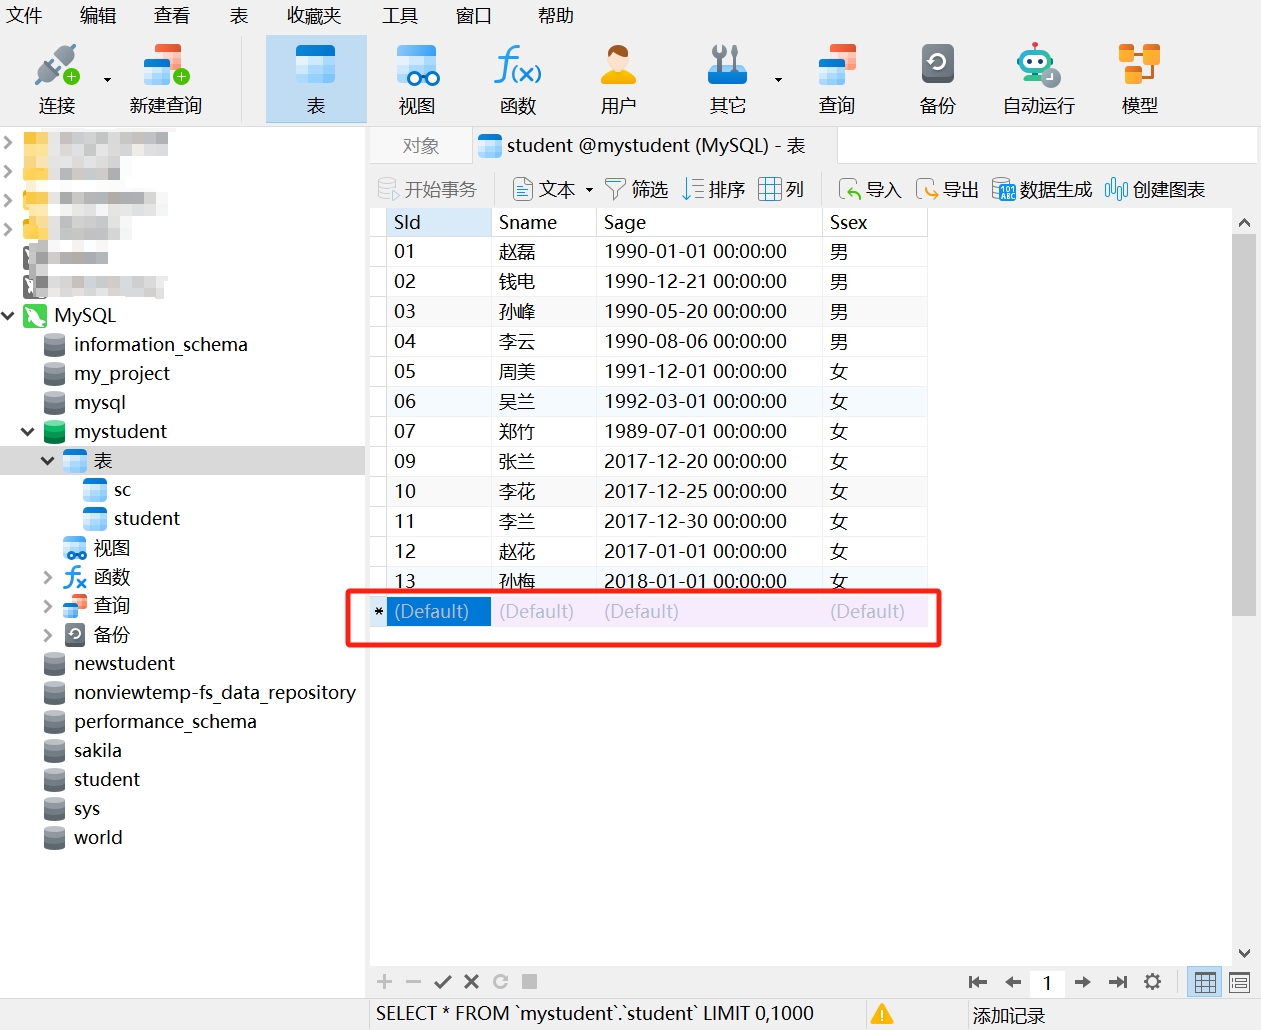
- In the new row, enter the student's information sequentially. After confirming it is correct, click " √ " in the lower left corner of the table to save the added data.
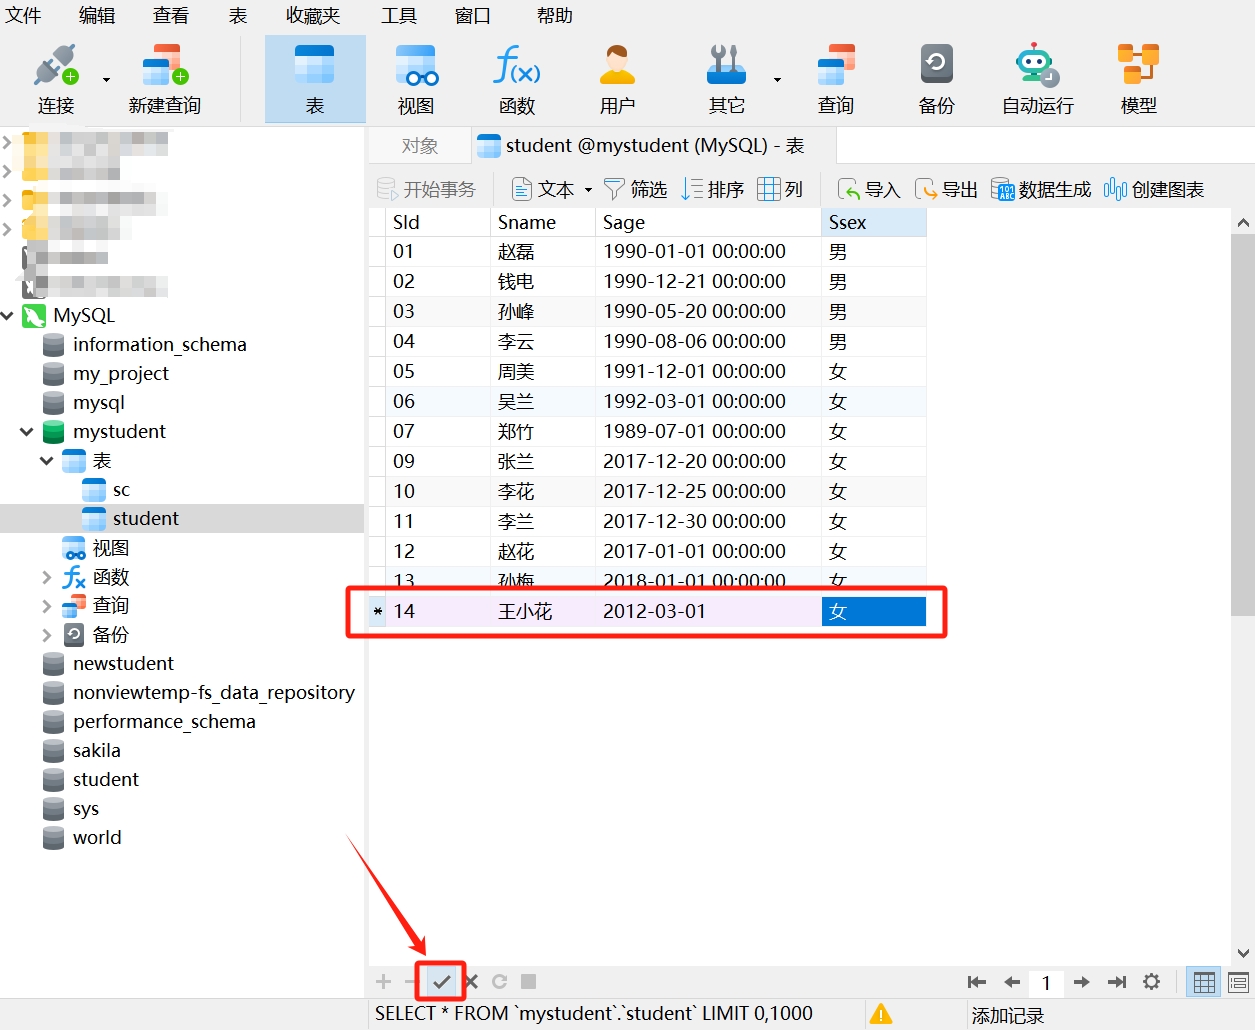
- Data added successfully.
It is important to note that if you only need to add one or a few records to the table, using the Navicat graphical interface is perfectly fine; however, if you need to add multiple records, it is recommended to use SQL statements for a simpler and quicker process.
Adding Data Using the INSERT Statement
In SQL statements, we use the INSERT statement to insert new rows into a table. Here is the basic syntax of the INSERT statement:
INSERT INTO table_name (column1, column2, ...)
VALUES (value1, value2, ...);
Where:
INSERT INTO: A keyword indicating the target table for data insertion.table_name: The name of the target table where data will be inserted.column1, column2, ...: Specifies the column names for the data to be inserted.VALUES (value1, value2, ...): Specifies the actual values to be inserted into the columns.
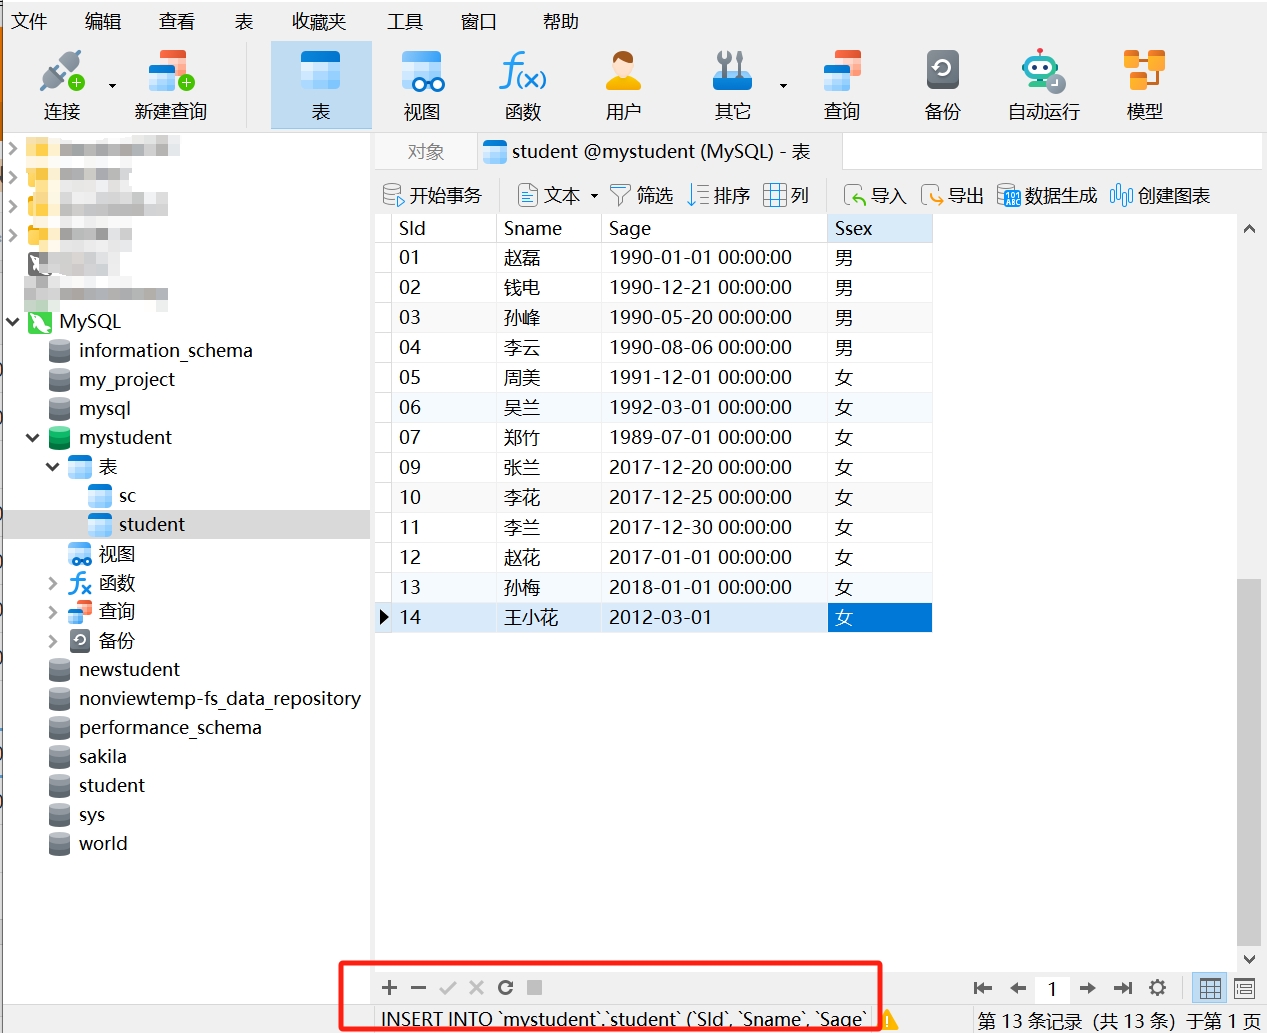
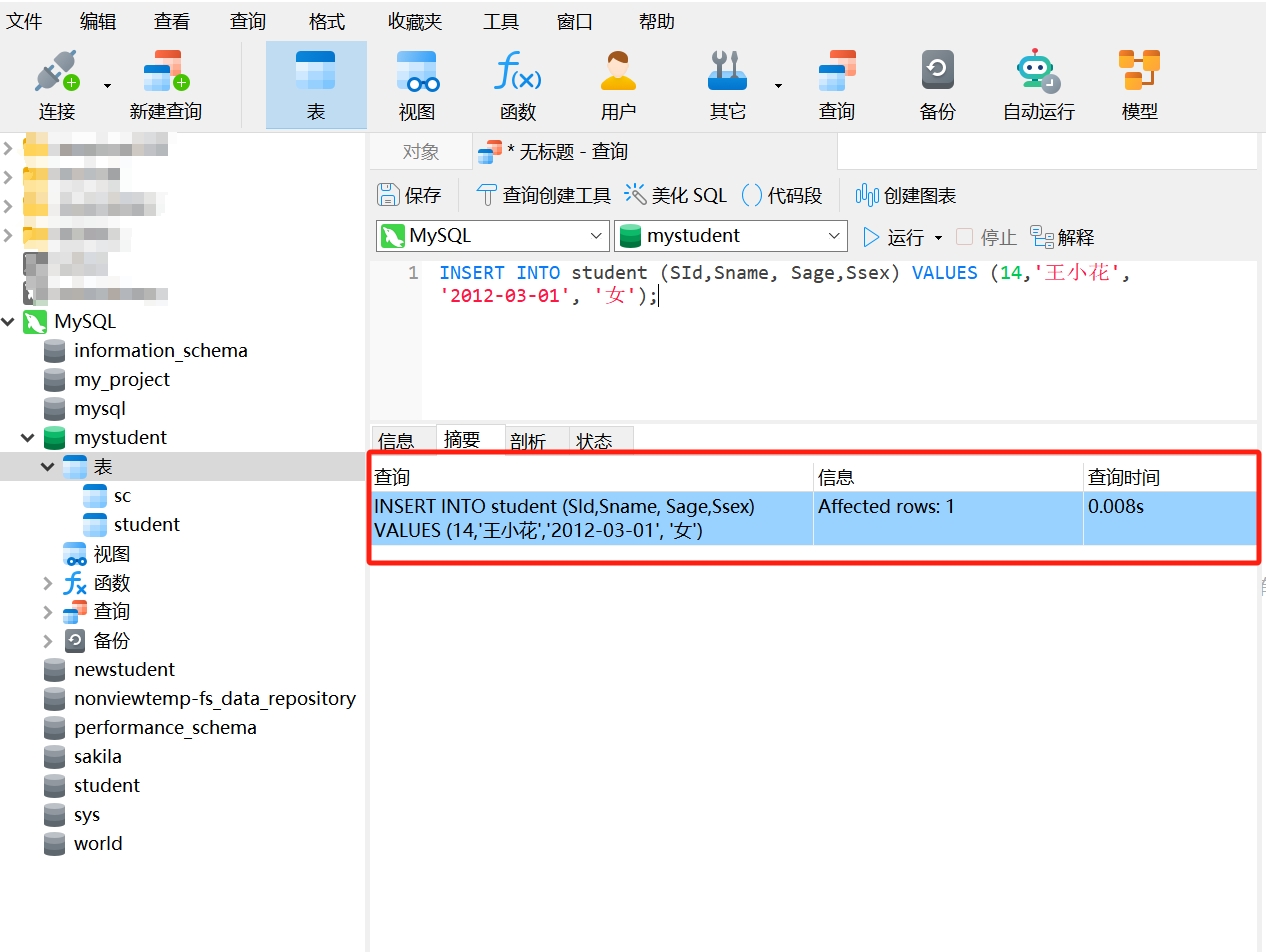
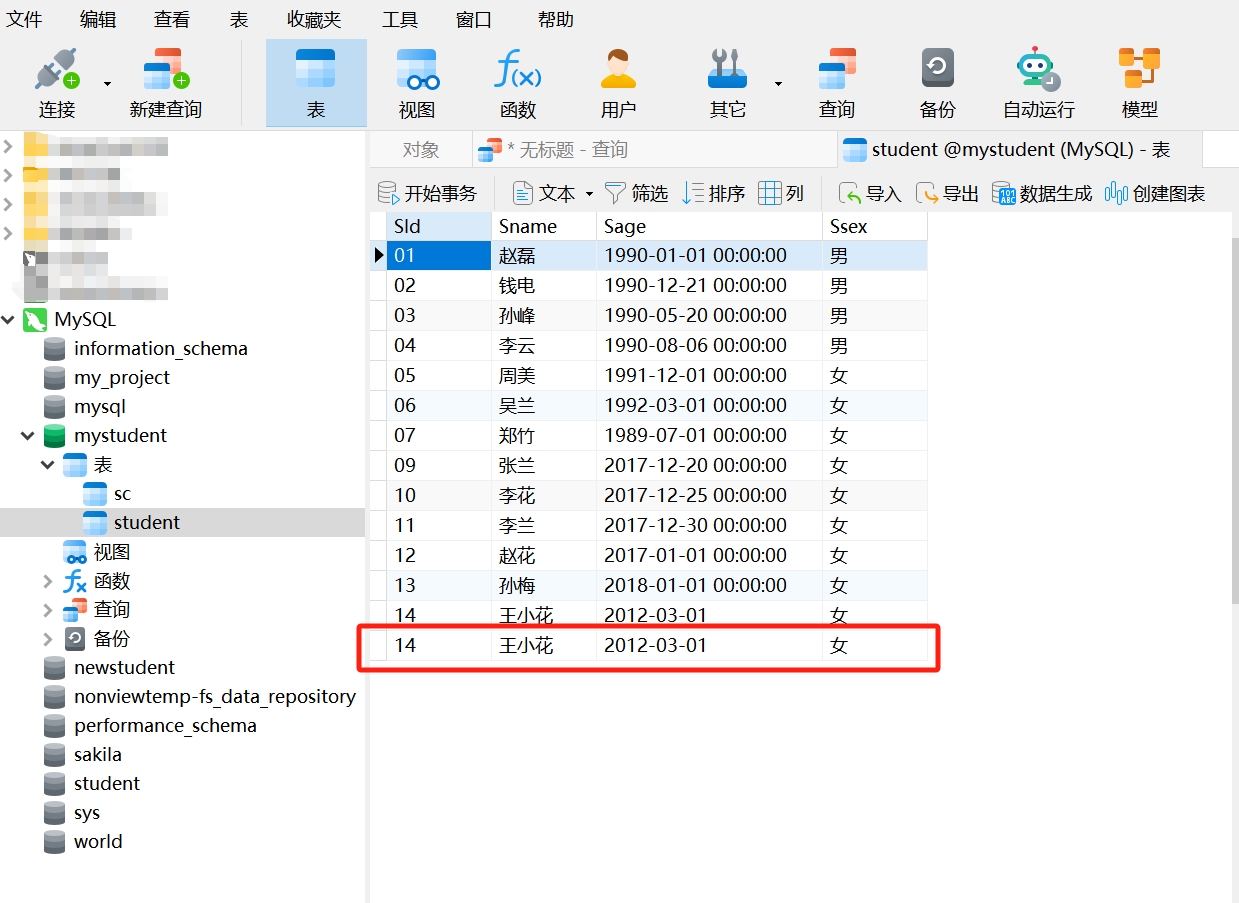
For example, to add another record for 'Wang Xiaohua' in the "student" table using the following SQL statement:
INSERT INTO student (SId, Sname, Sage, Ssex)
VALUES (14, 'Wang Xiaohua', '2012-03-01', 'Female'); - Copy this statement and run it in Navicat. If you see "Affected rows: 1", it indicates that the new data was added successfully.
- Reopen the "student" table, and you will see the added student information.
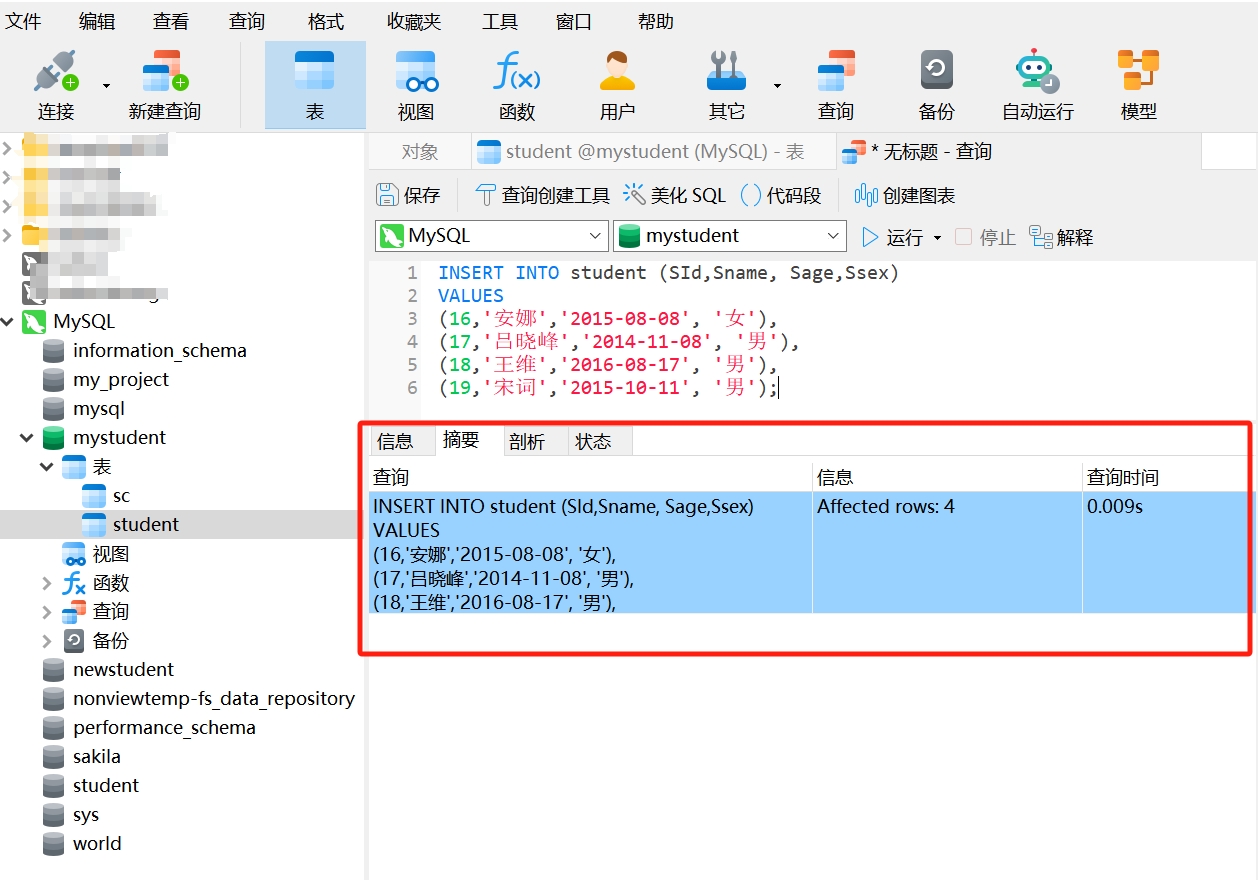
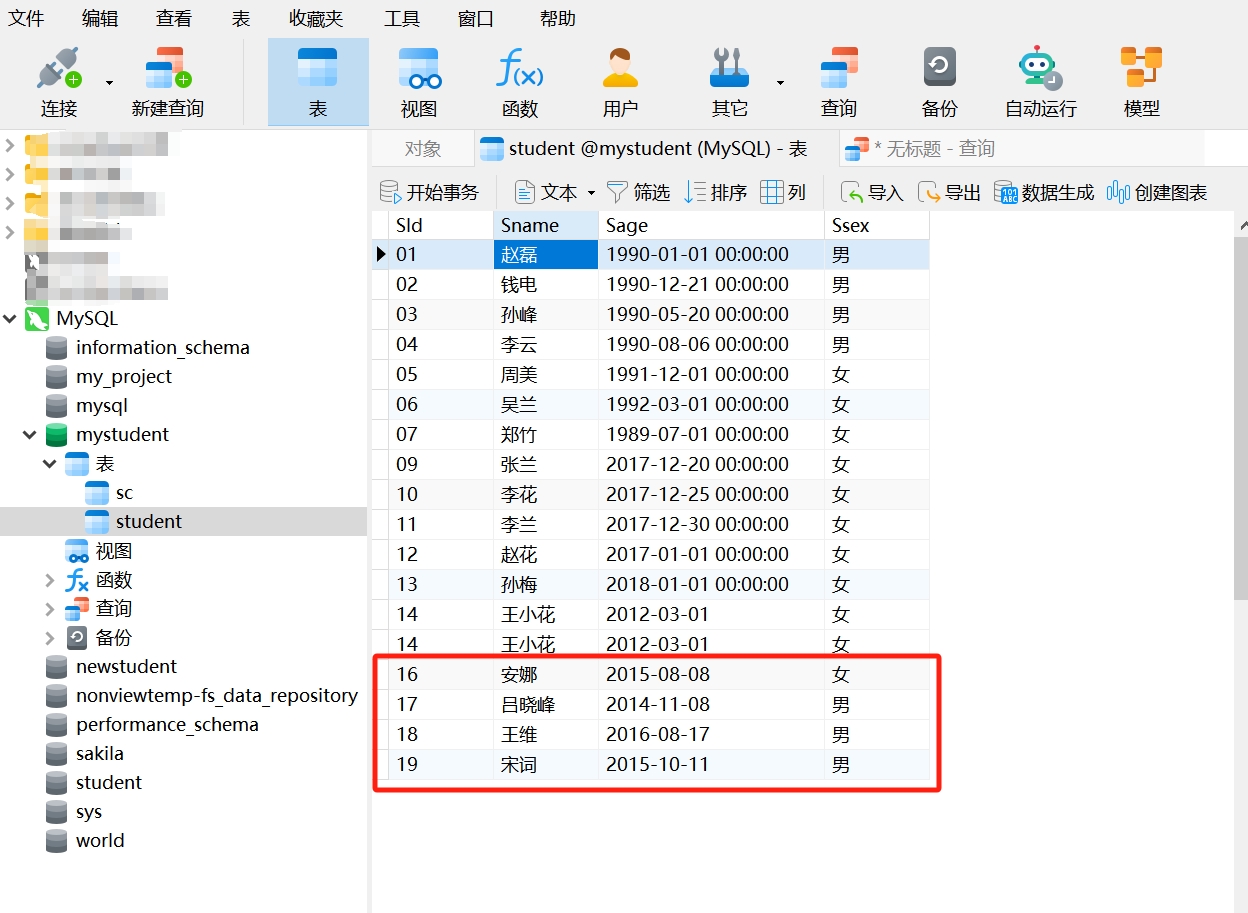
As mentioned earlier, to add multiple records to a table, you can use SQL statements. In the basic syntax of the INSERT statement, you can list multiple sets of data after the VALUES keyword:
INSERT INTO student (SId, Sname, Sage, Ssex)
VALUES
(16, 'Anna', '2015-08-08', 'Female'),
(17, 'Lü Xiaofeng', '2014-11-08', 'Male'),
(18, 'Wang Wei', '2016-08-17', 'Male'),
(19, 'Song Ci', '2015-10-11', 'Male');
After running this statement in Navicat, you can see that the data was added successfully.
2. Modifying Data in a Table
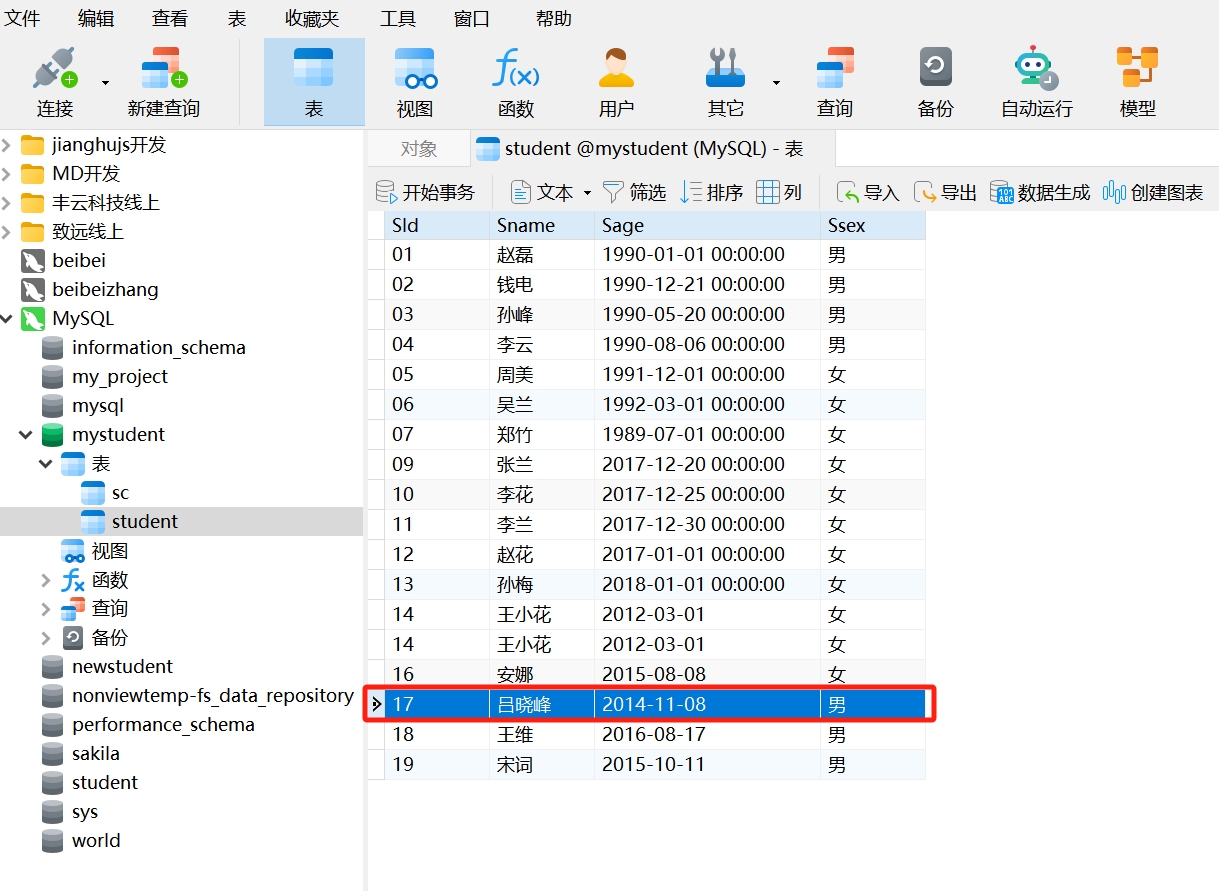
Example: In the "student" table, change the date of birth (Sage) of the student 'Lü Xiaofeng' to '2015-11-18'.
Modifying Data Using Navicat
- After opening the "student" table, select the row to be modified.
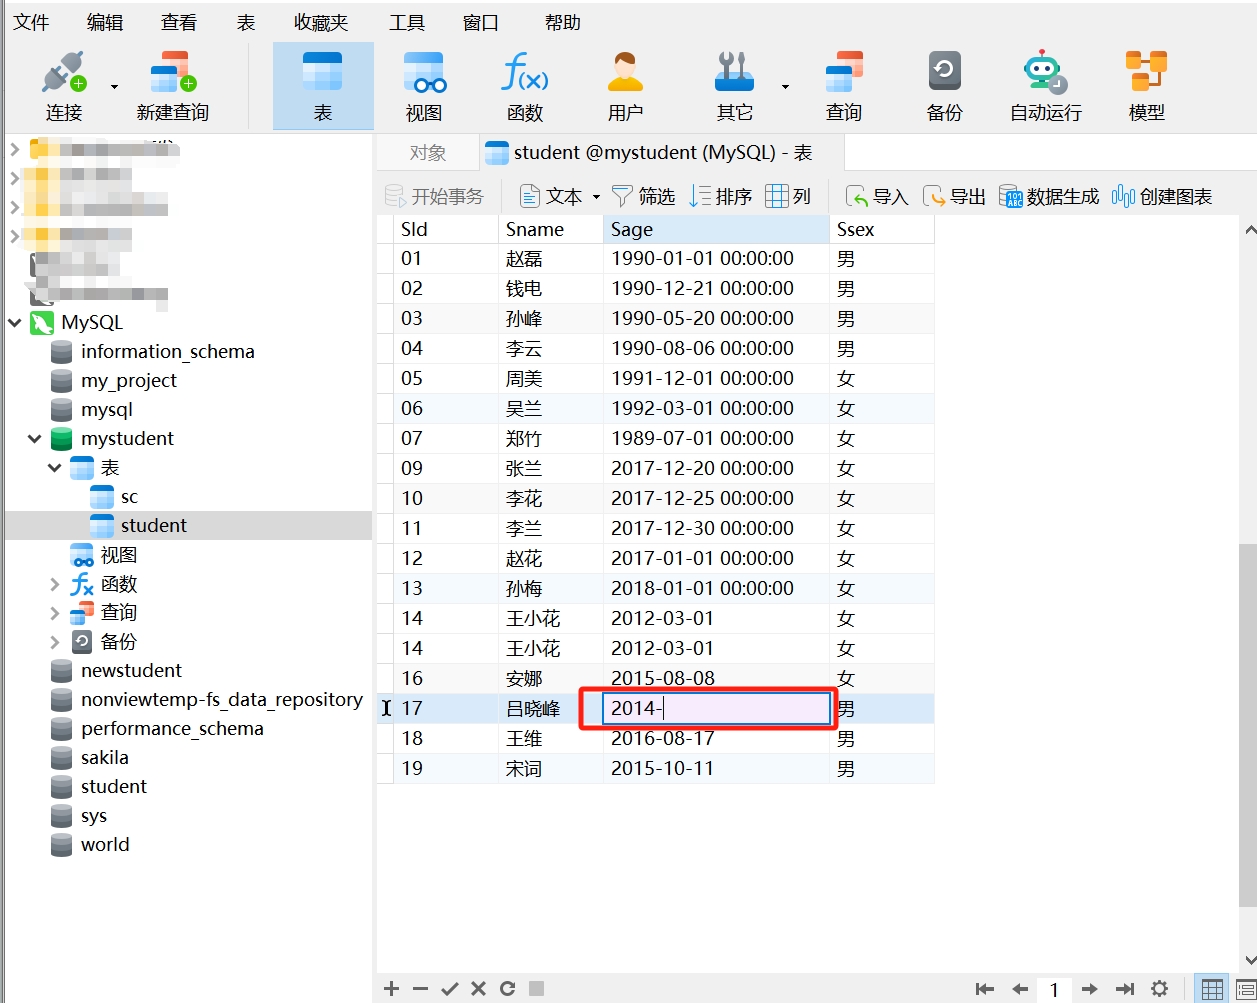
- Click on the cell you want to modify to edit the data.
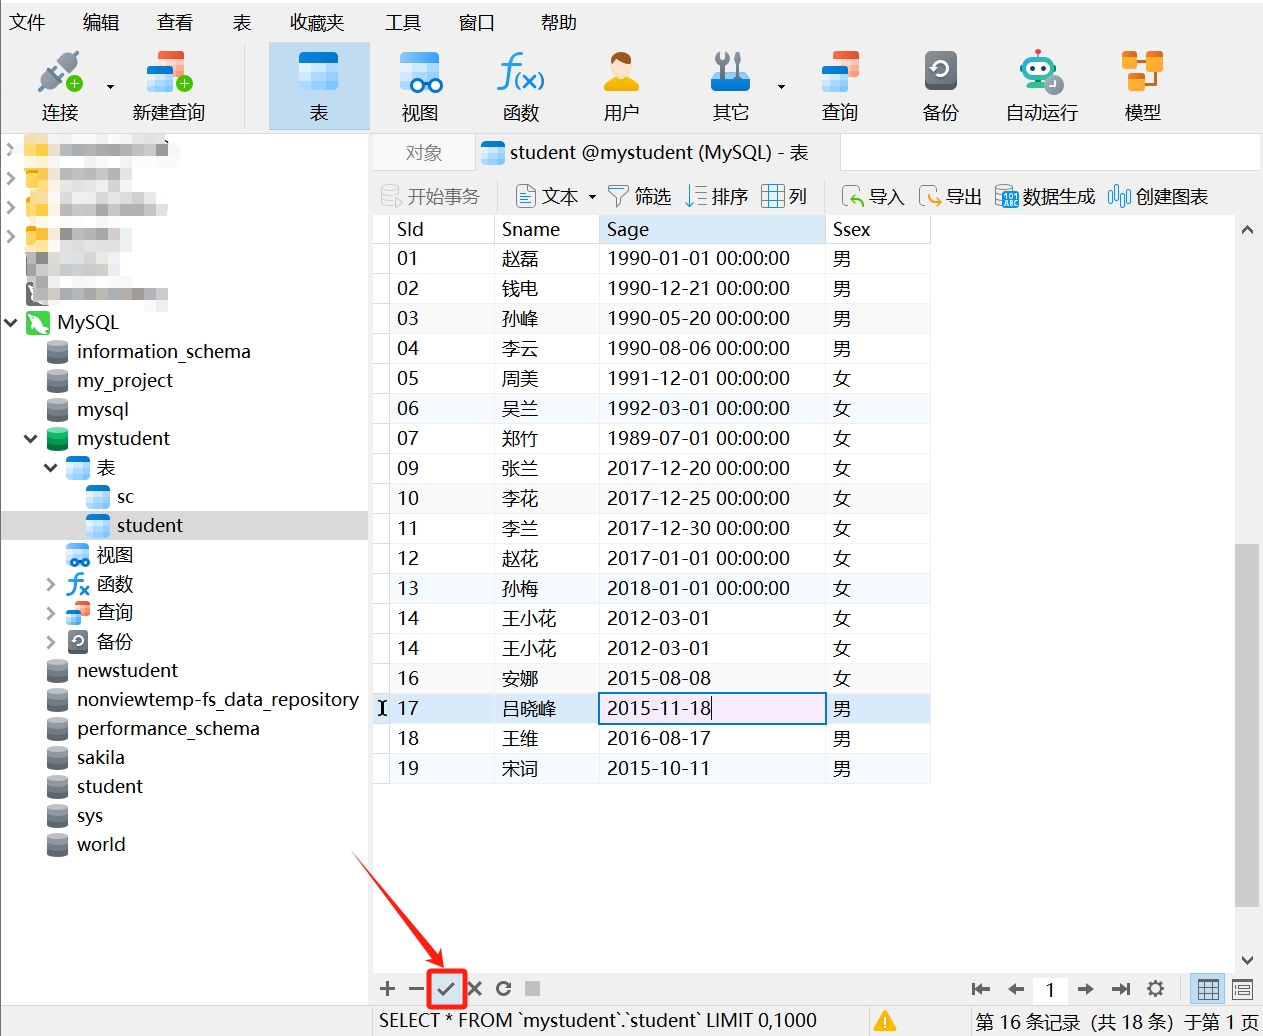
- After confirming it is correct, click " √ " in the lower left corner of the table to save the modified data.
It is important to note that when modifying data, please double-check to ensure accuracy. Modifying data in Navicat is irreversible; once saved, it cannot be undone. Additionally, Navicat's data editing typically only supports modifying a single data row and does not support batch operations. If you need to modify data in bulk, it is recommended to use SQL statements.
Modifying Data Using the UPDATE Statement
In SQL statements, we use the UPDATE statement to modify data in a table. Here is the basic syntax of the UPDATE statement:
UPDATE table_name
SET column1 = value1, column2 = value2, ...
WHERE condition;
Where:
UPDATE: A keyword indicating that a modification operation will be performed.table_name: The name of the table where data will be modified.SET: A keyword used to specify the columns to be modified and their corresponding new values.column1 = value1, column2 = value2, ...: Lists the columns to be modified and their new values after theSET. Each column name is followed by an equals sign and the new value. You can specify multiple column modifications, separated by commas.WHERE: An optional keyword used to specify the conditions for modification. If the WHERE clause is omitted, all rows in the table will be modified. If a WHERE clause is specified, only the rows that meet the condition will be modified.condition: The condition used to filter the rows to be modified.
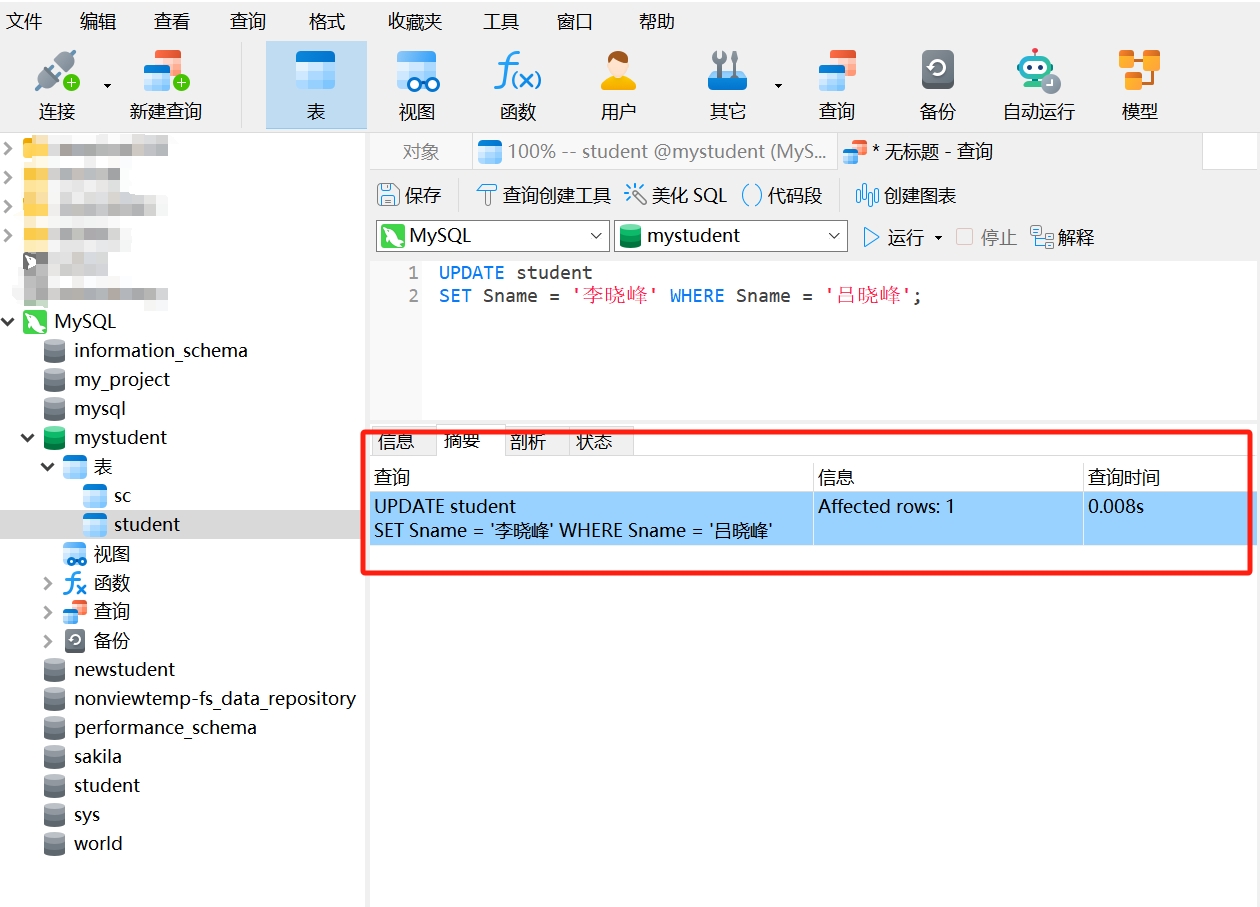
For example, using the following SQL statement to change the name (Sname) of the student 'Lü Xiaofeng' in the "student" table to 'Li Xiaofeng':
UPDATE student
SET Sname = 'Li Xiaofeng' WHERE Sname = 'Lü Xiaofeng'; - Copy this statement and run it in Navicat. If you see "Affected rows: 1", it indicates that the data was modified successfully.
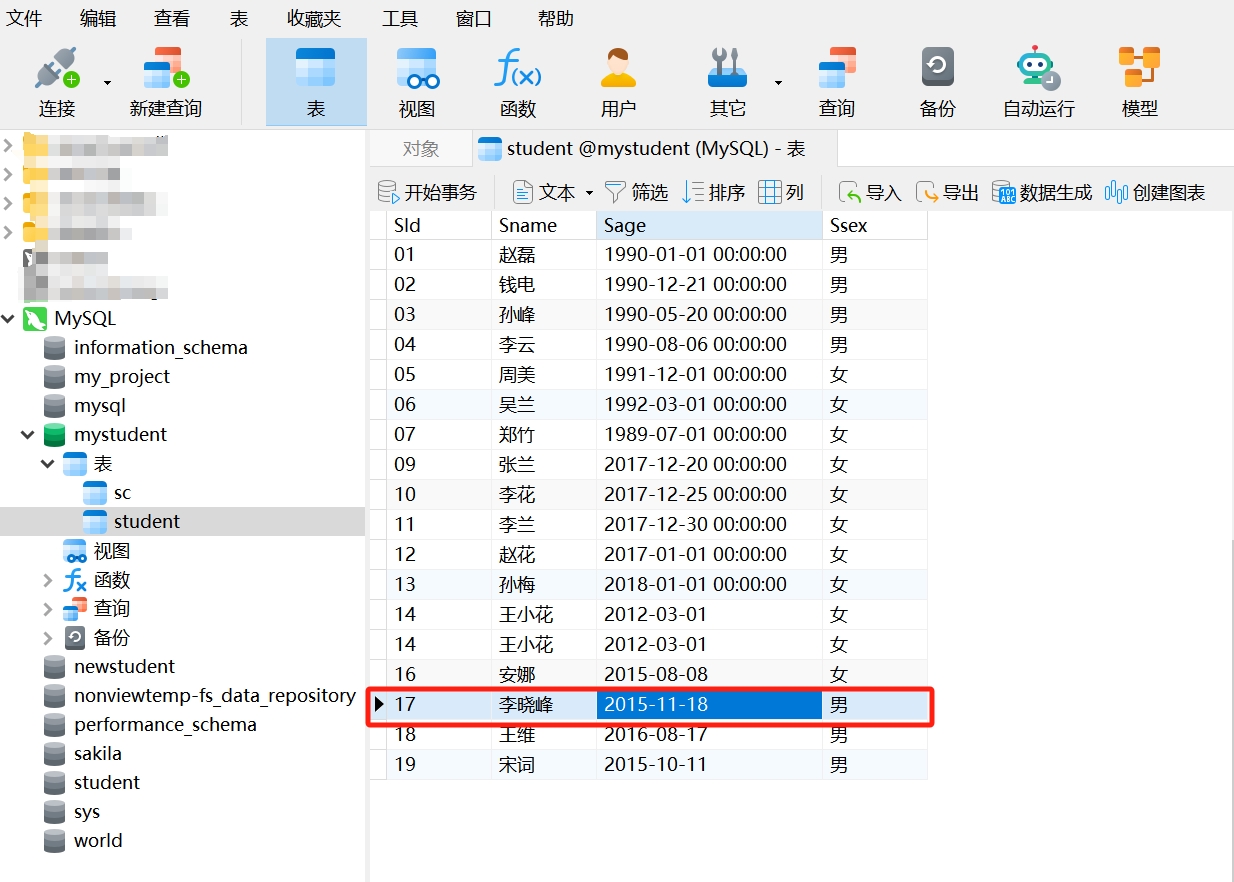
- Reopen the "student" table, and you will see that the student information has been modified.
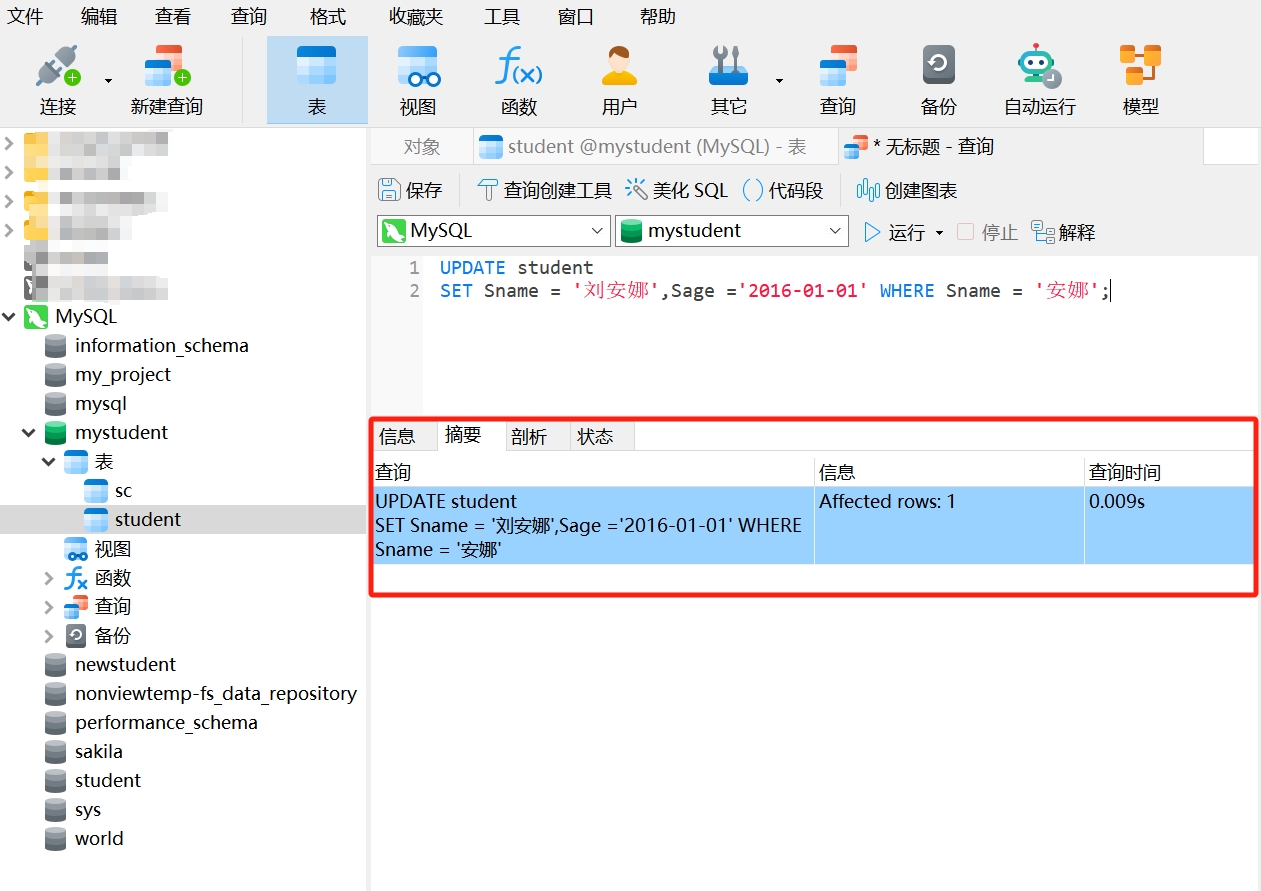
As mentioned earlier, SQL statements can modify multiple column values simultaneously. In the basic syntax of the UPDATE statement, you only need to list all the columns and values after the SET keyword, separated by commas:
UPDATE student
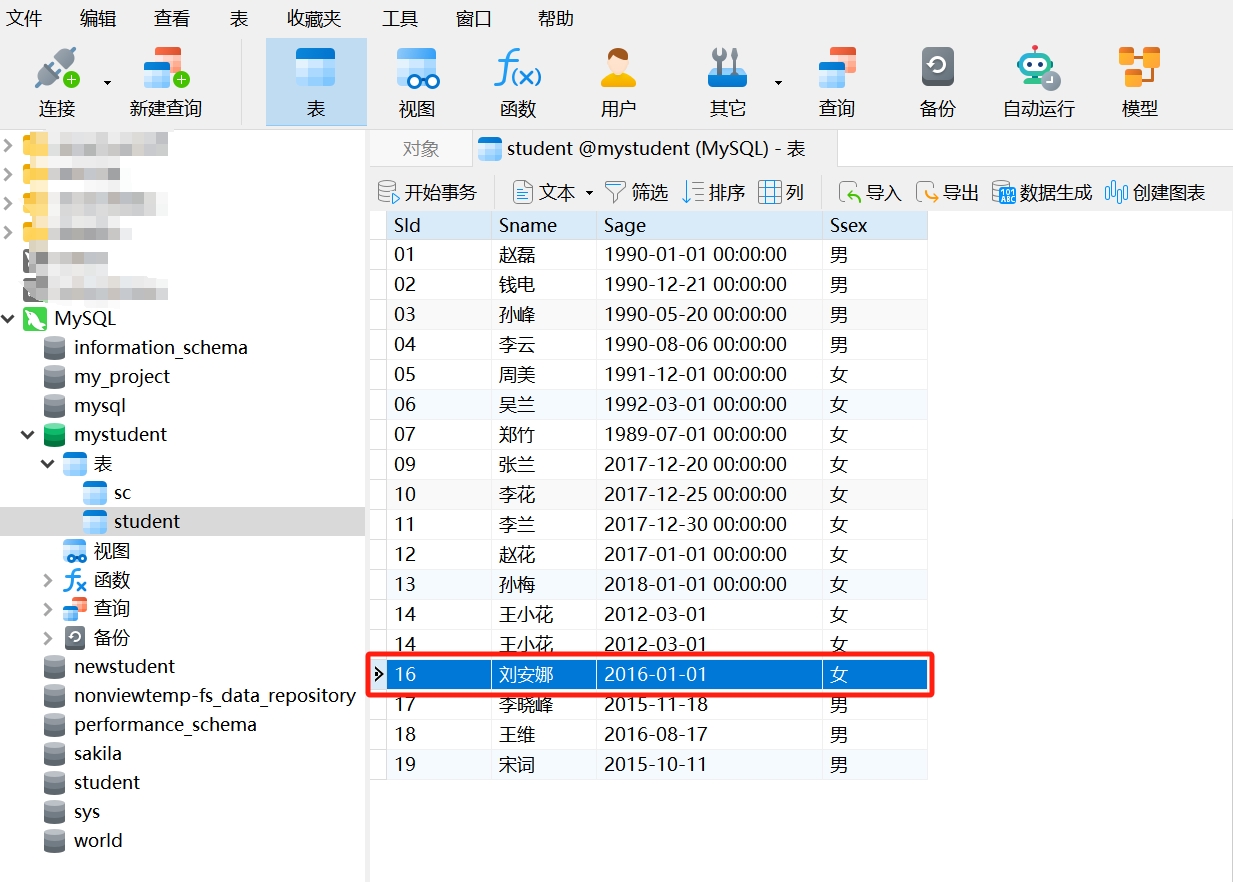
SET Sname = 'Liu Anna', Sage = '2016-01-01' WHERE Sname = 'Anna'; After running this statement in Navicat, you can see that the data was modified successfully.
Again, it is emphasized that SQL modifications are irreversible. Once a modification operation is executed, the data in the database will be permanently changed and cannot be restored to its previous state. Therefore, before executing SQL modification operations, please ensure the accuracy of the data and carefully consider each step of the operation; in the UPDATE statement, if the WHERE clause is omitted, the UPDATE statement will modify all rows in the table. Therefore, unless you truly intend to modify all rows, you should always use the WHERE clause.
3. Deleting Data from a Table
Example: In the "student" table, delete the redundant data for 'Wang Xiaohua'.
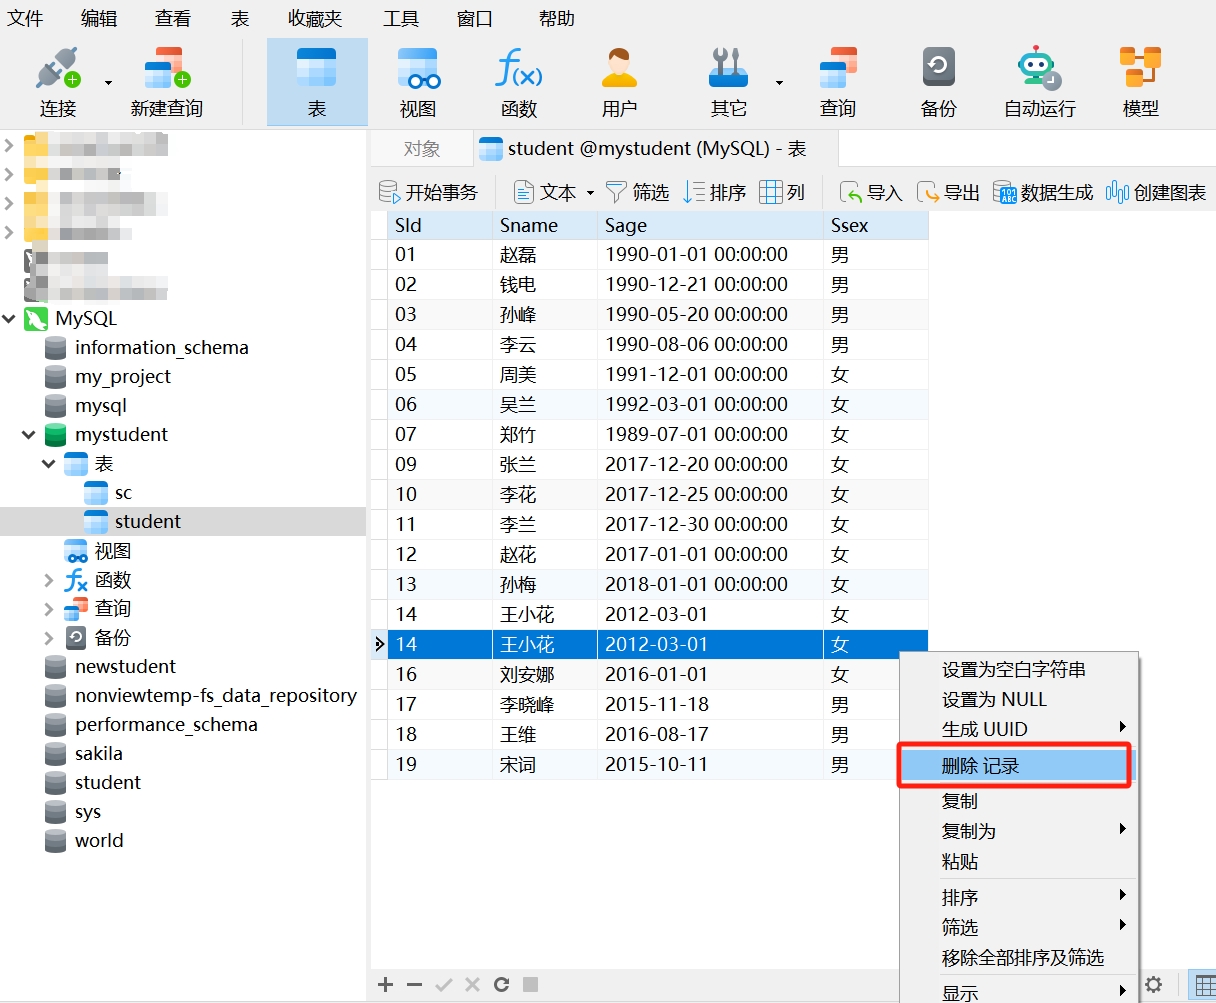
Deleting Data from a Table Using Navicat
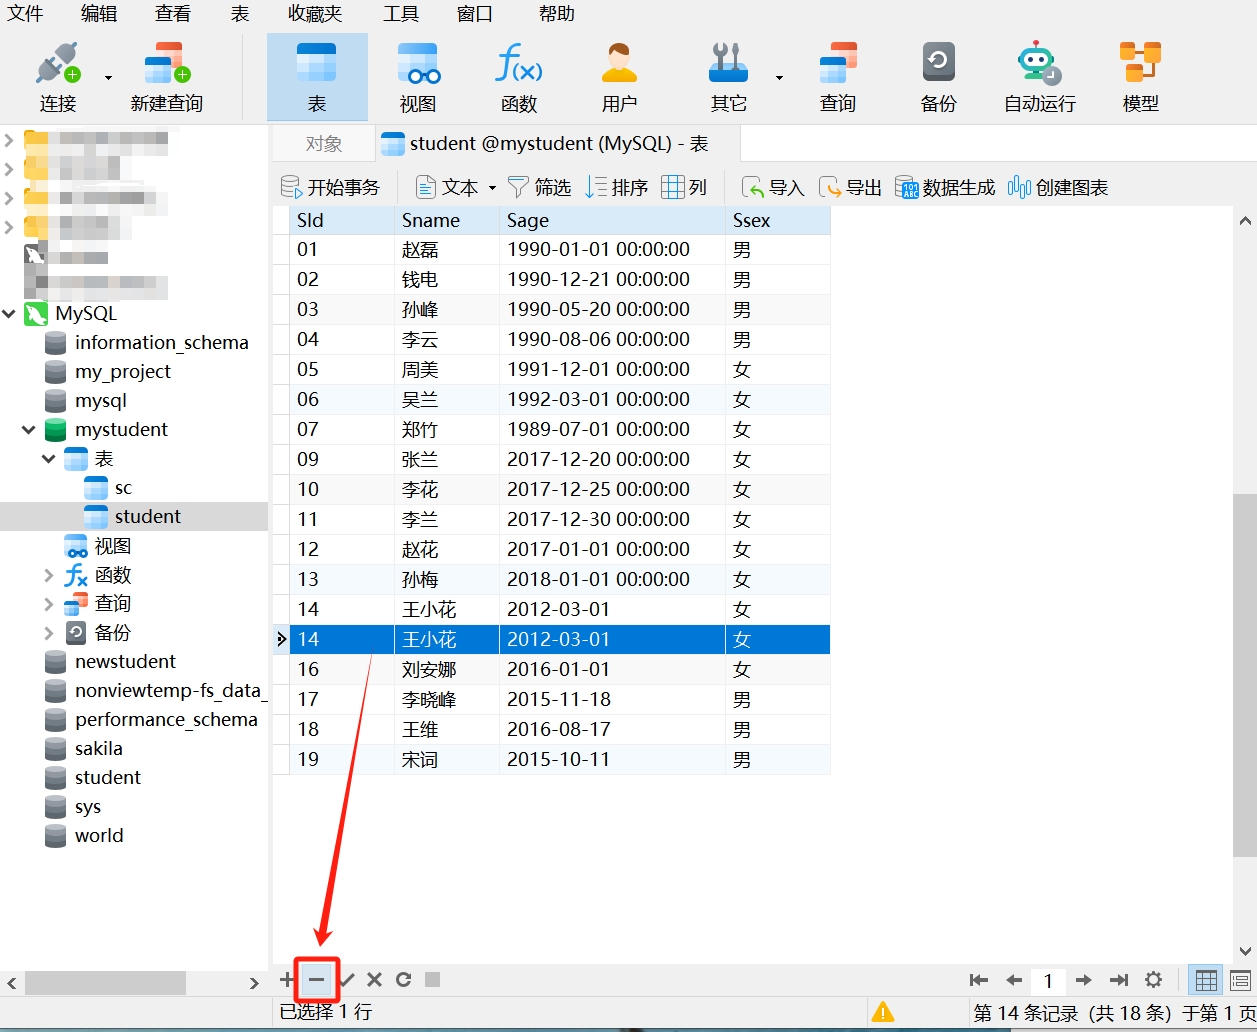
- After opening the "student" table, select the row to be deleted.

- Right-click and select "Delete Record"; or click the " - " in the lower left corner of the table.
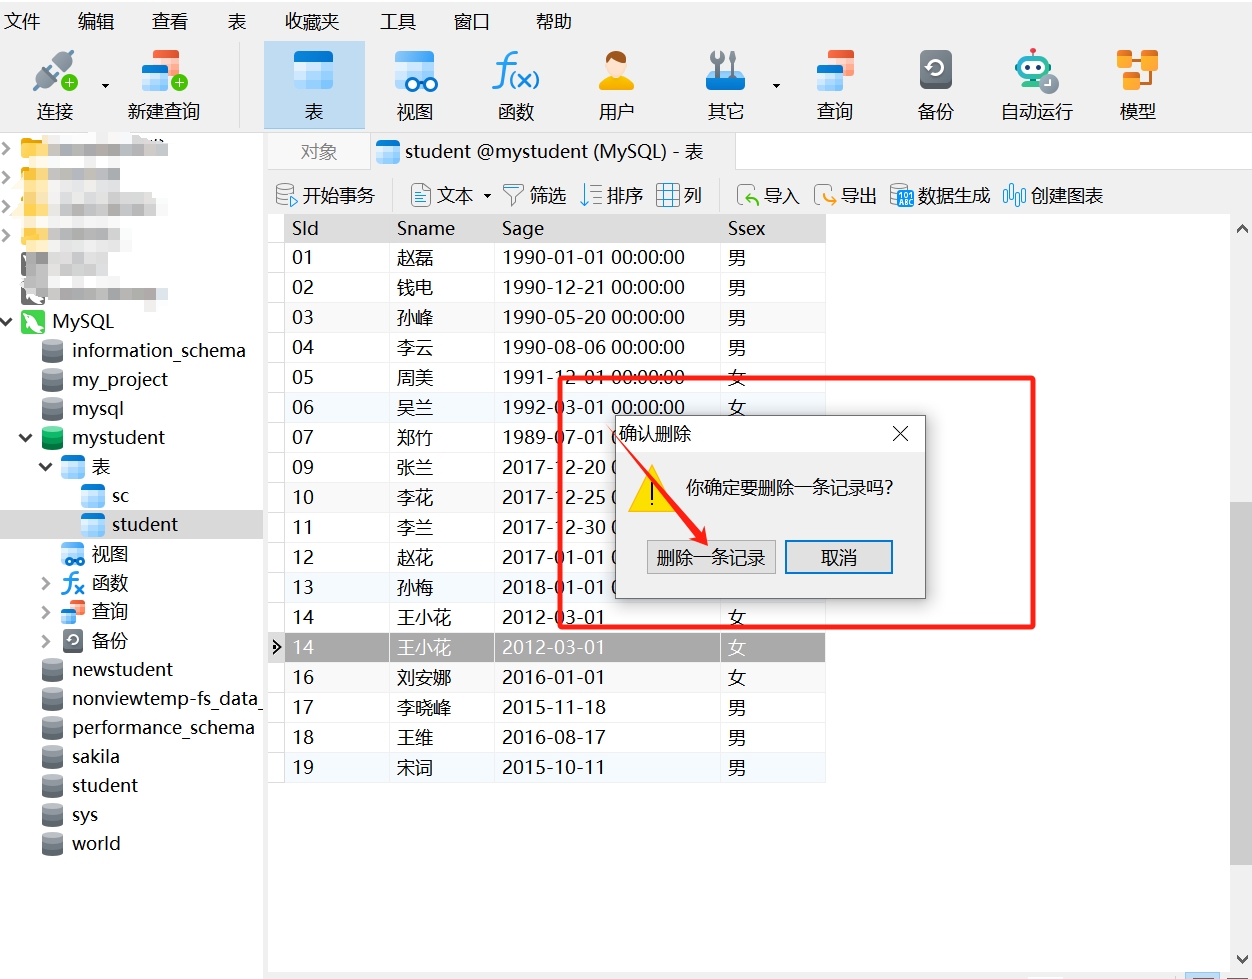
- After clicking, a pop-up will prompt: "Are you sure you want to delete this record?" Confirm that the information to be deleted is correct and select "Delete One Record".
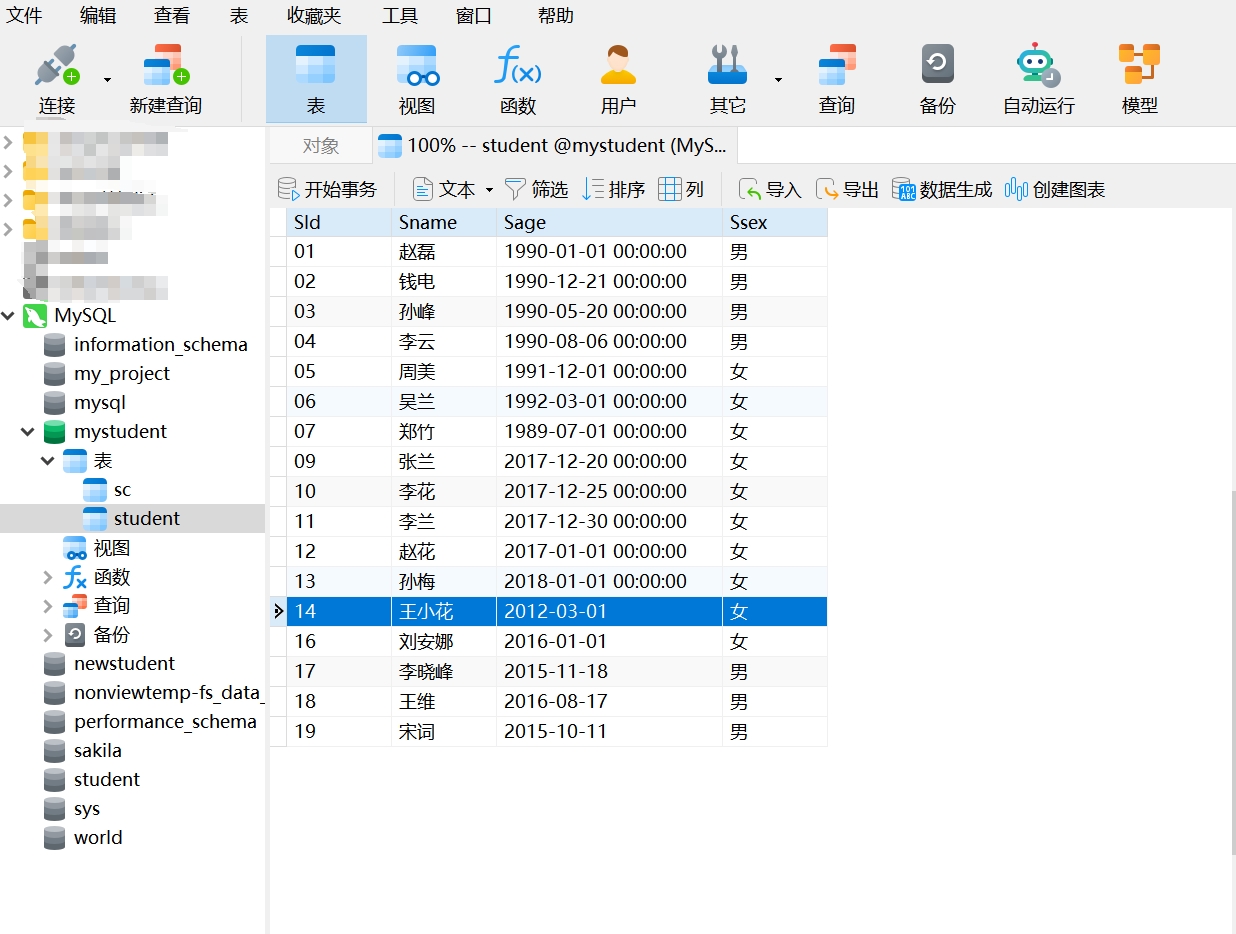
- Data deleted successfully.
Although Navicat provides the functionality to delete data, it is also recommended to use SQL statements when performing bulk deletions. By writing precise SQL statements, you can clearly specify the conditions for data deletion, reducing the risk of operational errors.
Deleting Data from a Table Using the DELETE Statement
In SQL statements, we use the DELETE statement to delete rows from a table. Here is the basic syntax of the DELETE statement:
DELETE FROM table_name
WHERE condition;
Where:
DELETE FROM: A keyword indicating that data will be deleted.table_name: Specifies the name of the table from which data will be deleted.WHERE: An optional clause used to specify the conditions for data deletion. If no condition is specified, all data in the table will be deleted.condition: The condition used to filter the rows to be deleted.
For example, using the following SQL statement to delete the data for the student 'Wang Wei' from the "student" table:
DELETE FROM student
WHERE Sname = 'Wang Wei'; - Copy this statement and run it in Navicat. If you see "Affected rows: 1", it indicates that the data was deleted successfully.
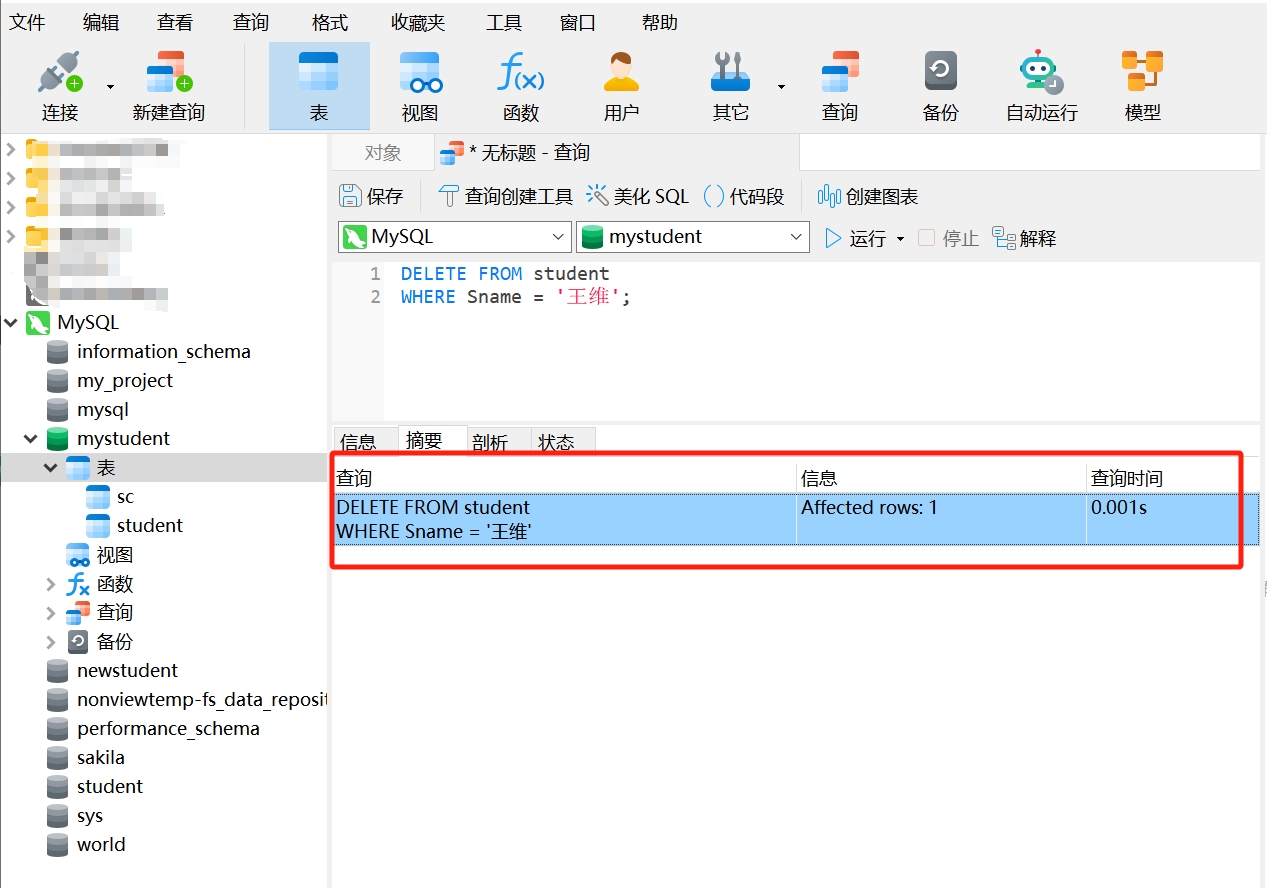
- Reopen the "student" table, and you will see that the student information has been deleted.

Again, it is emphasized that deleting data is a sensitive operation because it is irreversible and prone to errors. It is advisable to exercise extra caution when performing deletion operations to ensure that you truly intend to delete the correct data. Especially in a production environment, mistakenly deleting data can lead to serious consequences; when using SQL DELETE statements, if the WHERE clause is omitted, the DELETE statement will delete all rows in the table. Therefore, unless you truly intend to delete all rows, you should always use the WHERE clause.
4. Deleting Tables and Databases
Deleting Tables and Databases Using Navicat
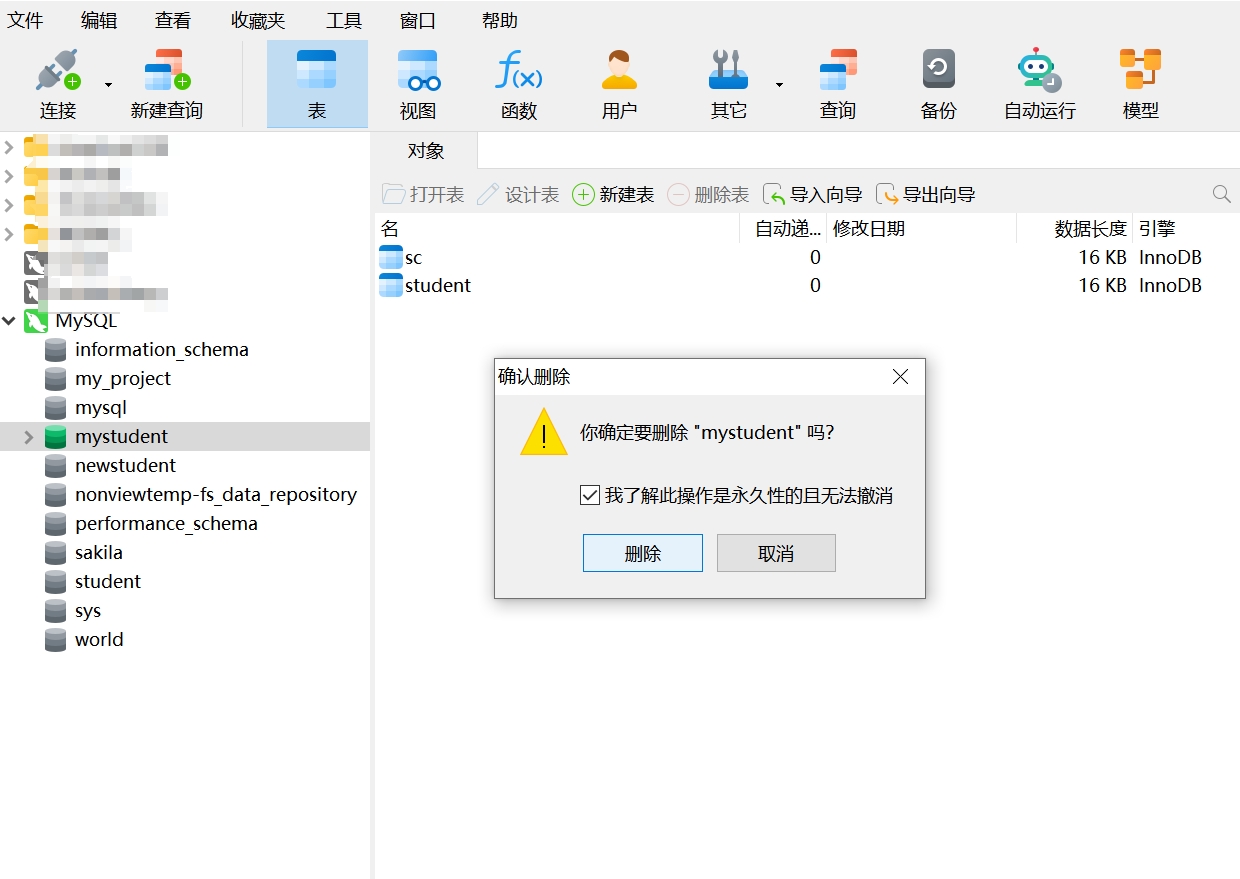
- Select the table or database you want to delete, right-click, and choose "Delete Table" or "Delete Database".
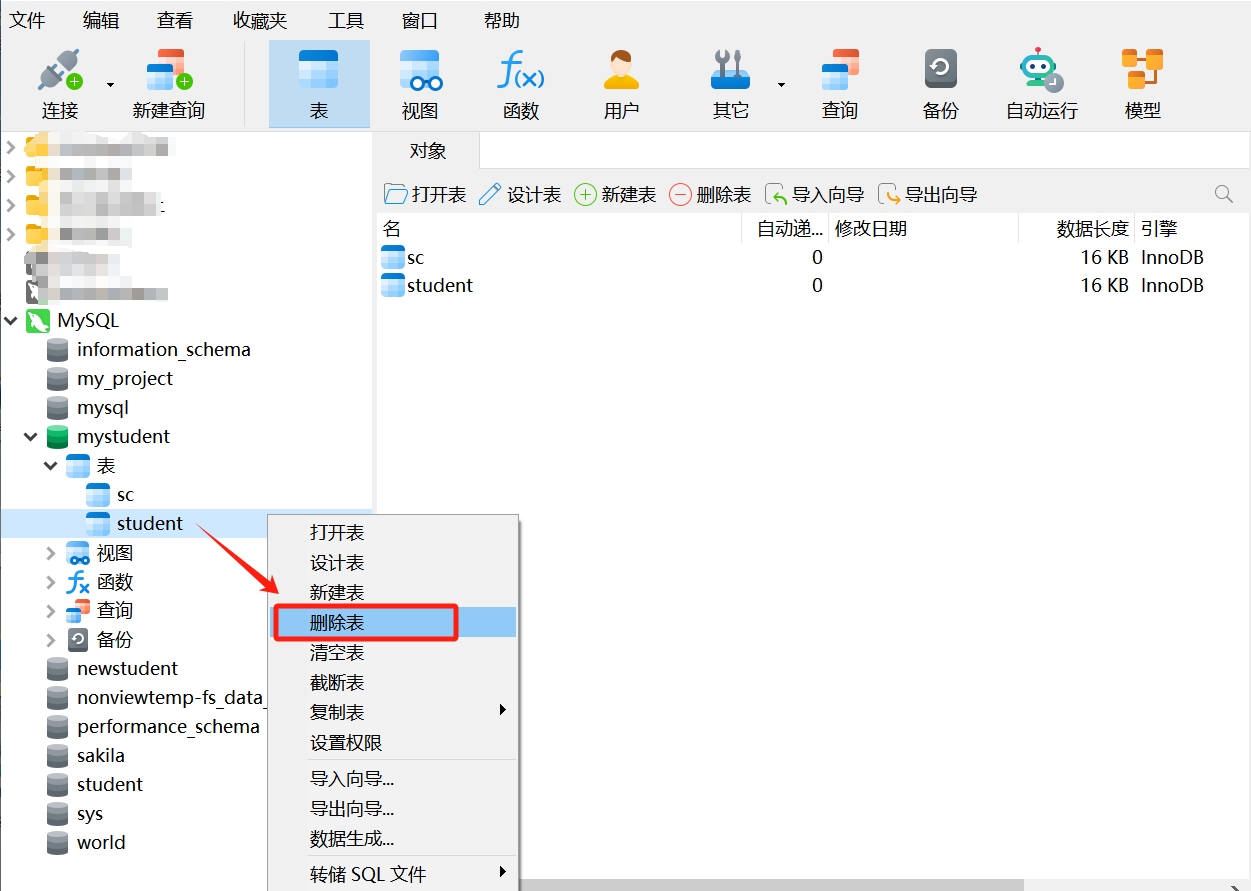
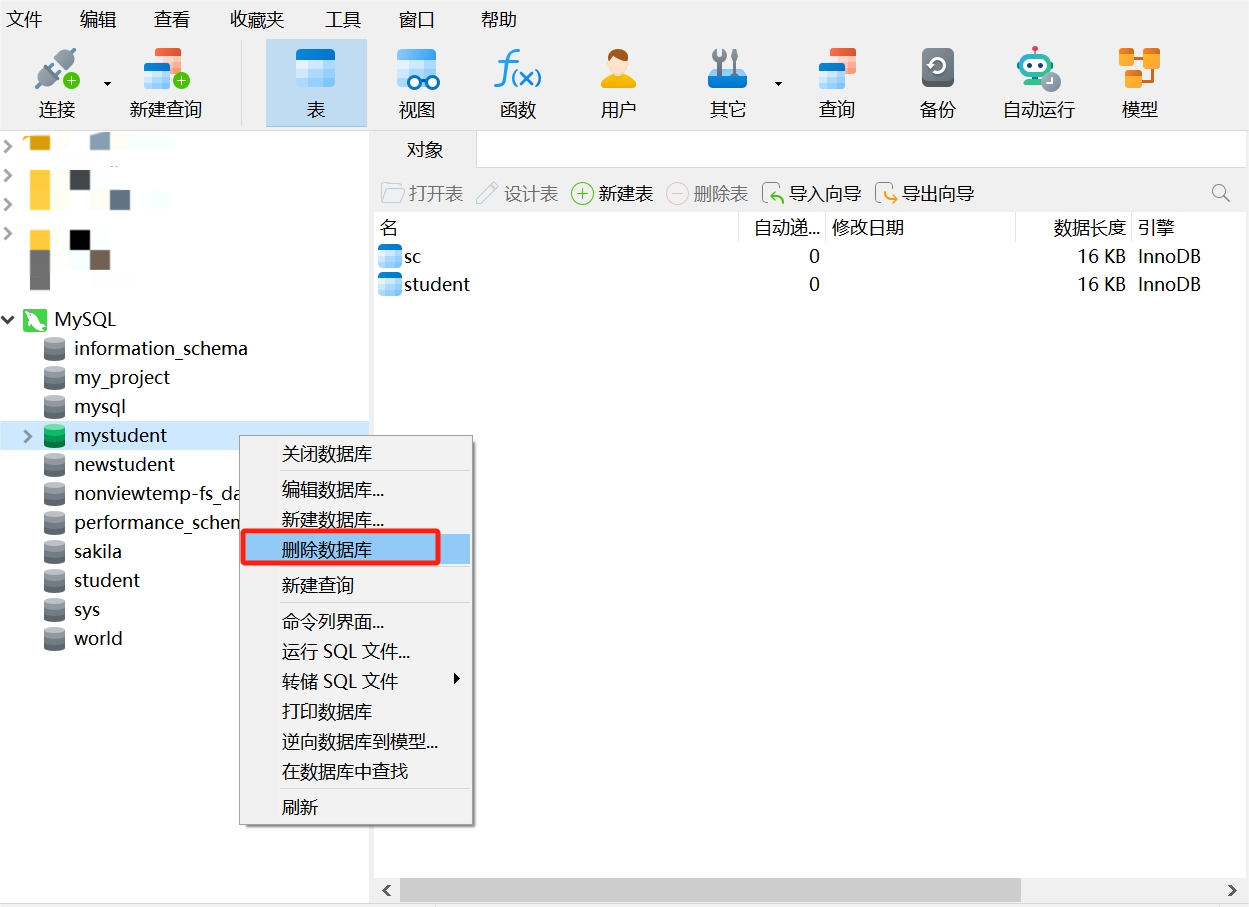
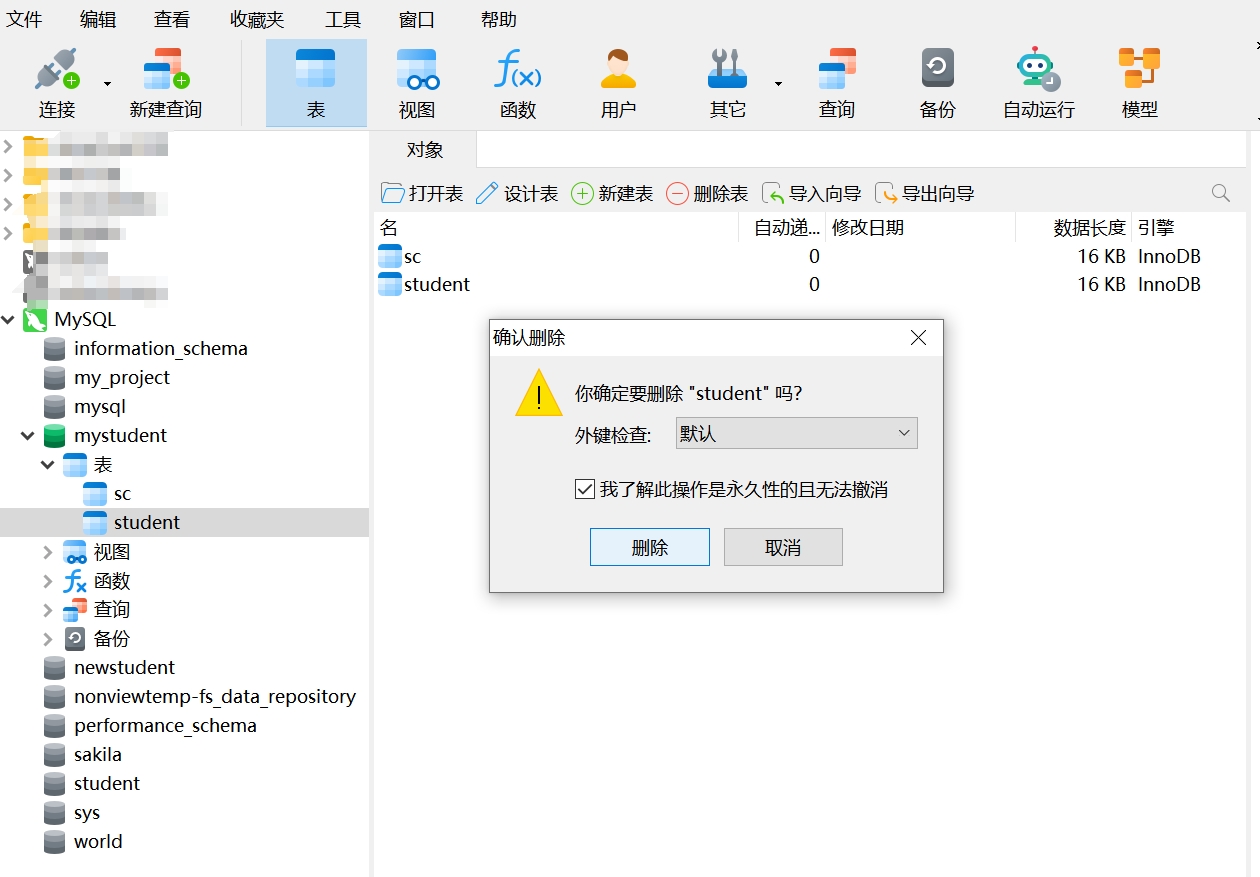
- After clicking, a pop-up will prompt: "Are you sure you want to delete 'XXX'?" Note: You need to check "I understand that this operation is permanent and cannot be undone" before proceeding with the deletion. Deleting a table or database is a sensitive operation; once data is deleted, it cannot be retrieved, so be sure to use caution.
Using the DROP Statement to Delete Tables and Databases
In SQL statements, we use the DROP statement to delete tables and databases. Here is the basic syntax of the DROP statement:
- The DROP TABLE statement is used to delete a table
DROP TABLE table_name - The DROP DATABASE statement is used to delete a database
DROP DATABASE database_name Next, you can create a new database and a new table in your database management system. Then, by reading the tutorial: SQL DROP, try to perform the operations of deleting tables and databases.