Data Association Queries and Views
12002Course Introduction
This course will delve into key concepts in data management: data association queries and views. We will introduce the basic concepts of association queries, including the usage and application scenarios of INNER JOIN, LEFT JOIN, and RIGHT JOIN, and understand the usage of multi-table queries through examples. Additionally, we will learn about the definition, function of views, and how to create views using Navicat and SQL statements.
1. Basics of Association Queries: INNER JOIN, LEFT JOIN, RIGHT JOIN
In previous lessons, we have learned the basic operations of SQL statements, including adding, deleting, modifying, and querying, but these operations are limited to a single table. In data management applications, we often need to perform association operations on multiple tables to achieve more complex data processing. Next, we will learn the SQL statements that can achieve multi-table association queries: JOIN.
Application Scenarios and Common Types of JOIN Statements
JOIN is commonly used in relational databases to connect two or more tables, associating them through common fields for association queries. This query method is suitable for the following scenarios:
Multi-table association queries: When data is distributed across multiple tables and there are relationships between these tables, association queries can retrieve relevant information from multiple tables at once.
Data association analysis: Used to analyze the relationships between data, for example, finding students' score information in a score table, or finding information about students participating in exams for a specific subject.
Data integration: Integrating data stored in different tables to form a more complete data view.
There are various types of JOIN, among which the most common include INNER JOIN, LEFT JOIN, and RIGHT JOIN. Let's take a look at their usage and basic syntax.
Usage of INNER JOIN, LEFT JOIN, RIGHT JOIN
- INNER JOIN
INNER JOIN is used to query records that match common fields in two tables. If a record exists in one table but not in the other, that record will not appear in the query results. The basic syntax of INNER JOIN is as follows:
SELECT column_name(s)
FROM table1
INNER JOIN table2
ON table1.column_name=table2.column_name;
Here:
SELECT column_name(s): Specifies the field names to display in the query results.FROM table1: Specifies the first table to query.INNER JOIN table2: Specifies the second table to perform an inner join with the first table.ON: TheONclause is used to specify the join condition.table1.column_name = table2.column_name: The common field between the two tables.
Reference: SQL INNER JOIN
- LEFT JOIN
LEFT JOIN means left join. When two tables are associated, it focuses on querying the left table and will display all matching data from the left table. If there is matching data in the right table, it will be displayed; if there is no matching data, it will show NULL. The basic syntax of LEFT JOIN is as follows:
SELECT column_name(s)
FROM table1
LEFT JOIN table2
ON table1.column_name=table2.column_name;
Here:
SELECT column_name(s): Specifies the field names to display in the query results.FROM table1: Specifies the left table to query.LEFT JOIN table2: Specifies the right table to join with the left table.ON: TheONclause is used to specify the join condition.table1.column_name = table2.column_name: The common field between the two tables.
Reference: SQL LEFT JOIN
- RIGHT JOIN
RIGHT JOIN is right join, similar to LEFT JOIN, but it focuses on querying the right table and will display all matching data from the right table. If there is matching data in the left table, it will be displayed; if there is no matching data, it will show NULL. The basic syntax of RIGHT JOIN is as follows:
SELECT column_name(s)
FROM table1
RIGHT JOIN table2
ON table1.column_name=table2.column_name;
Here:
SELECT column_name(s): Specifies the field names to display in the query results.FROM table1: Specifies the left table to query.RIGHT JOIN table2: Specifies the right table to join with the left table.ON: TheONclause is used to specify the join condition.table1.column_name = table2.column_name: The common field between the two tables.
Reference: SQL RIGHT JOIN
When using LEFT JOIN and RIGHT JOIN, ensure that the left table is placed after the FROM clause and the right table is placed after the JOIN clause to ensure the accuracy of the join and the correctness of the results.
Next, we will deepen our understanding of INNER JOIN, LEFT JOIN, and RIGHT JOIN through specific examples.
2. Practical Application Example of Multi-table Queries: Finding Student Scores
In previous studies, we have created two data tables: one is the student information table "student," and the other is the score table "sc." These two tables have common fields: SId and Sname. Therefore, we can associate the two tables through JOIN operations to query students' scores based on different needs.
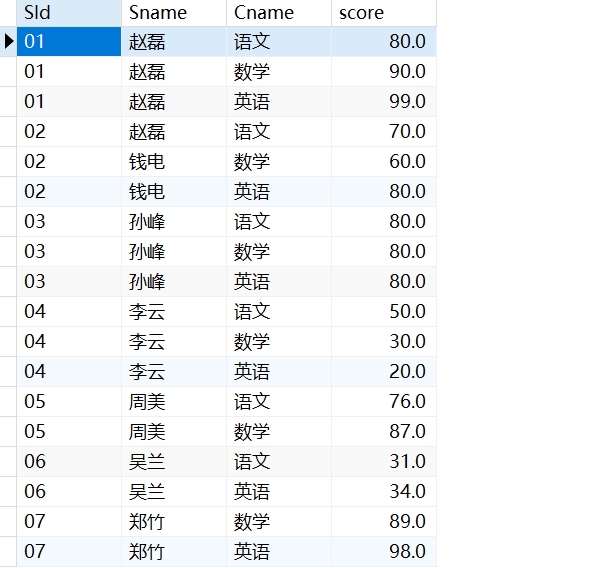
Student Table (student)

Score Table (sc)
Students Participating in Exams (INNER JOIN)
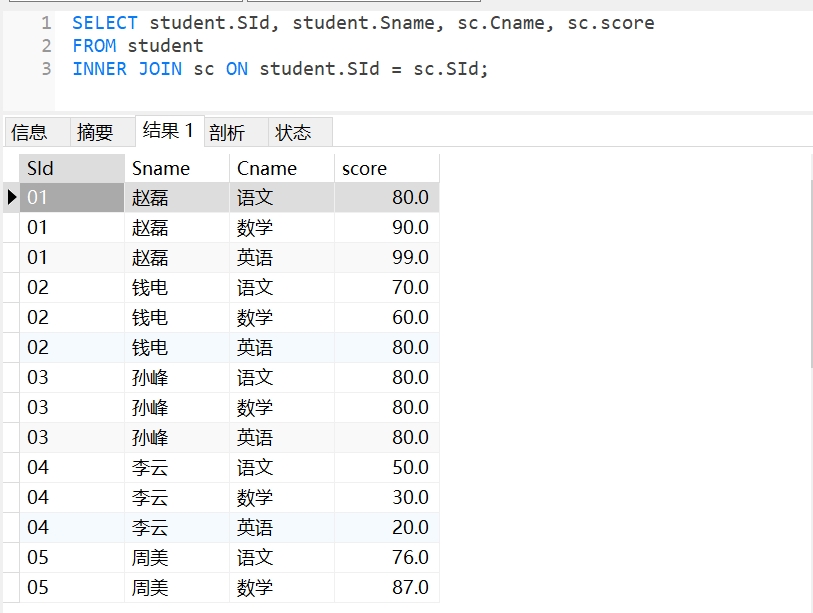
To find students participating in exams and their scores, we can use INNER JOIN. By using the common field SId, we can associate the student table and the score table, displaying only the student data that has matching records in both tables. Copy the following query statement and run it in Navicat:
SELECT student.SId, student.Sname, sc.Cname, sc.score
FROM student
INNER JOIN sc
ON student.SId = sc.SId;
This query displays the student ID, name, exam subject, and score of all students participating in exams, as shown below:
Students Not Participating in Exams (LEFT JOIN)
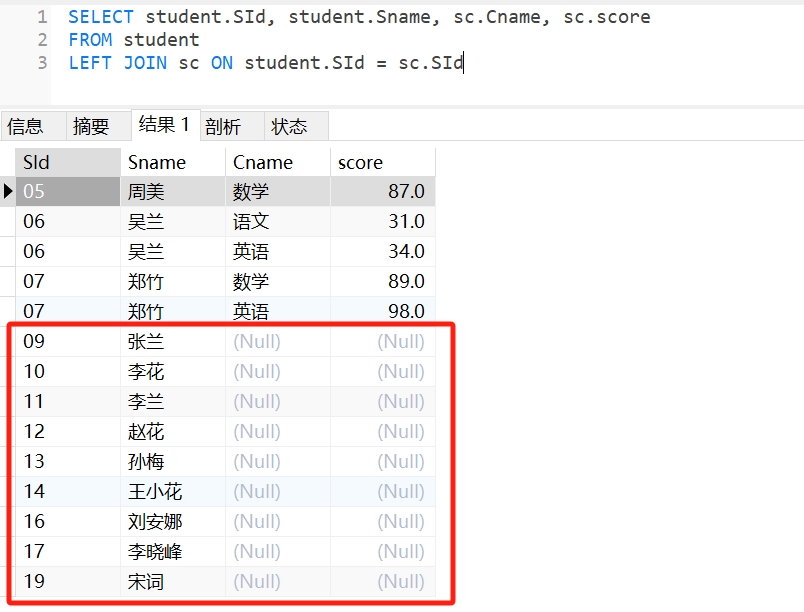
To find students who did not participate in exams, we can use LEFT JOIN. We take the student table as the left table and use the common field SId to query the data of students who did not participate in exams. If there is no score data in the score table, it will show NULL. Copy the following query statement and run it in Navicat:
SELECT student.SId, student.Sname, sc.Cname, sc.score
FROM student
LEFT JOIN sc
ON student.SId = sc.SId;
This query displays all students' IDs and names; students who participated in exams will see their subjects and scores, while students who did not participate will have their subject and score information displayed as NULL, as shown below:
Students with Incorrect IDs Entered During Score Entry (RIGHT JOIN)
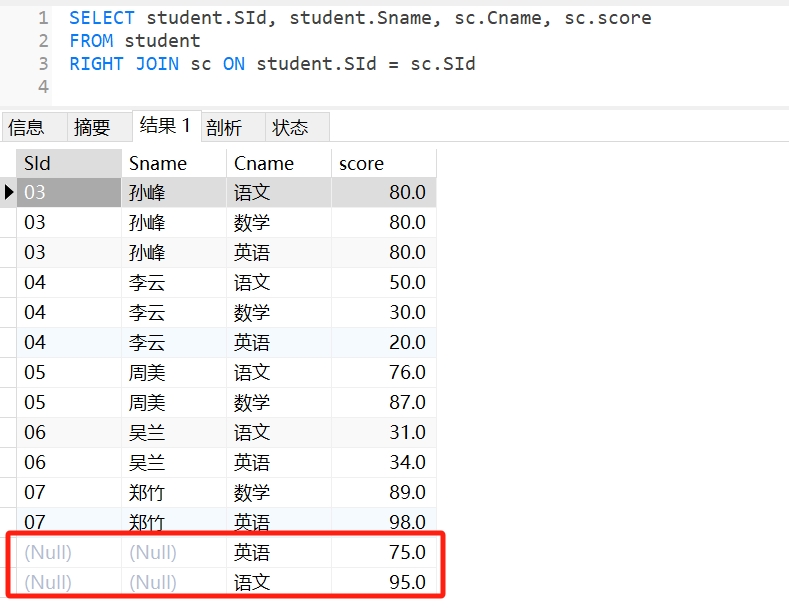
If an incorrect student ID was entered while recording exam scores, we need to query these erroneous data. This situation can be handled using RIGHT JOIN. We still take the student table as the left table and use the common field SId to query the score table for records with scores, but where SId does not match the student table. Copy the following query statement and run it in Navicat:
SELECT student.SId, student.Sname, sc.Cname, sc.score
FROM student
RIGHT JOIN sc
ON student.SId = sc.SId;
This query displays the scores of all students participating in exams, but for students without corresponding records in the student table, their ID and name data will be NULL.
Through the above three examples, we have gained a deeper understanding of the usage of JOIN in query statements. When writing queries, it is essential to ensure that the join conditions specified in the ON clause are accurate; additionally, when using LEFT JOIN and RIGHT JOIN, special attention should be paid to the position of the tables. The order of the tables can affect the query results, especially when handling cases where there are no matching records in the left or right tables. Correct table positioning can ensure that the required data is matched and displayed accurately, avoiding inaccuracies in the results.
3. Definition and Usage of Views
Concept and Function of Views
By using JOIN statements, we can connect multiple tables and simplify complex data into the results we need. So, can we save these complex query statements as a table for use at any time? Of course, we can. In data management, there is a commonly used tool called a view.
A view is a virtual table where you can save complex SQL queries as a view and then query this view just like a regular table. This practice can simplify complex SQL operations and help us handle complex data queries and management tasks more conveniently. Here are some common application scenarios for views:
Simplifying complex queries: By creating views, complex SQL queries can be abstracted into a simple view, allowing users to obtain the results of complex queries without needing to understand the underlying complex logic.
Restricting user access permissions: Through views, database administrators can provide users with access permissions to specific columns or rows without directly accessing the underlying tables. This effectively controls user access to data and enhances data security.
Providing customized data views: Different users may have different needs for the same data. By creating views, customized data views can be provided for different users or applications, containing only the data they care about, improving data readability and relevance.
Hiding changes in table structure: If the structure of the underlying table changes, but the interface provided externally remains as a view, it can avoid impacting external applications. Views can act as an intermediary layer, hiding changes in the underlying tables.
For example, in the previous example, we used INNER JOIN to query students participating in exams and their scores, which can be saved as a view. This way, regardless of how the data in the student table or score table changes, querying this view will always yield the latest results that meet the query conditions. Next, we will learn how to create views.
Creating Views Using SQL Statements
We can create views using SQL statements, with the syntax as follows:
CREATE VIEW view_name AS
SELECT column1, column2, ...
FROM table_name
WHERE condition;
Here:
CREATE VIEW view_name: CREATE VIEW is the SQL syntax used to create a view. view_name is the name of the view being created.AS: In SQL, it is commonly used to give aliases to tables, columns, or views, and the query statement following AS will be saved as the specified view name, i.e., view_name.
We can use this SQL statement to create a simple view that queries students with scores above 60:
- Copy the following SQL statement and run it in Navicat to see the results as follows:
CREATE VIEW sc_over_60 AS
SELECT * FROM SC
WHERE score > 60;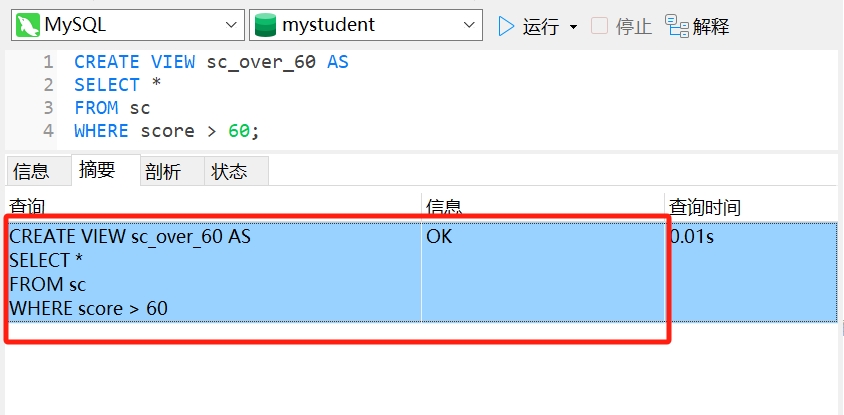
- Click on "Views," then right-click and select "Refresh."
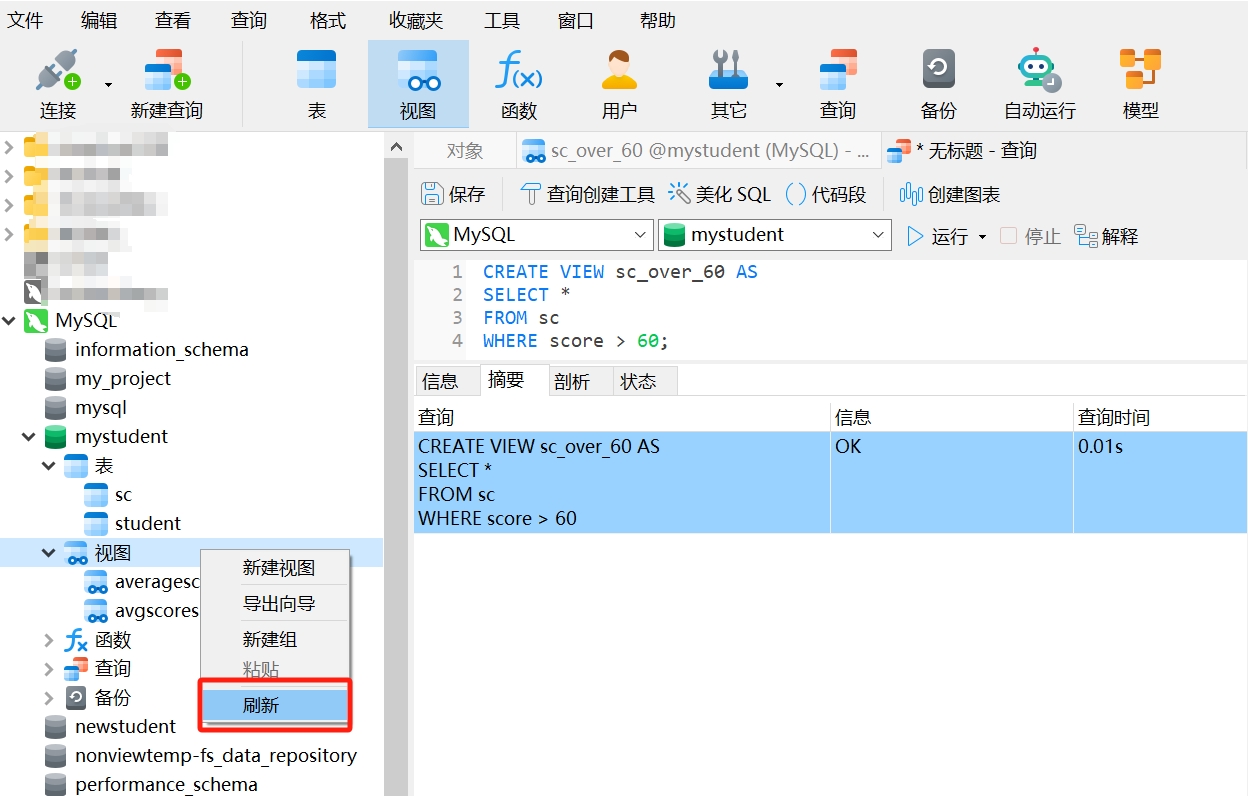
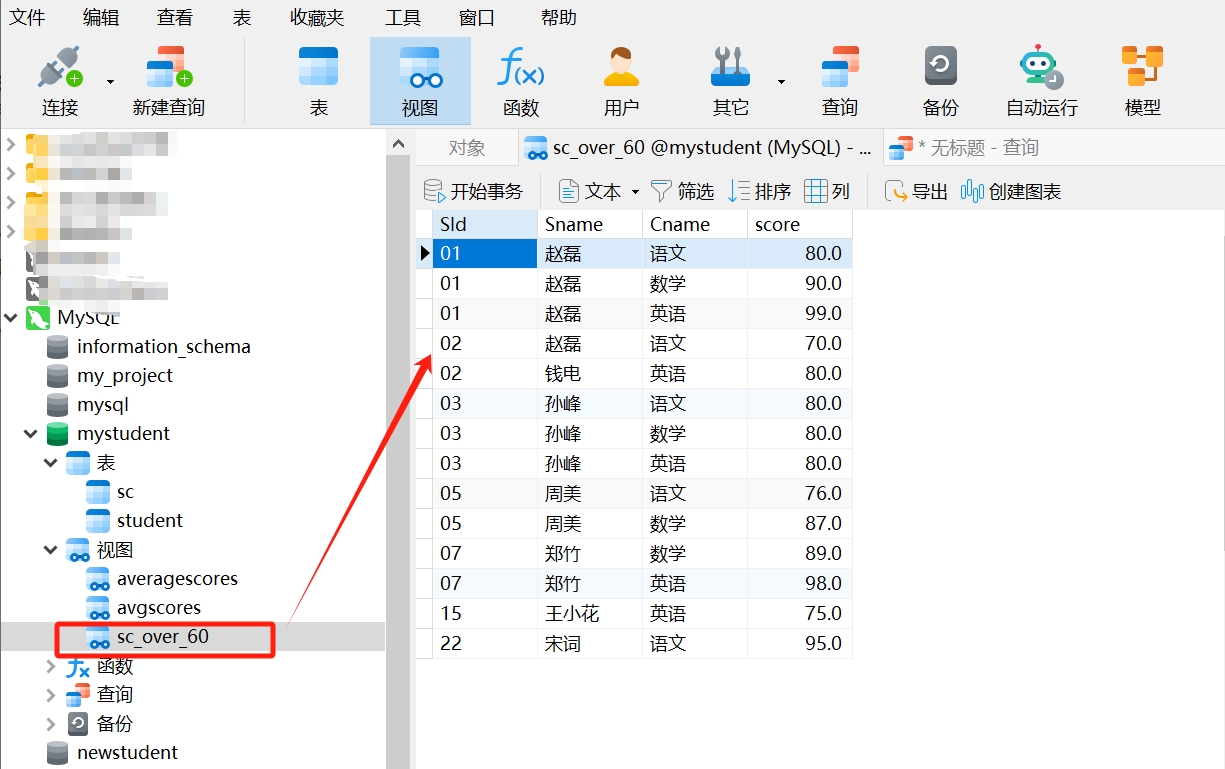
- We see that the view named
sc_over_60has been successfully created, and it displays information about students with scores above 60.
We can also store query statements as a view. For example, if we frequently need to query information about students who did not participate in exams, you can copy the following SQL statement and run it in Navicat:
CREATE VIEW student_no_score AS
SELECT SId, Sname
FROM student
LEFT JOIN sc ON student.SId = sc.SId
WHERE sc.score IS NULL;
This way, we can see that the view named student_no_score has been created, displaying information about students who did not participate in exams.
You can read the tutorials and try more examples to familiarize yourself with creating views using SQL statements.
Reference: SQL CREATE VIEW
Creating Views Using Navicat: View Creation Tool
In addition to creating views using SQL statements, there is a more intuitive method in Navicat for creating views, which is using the "View Creation Tool."
- Creating a View Using One Table
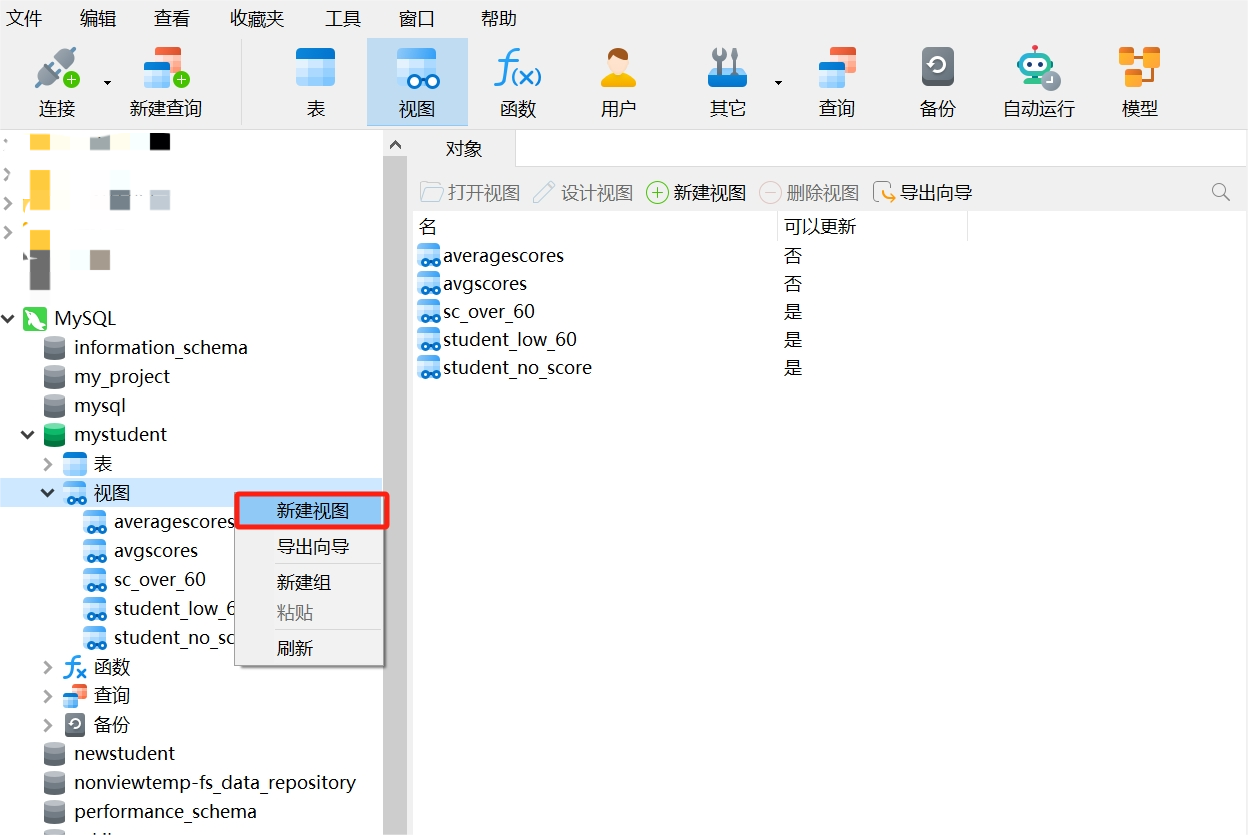
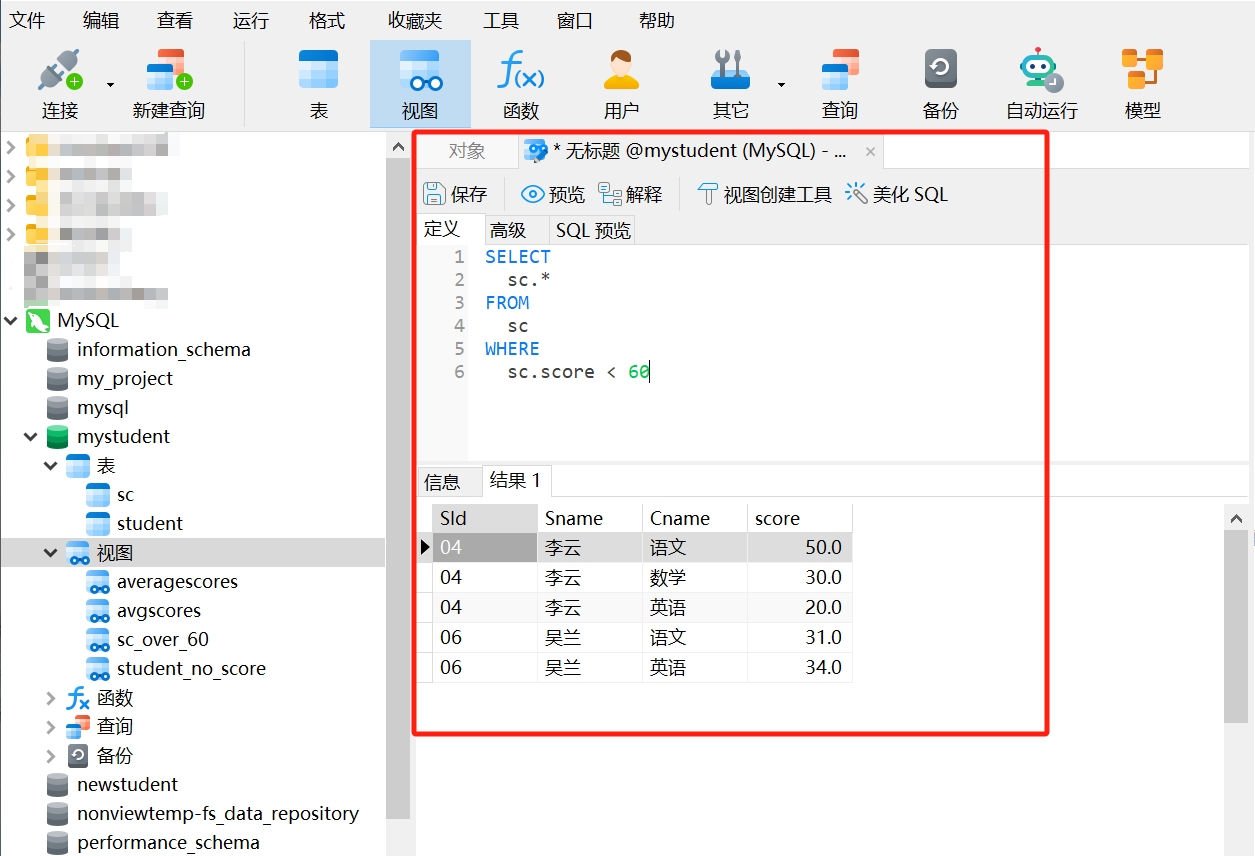
Let's take one table as an example to see how to use the view creation tool in Navicat to create a view that queries students with scores below 60:
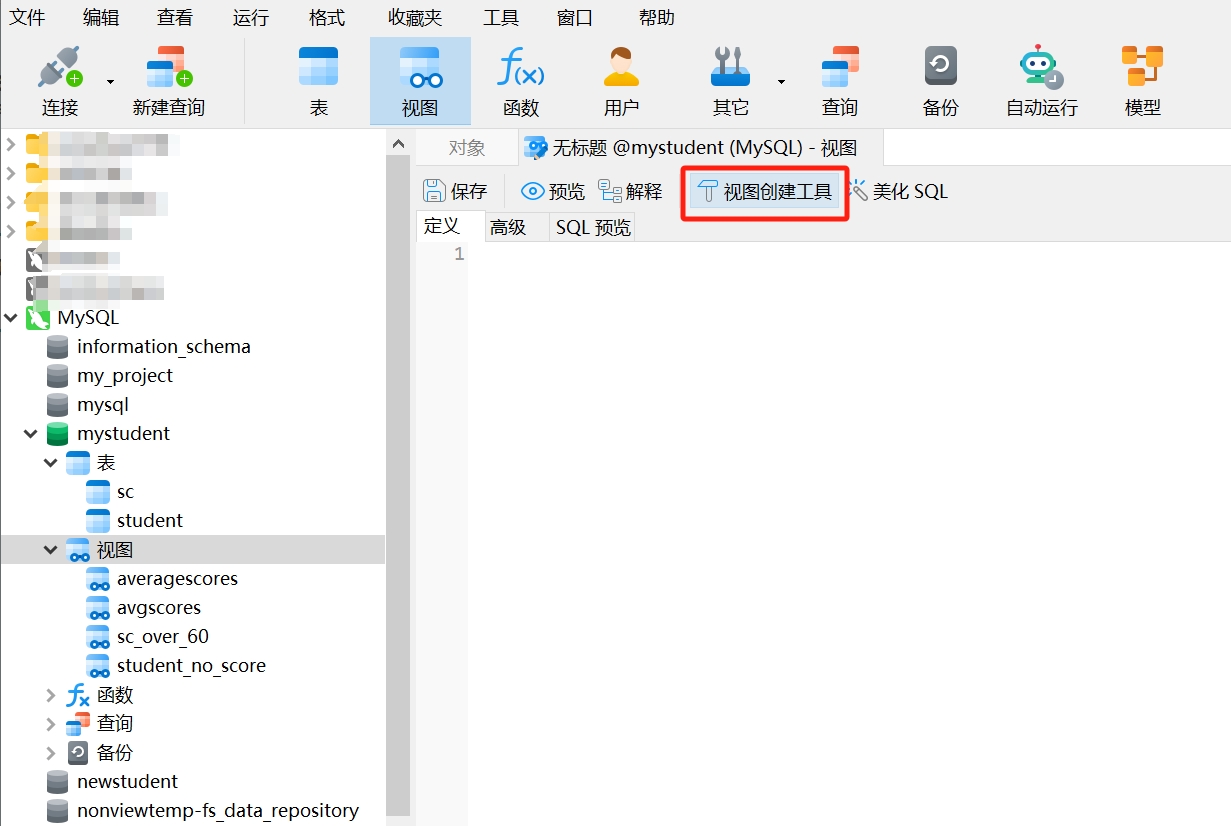
- Click on "Views," then right-click and select "New View."
- Then, click on "View Creation Tool."
- After opening the view creation tool, you can select the data table you want to use on the left side and drag it to the specified position as shown below.
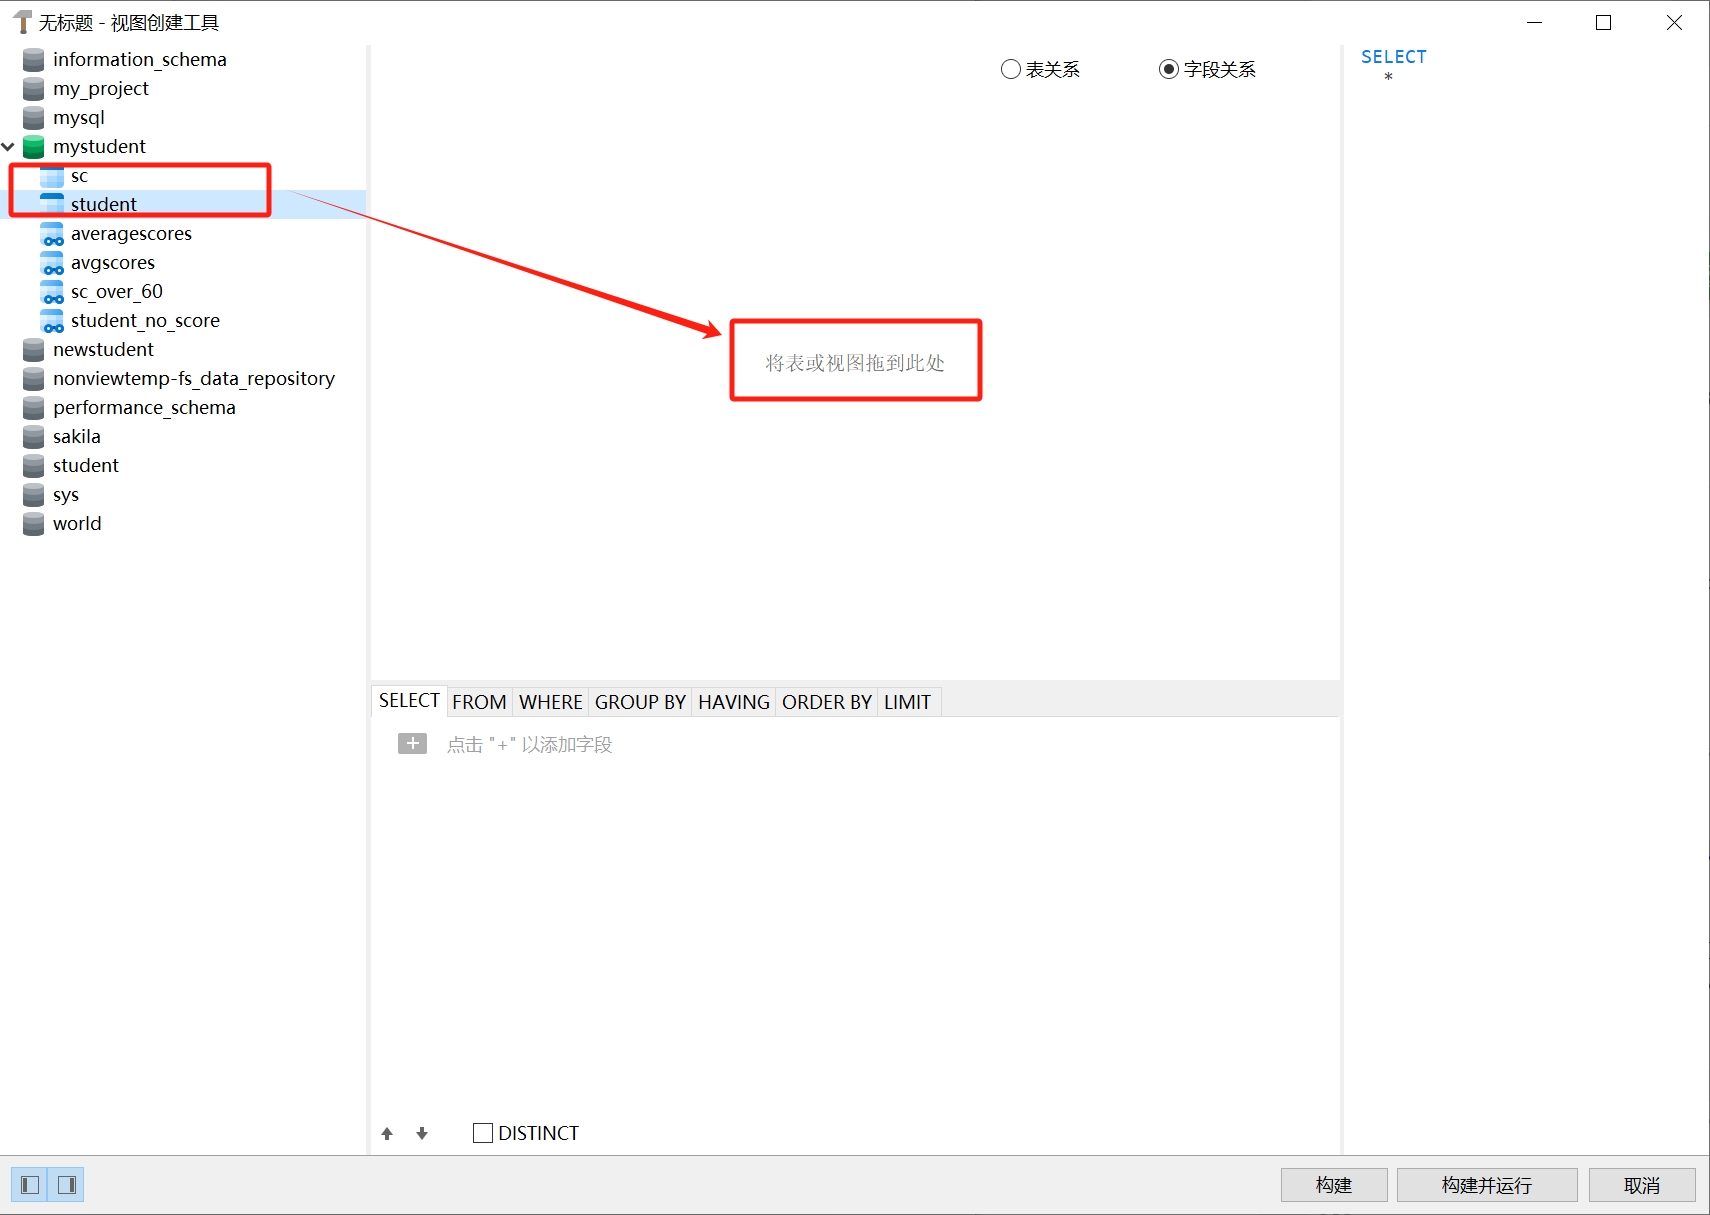
- Here we are using the data table
sc. After selecting the fields to display in the view, add the query condition.
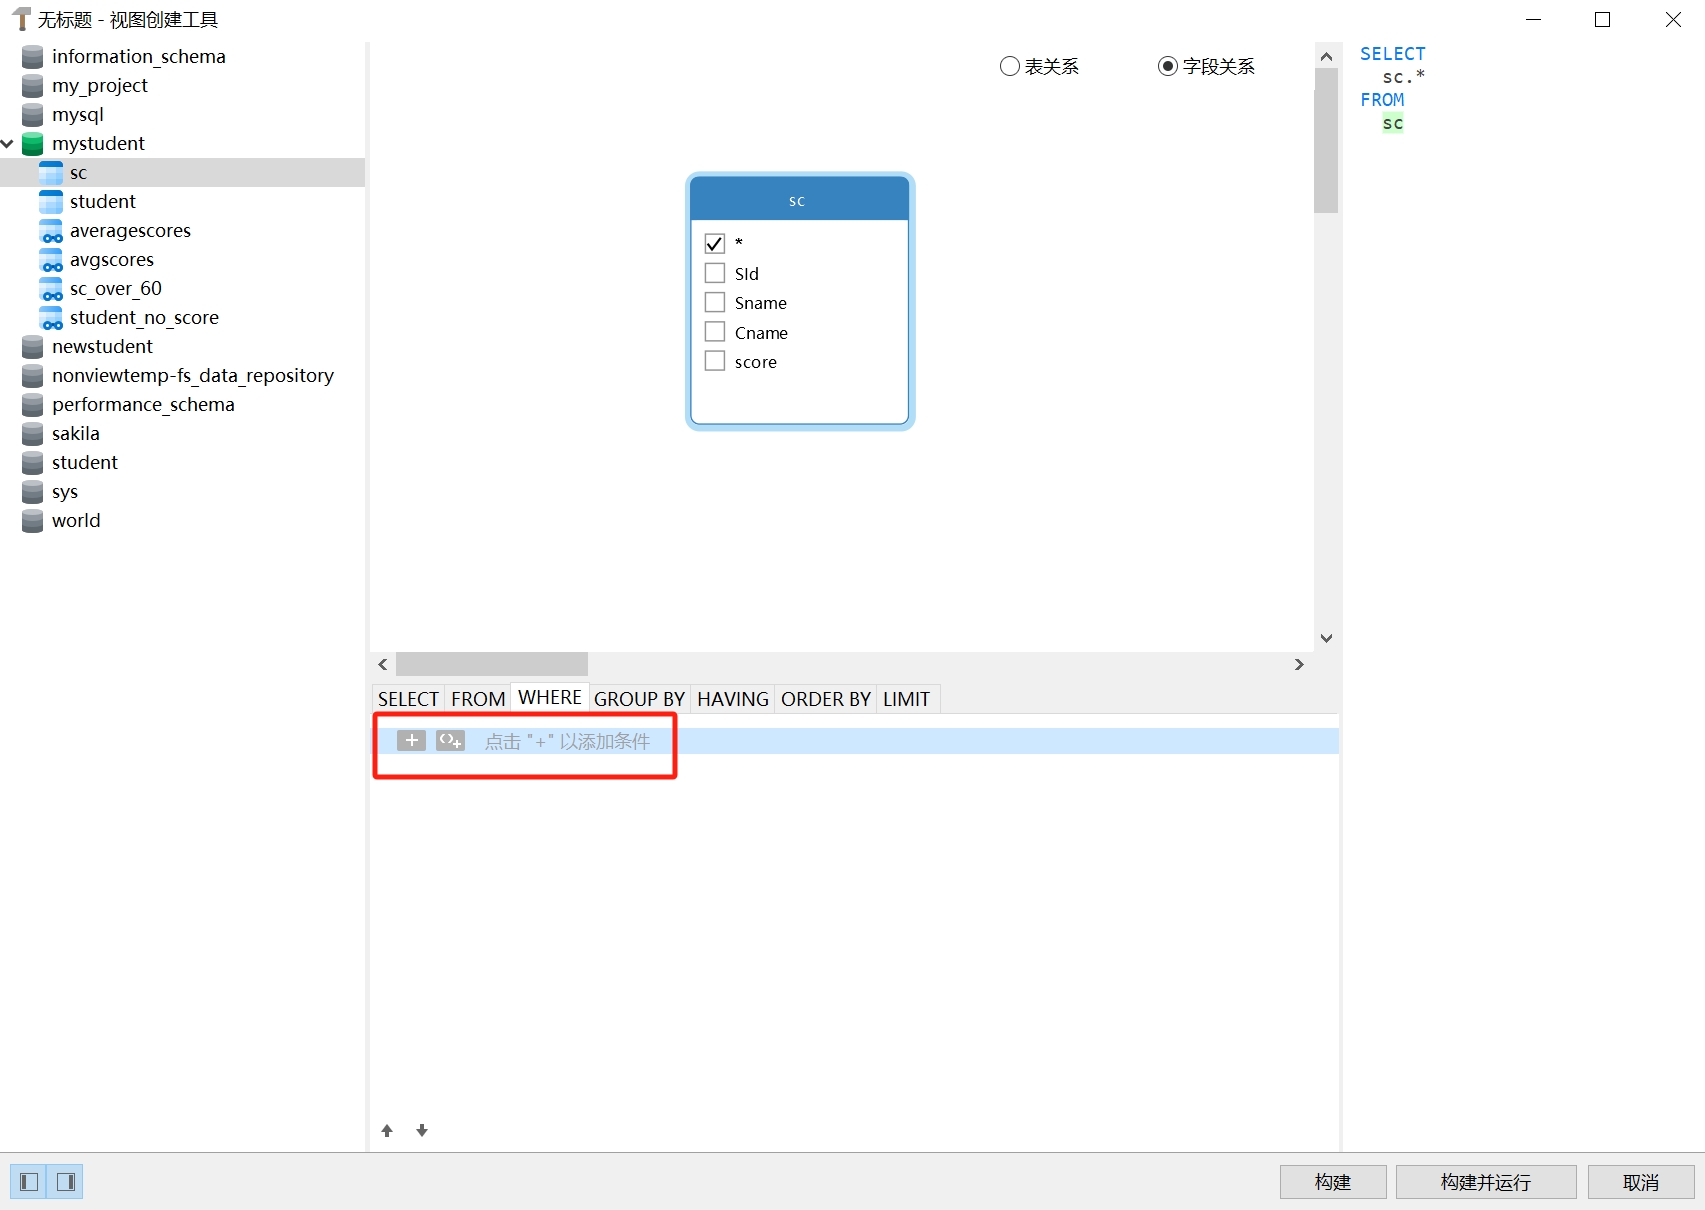
- After adding the query condition
score < 60, click "Build and Run," and you will see the created view as follows.
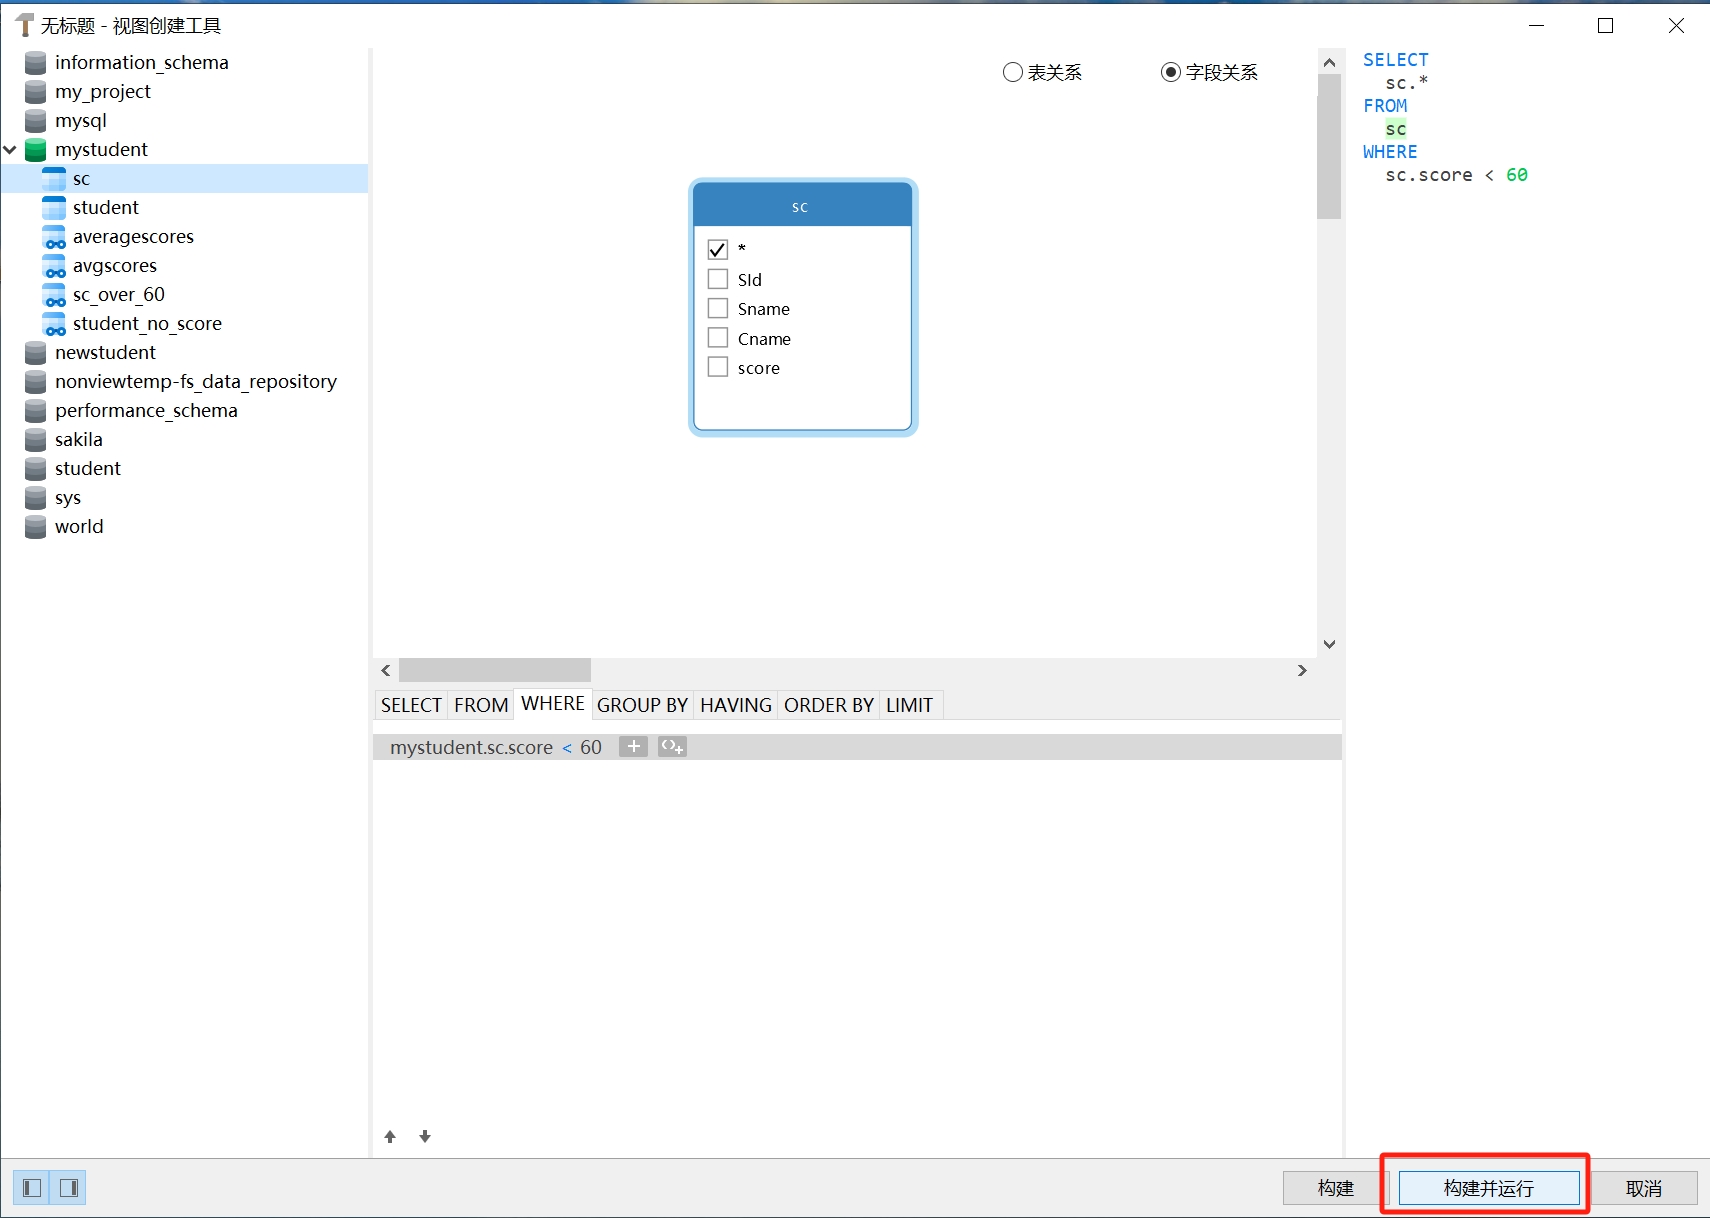
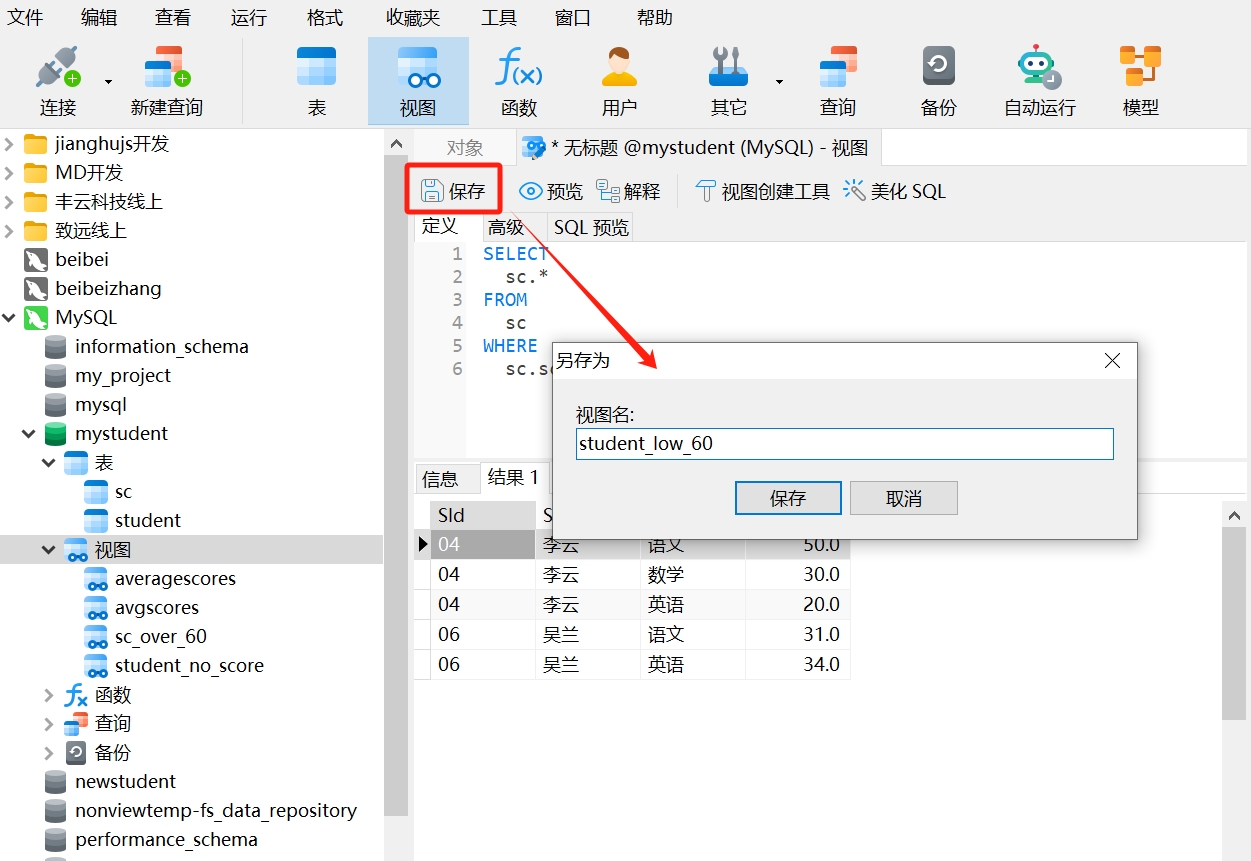
- Finally, click the "Save" button in the upper left corner and name the view
student_low_60, completing the view creation.
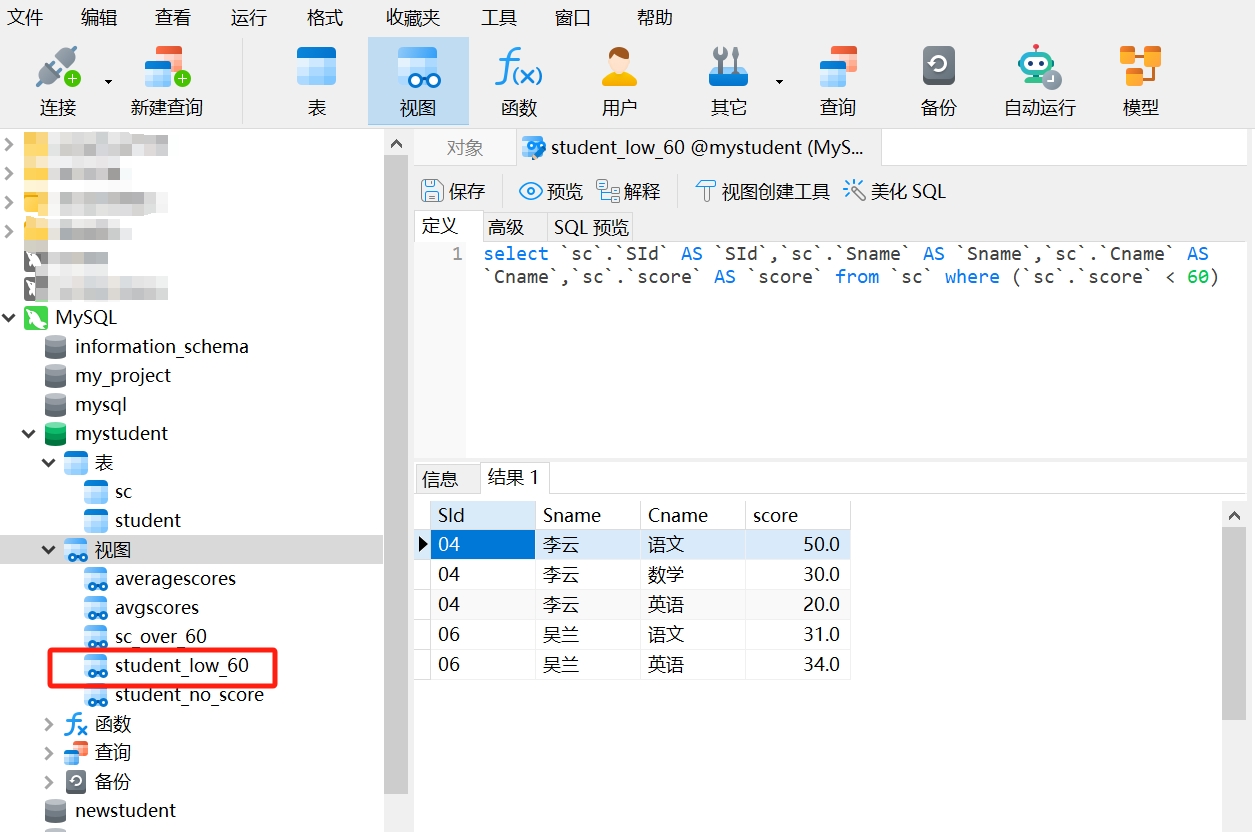
Here we can see that the view creation tool is the process of saving SQL query statements. If the results of the view are not what we want after building and running, you can continue to use the view creation tool to modify the query and save it once it is correct.
- Creating a View Using Two Tables
Next, we will use the view creation tool to create a view for queries involving two tables. In the previous example, we queried students with incorrect IDs entered during score entry. To visually display the correct and incorrect IDs, we can create it as follows:
- After opening the view creation tool, select the data tables
studentandscon the left side, and drag them to the specified position as shown. Here, it is important to note the position of the tables, as it determines whether the subsequent query will use LEFT JOIN or RIGHT JOIN.
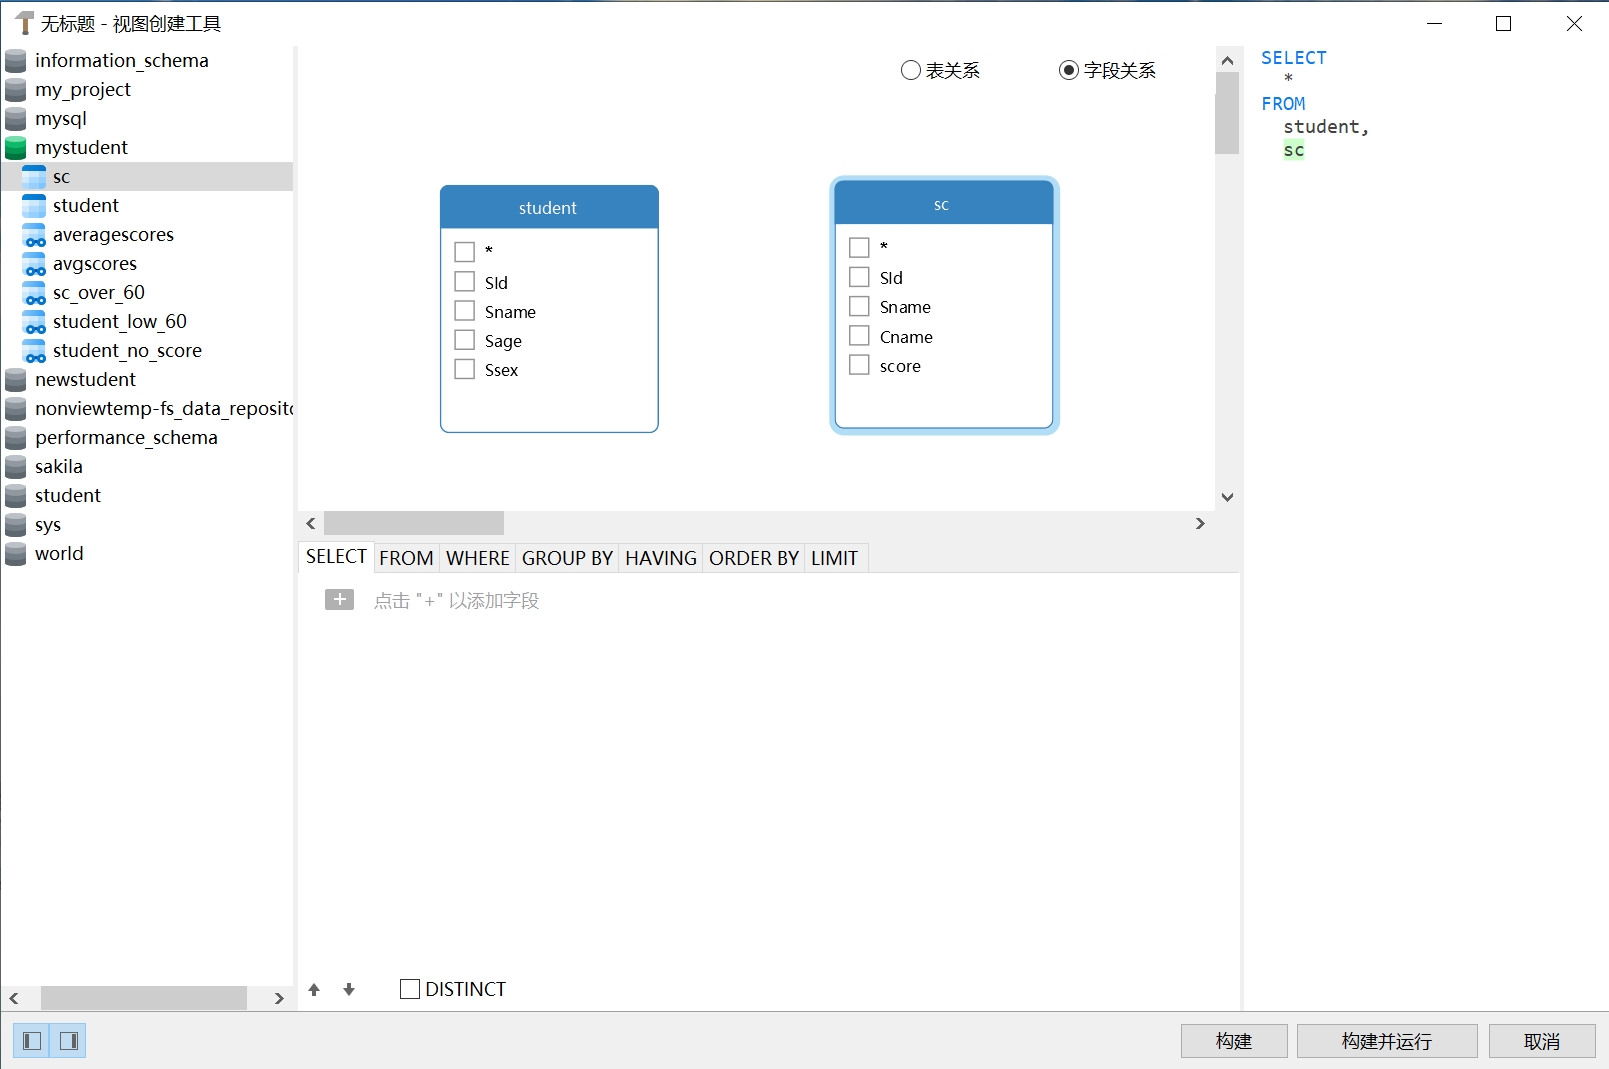
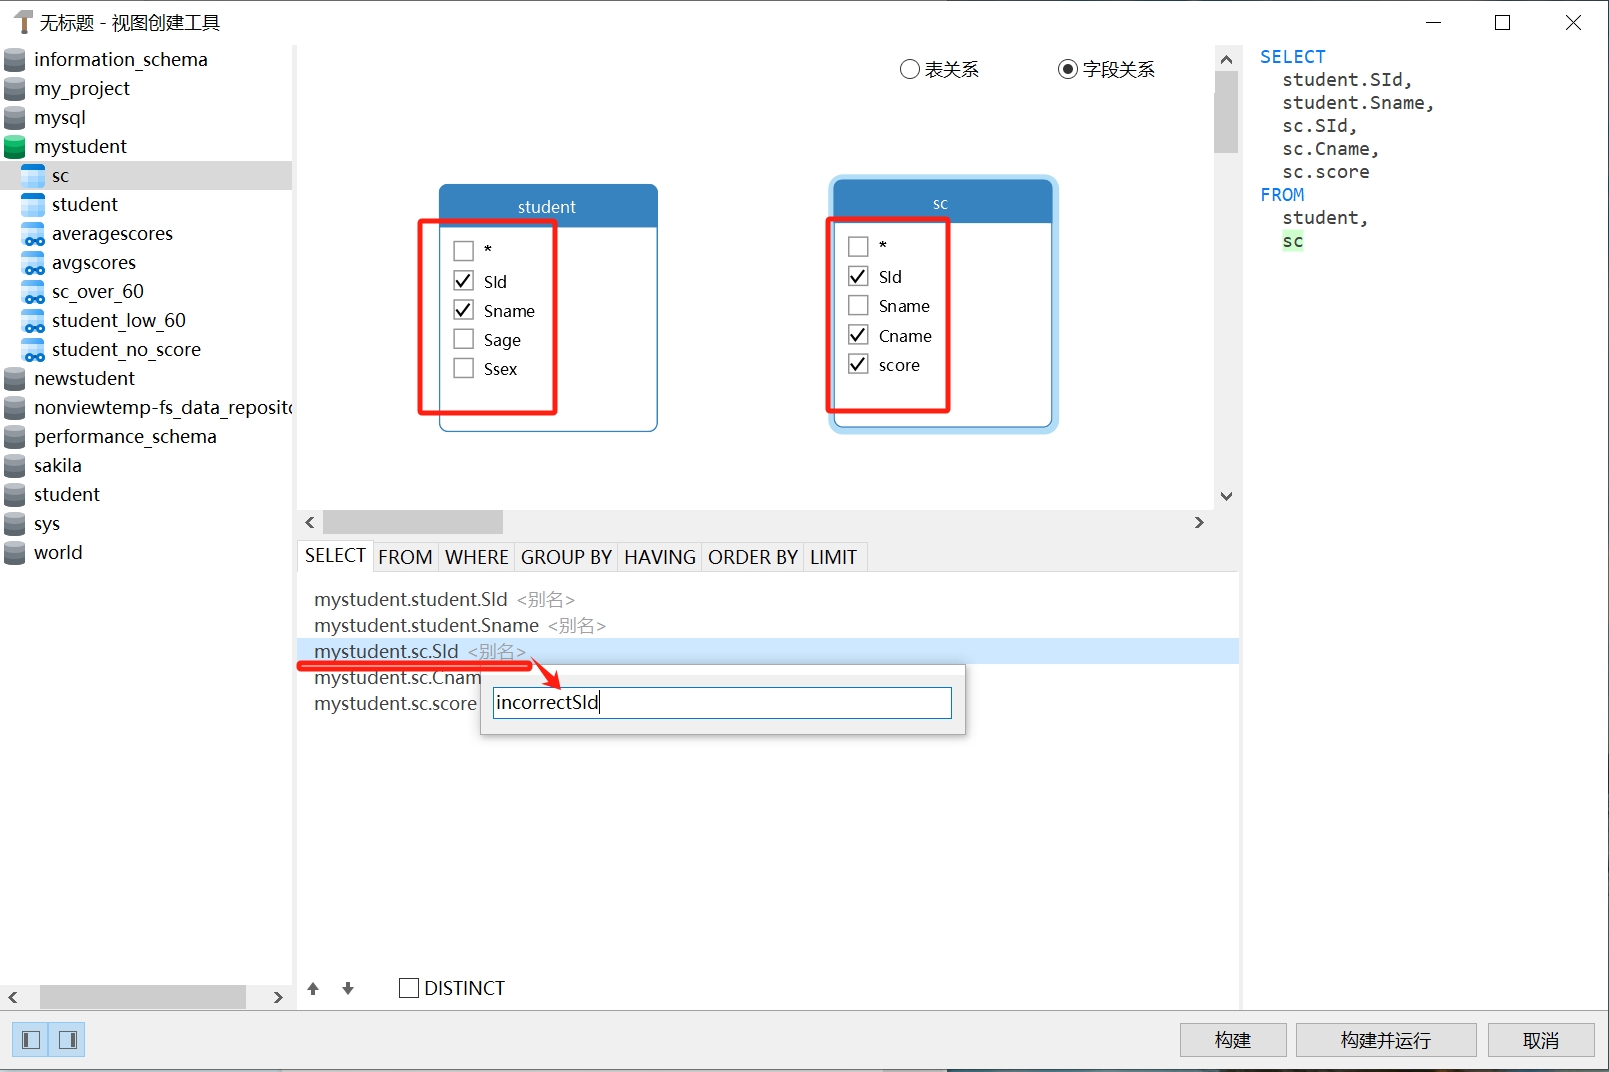
- Select the fields to display from each table. Here, it is important to note that the
SIdin thestudenttable is accurate, while theSIdin thesctable is erroneous. To distinguish them, we set an aliasincorrectSIdfor theSIdin thesctable to indicate the incorrectSId.
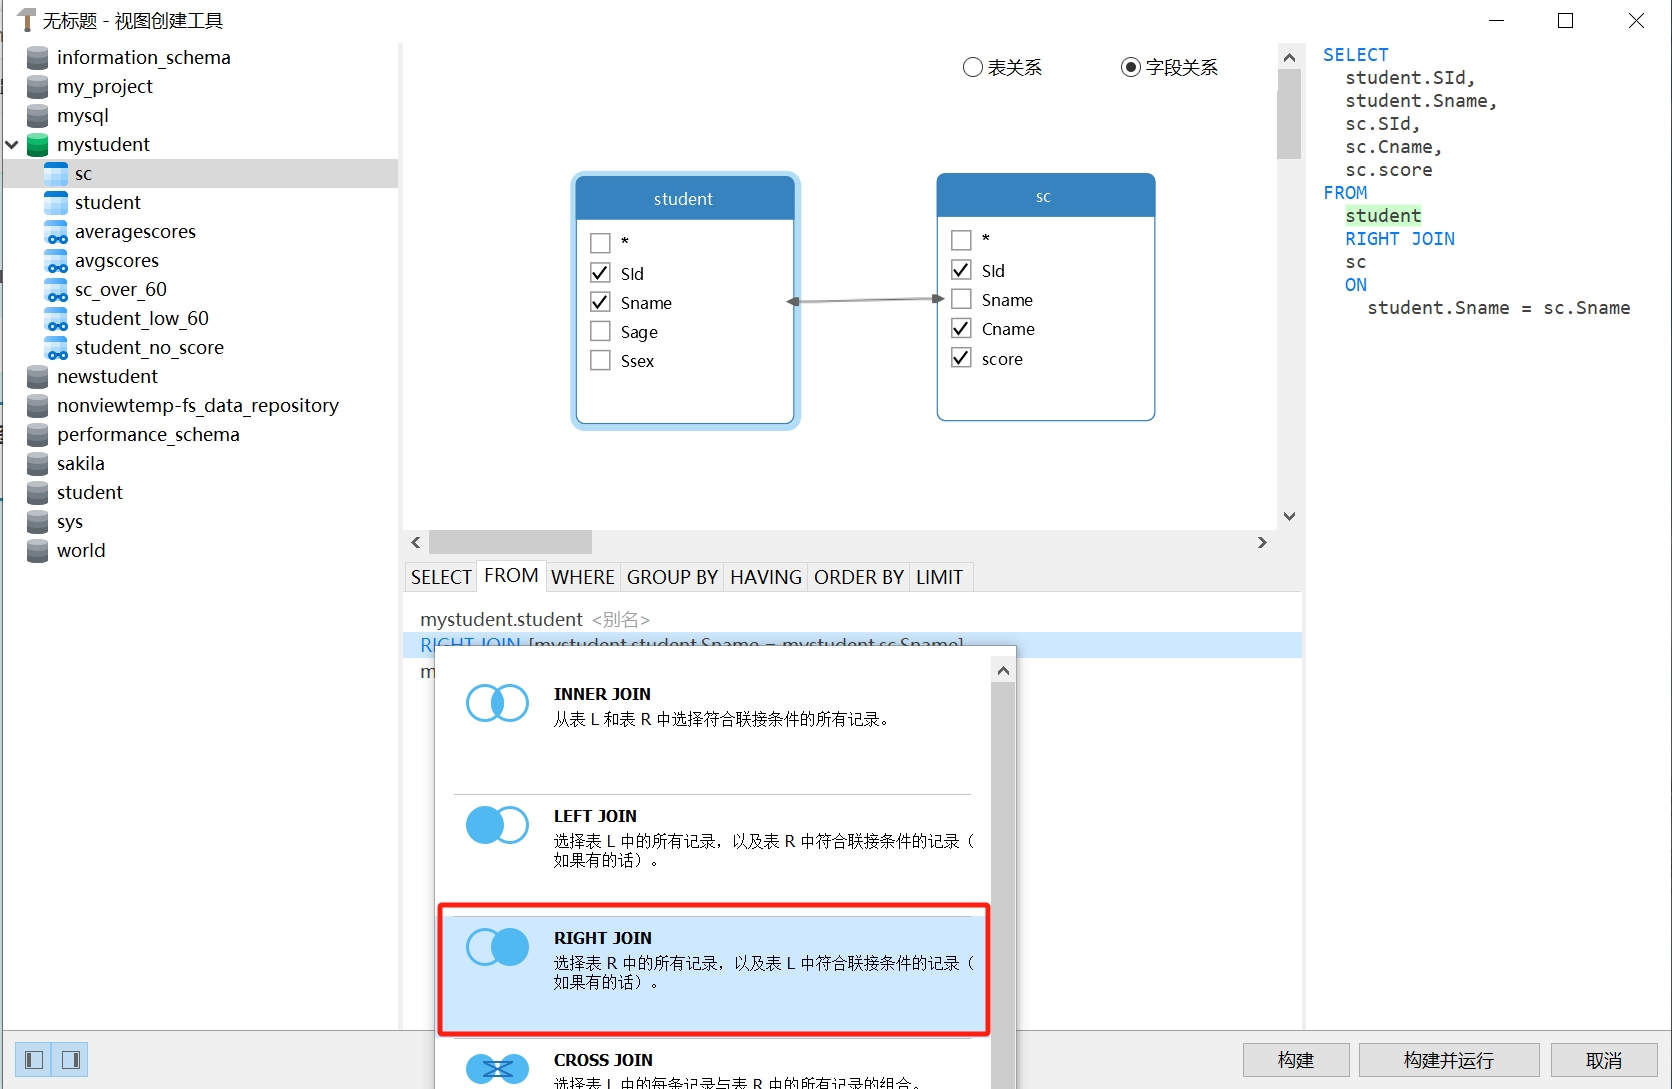
- Next, we will use the common field
Snamefrom both tables as the join condition to connect the two tables, and change the default INNER JOIN query to RIGHT JOIN.

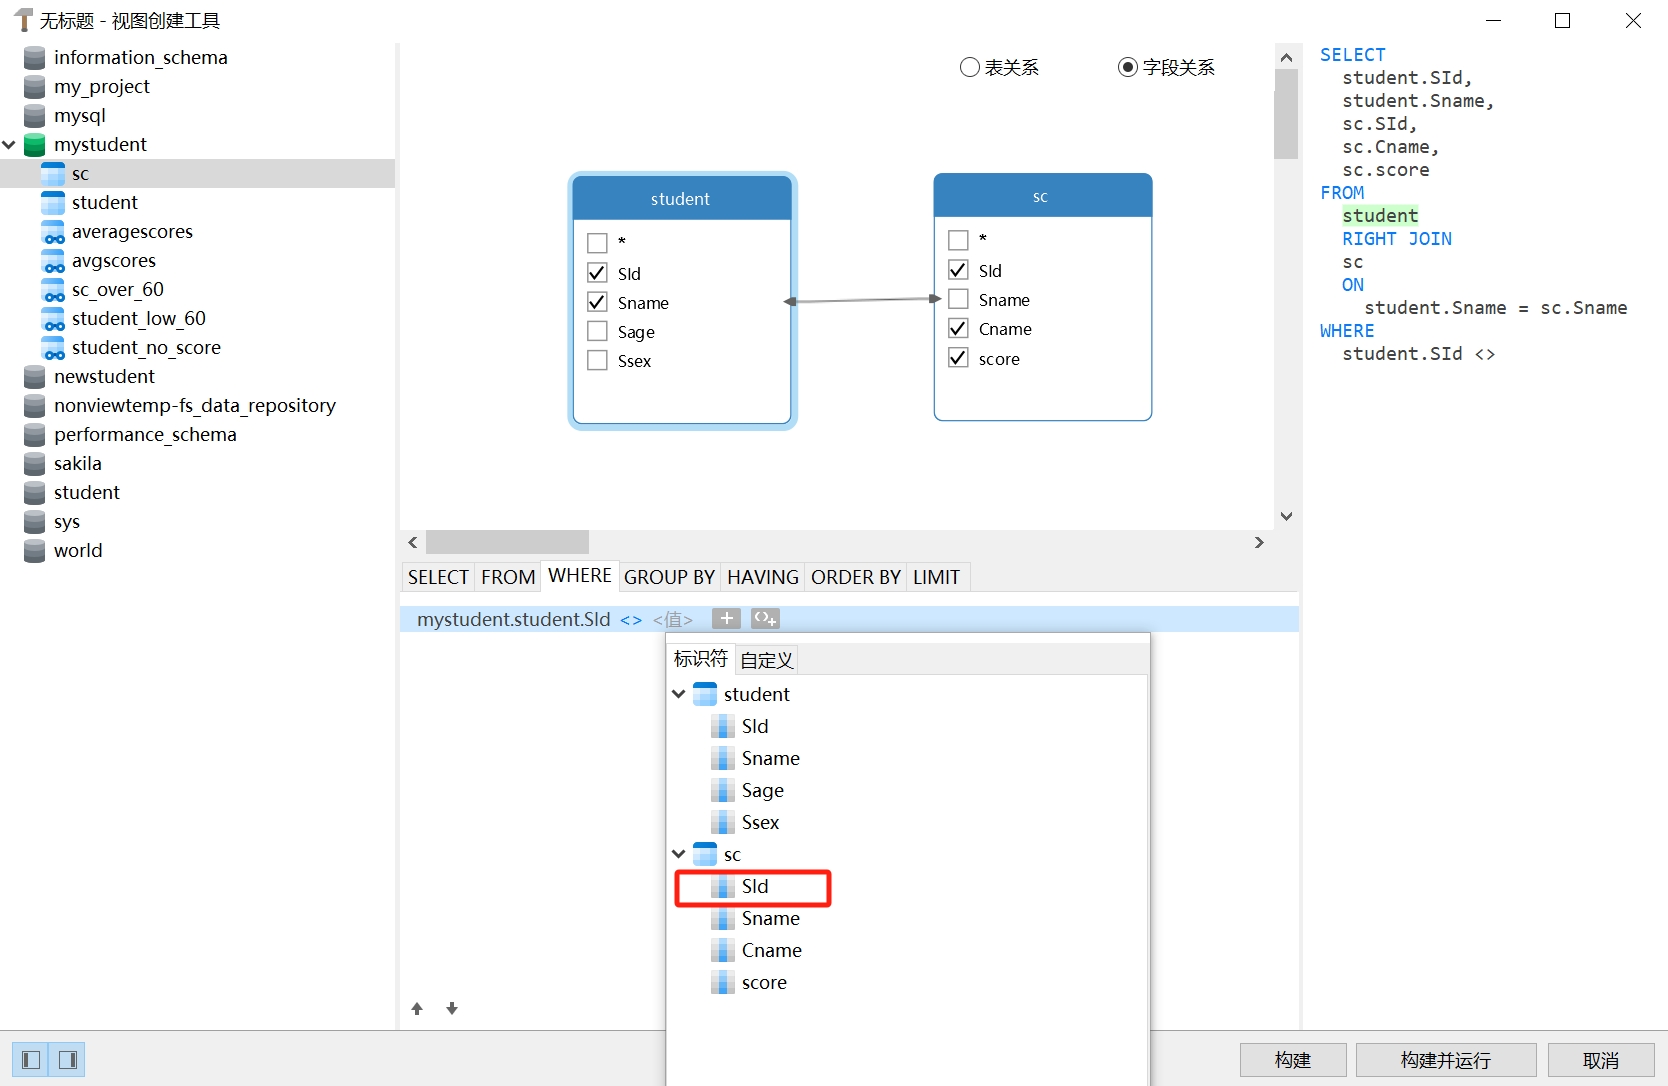
- Next, add the query condition. We want to query the data where
SIdfrom both tables are not equal, so the added query condition isstudent.SId <> sc.SId.
- After clicking "Build and Run," we see the created view as follows. After confirming it is correct, save the view and name it
student_incorrectsid, completing the view creation.
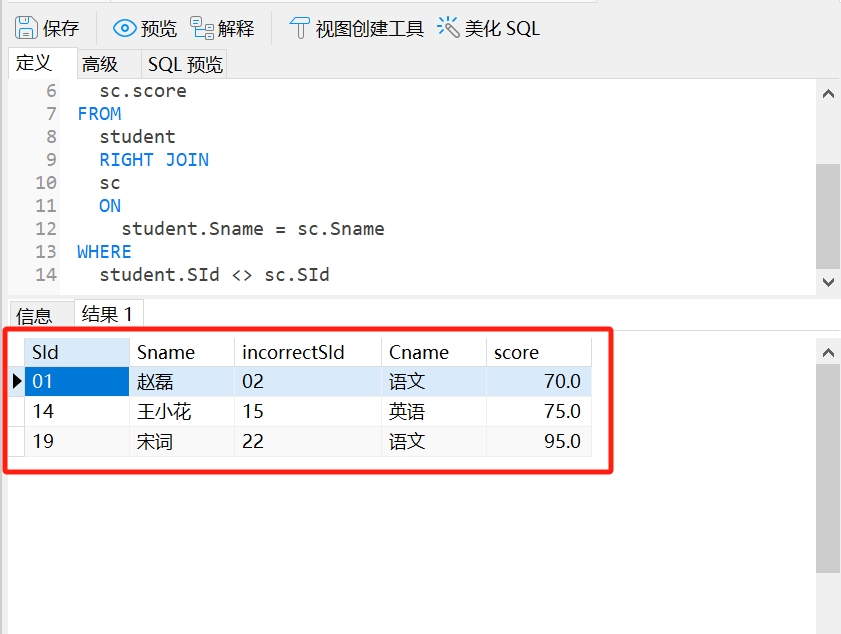
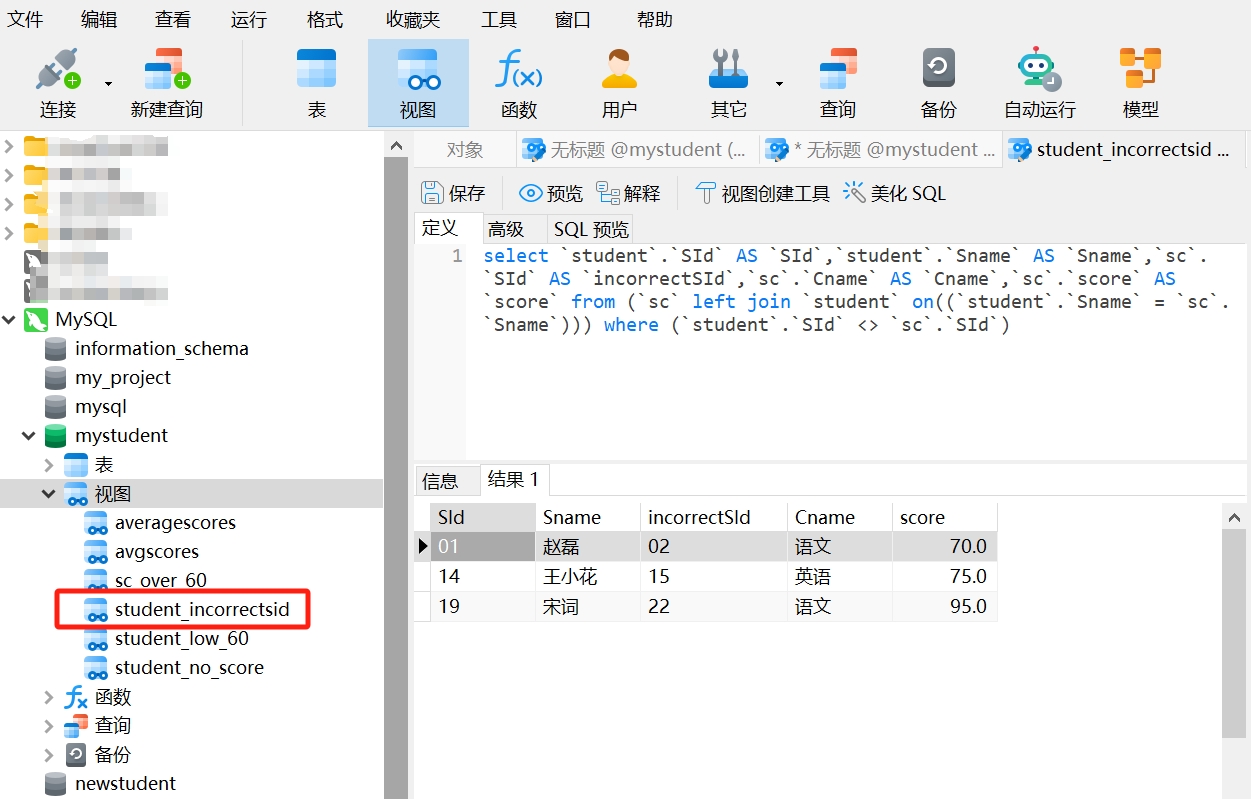
In this view, we can visually see which students have incorrect SIds while simultaneously displaying the correct SId, which helps us correct the erroneous information in the sc table.
4. Homework
Click to download the SQL file needed for this lesson's homework: Click here to download
Open your database in Navicat and run the SQL file for Lesson 9 to update your database data and views.
Use the Student table, Course table, and SC table to perform JOIN to find erroneous data.
Calculate the total number of courses, total scores, and average scores for students, and save your SQL statements as views.
Calculate the highest and lowest scores for each student.
Calculate how many students are in each course and what the average score is.
Calculate the highest and lowest scores of students in each course.