Reference Materials: Navicat Quick Operation Manual
120021. Description of Navicat Interface Functions
Navicat is a graphical database tool that can remotely connect to cloud databases or conveniently access local databases. Many functions can be operated without SQL, but rather through graphical operations, which can improve developers' efficiency and facilitate data querying and management.
There are many tools similar to Navicat, such as: MySQL Workbench (official tool), DataGrip (a powerful graphical database tool from Jetbrains), and SQLyog (a free MySQL database management tool).
If you need to install MySQL database, you can refer to the article: Install MySQL, Navicat
For functions not covered in this article, you can refer to the official documentation of Navicat software, which can be viewed online and is available in Chinese: online-manual. Other function demonstrations will be explained in subsequent articles.
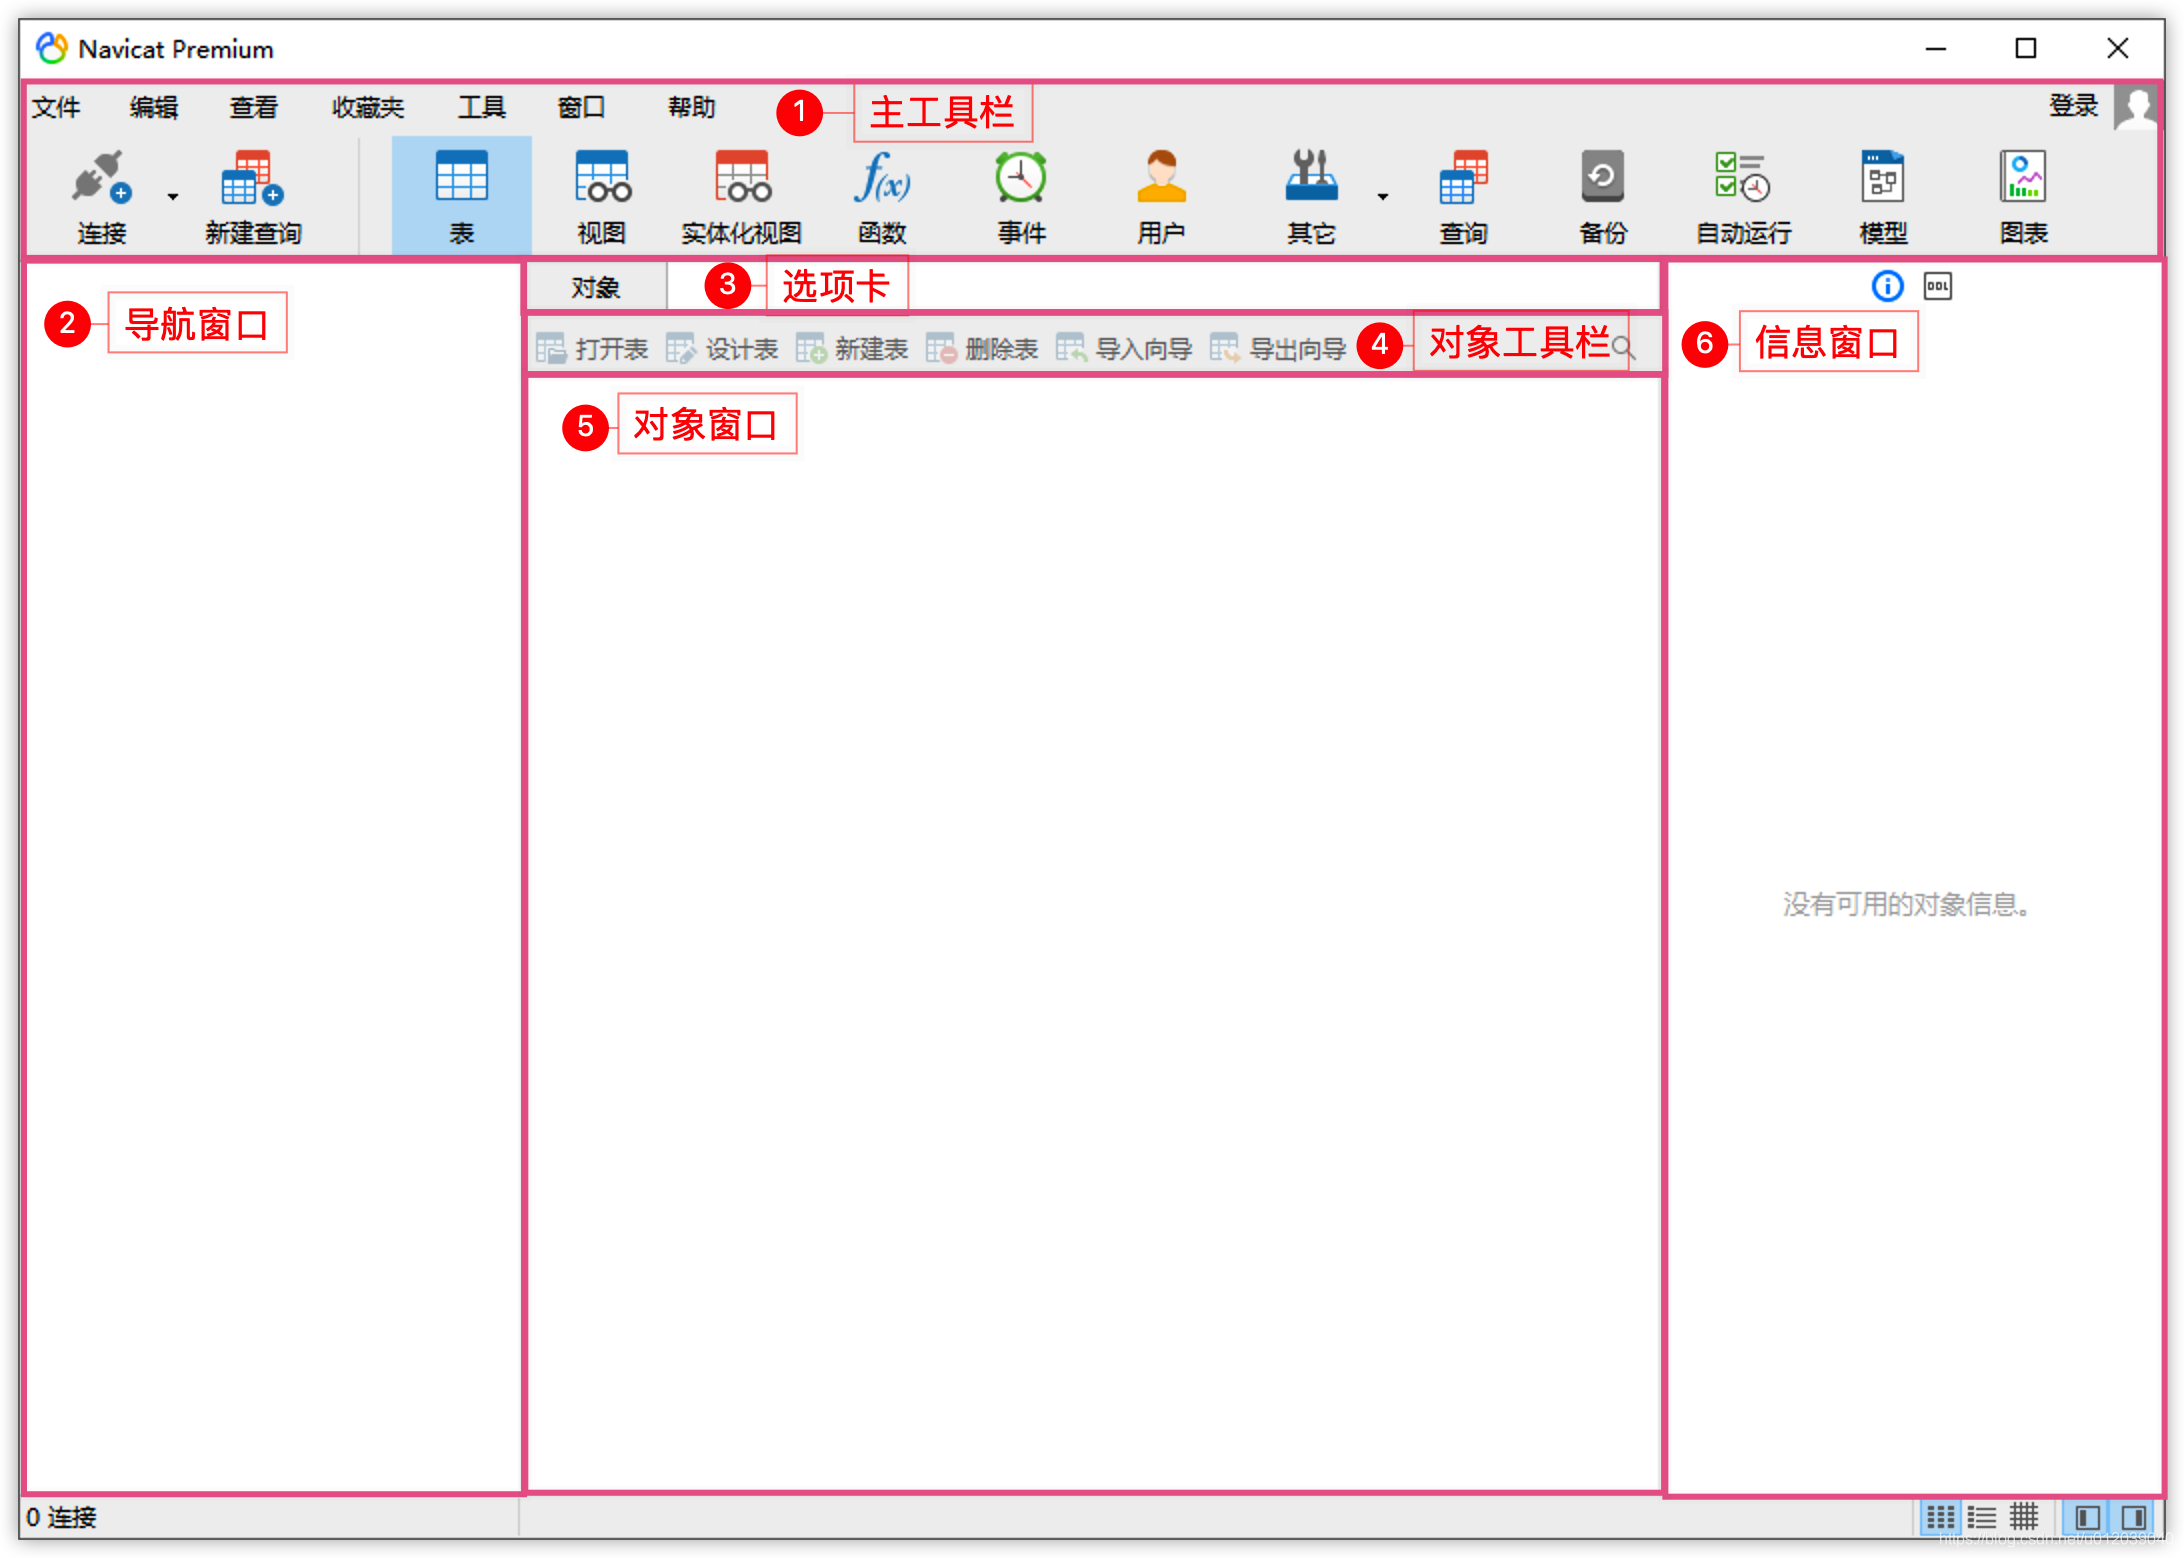
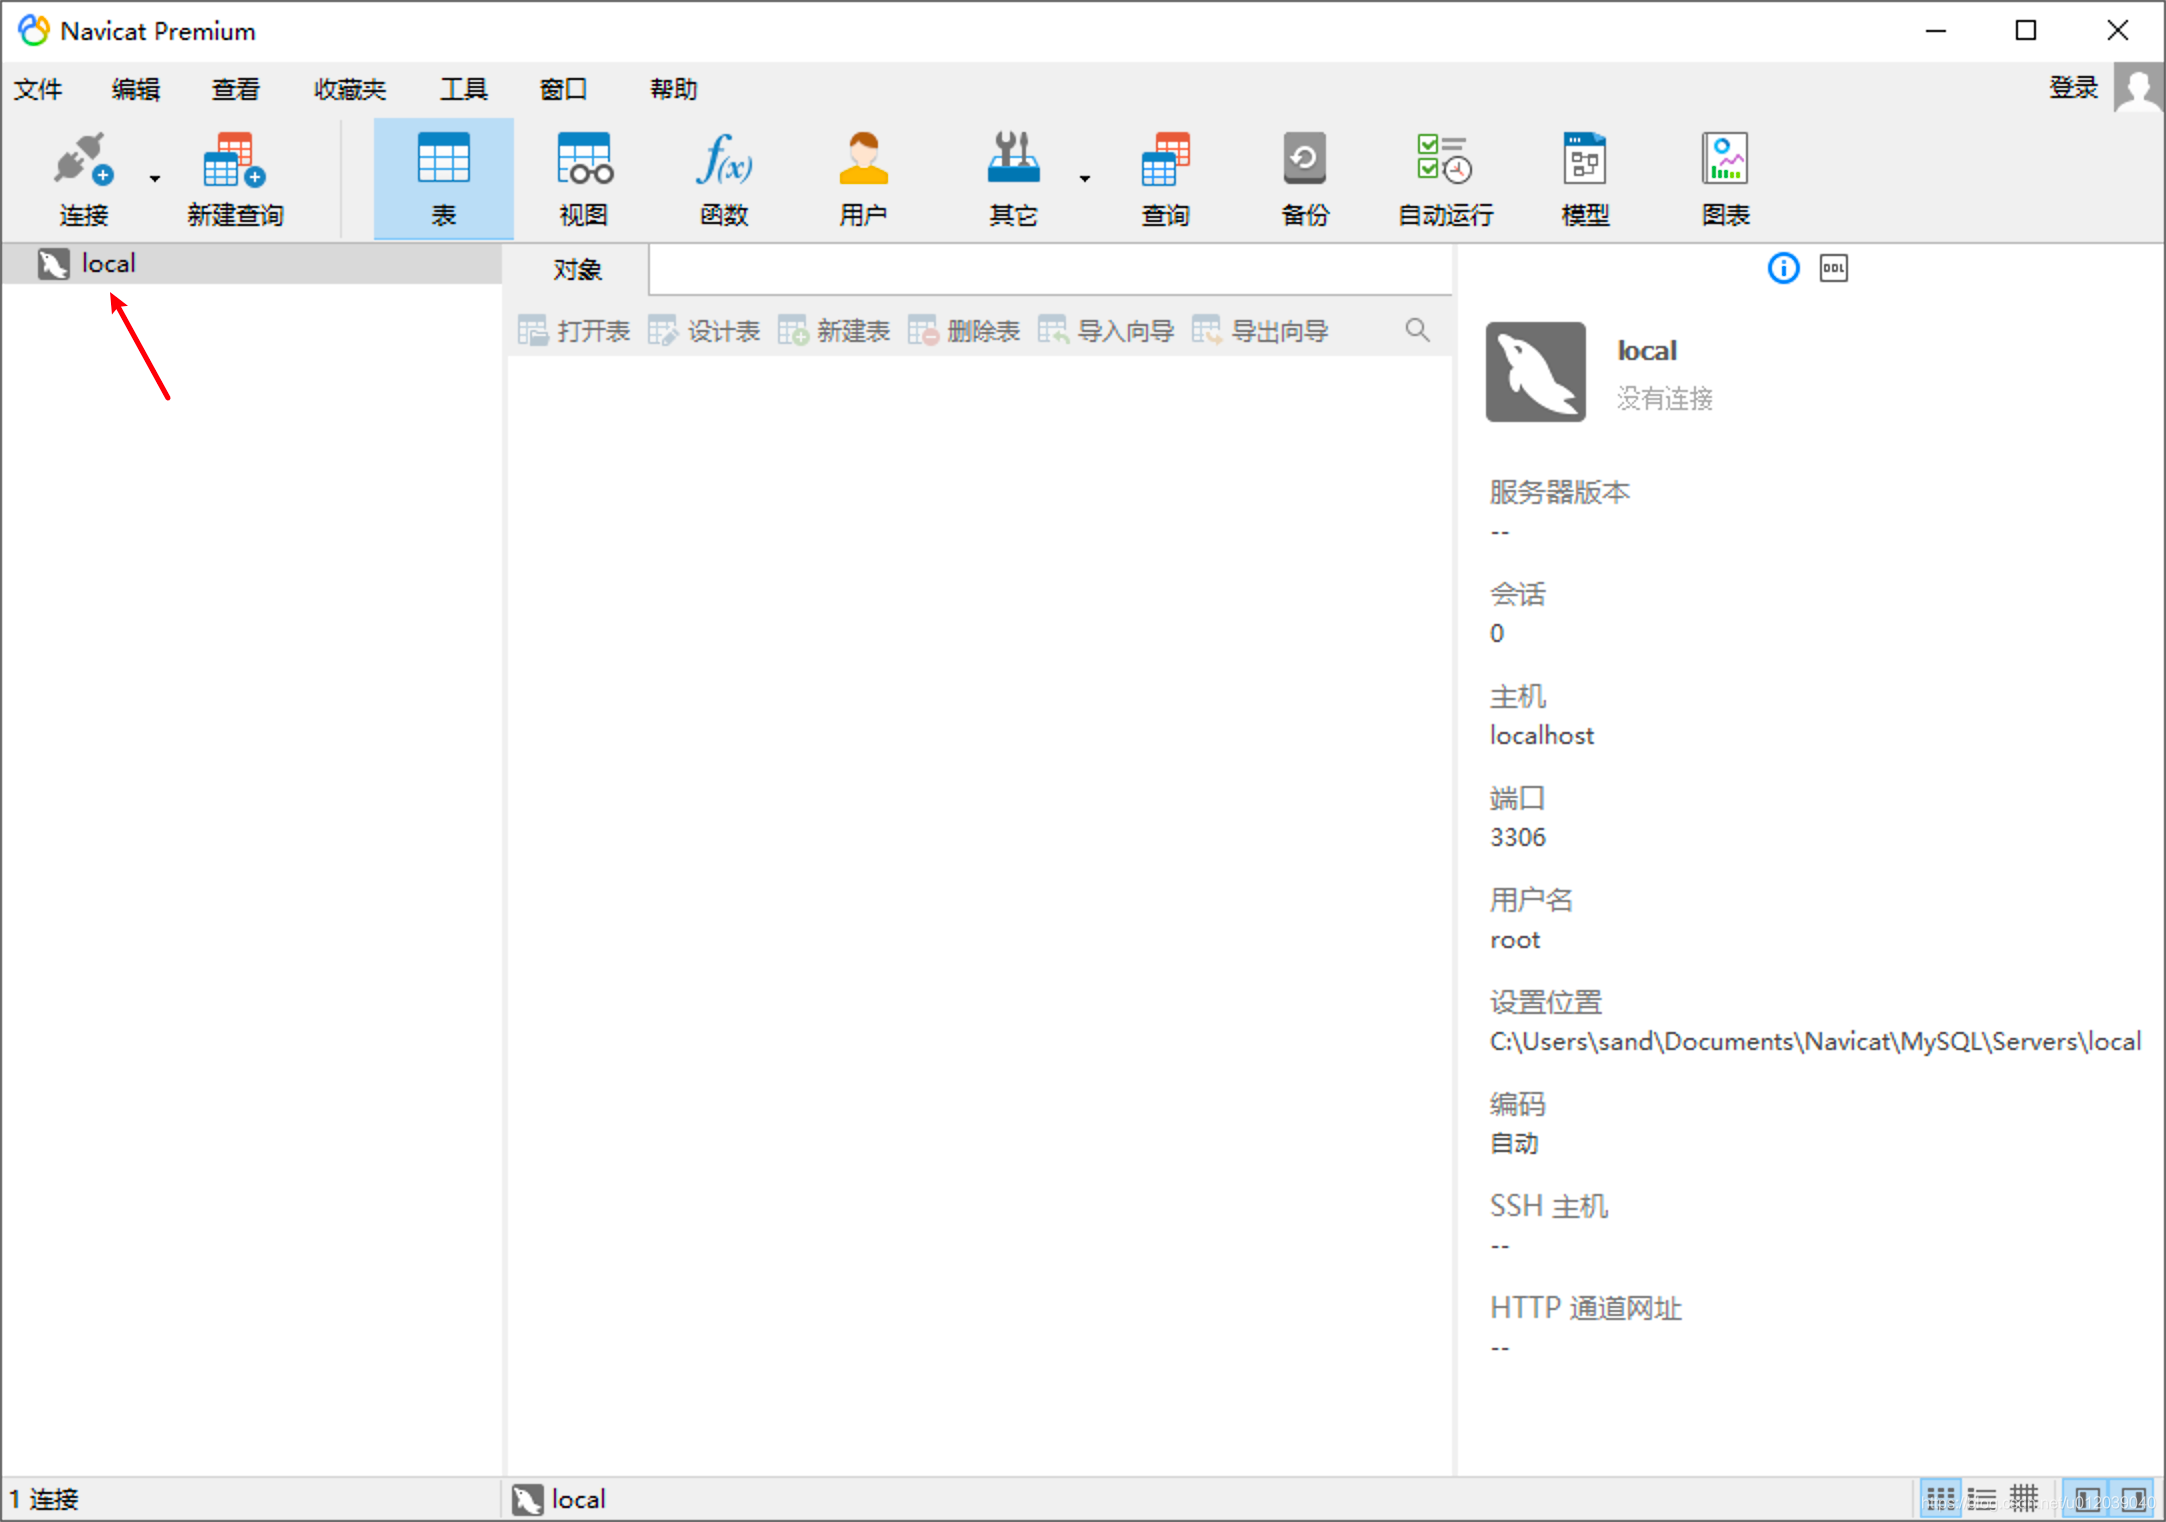
The functional areas of the interface are as follows:
- ① Main Toolbar: Provides quick access to commonly used functions, such as connection, query, tables, views, users, etc.
- ② Navigation Window: The area for browsing database connections, databases, tables, views, and other database objects.
- ③ Tabs: Each time a function is opened or a database object is operated on, a corresponding tab will be added, which can be switched or closed.
- ④ Object Toolbar: Displays corresponding functional controls for each function tab.
- ⑤ Object Window: Displays a list of objects in this area, such as tables, views, etc.
- ⑥ Information Window: Displays detailed information about objects, operation logs, or preview information in this area.
2. Create MySQL Connection
- New Connection
The first step in managing databases with Navicat is to establish a database connection. The prerequisite for establishing a connection is that the database has been successfully installed and the service is running. We can click the connection button in the main toolbar to establish a new connection, and we can see that the Premium version of Navicat supports various connections.
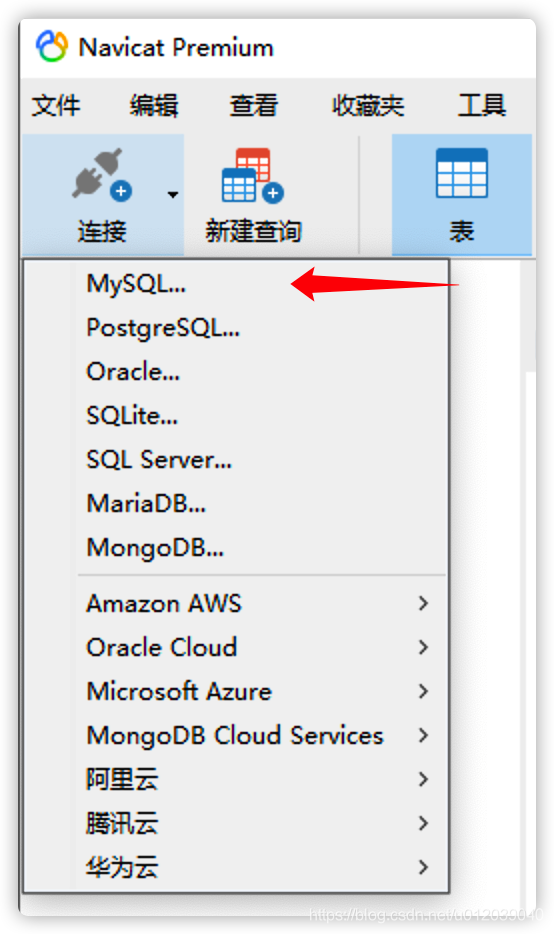
We click MySQL to create a new MySQL database connection. It is important to note: If we want to connect to a higher version of the database, our Navicat version must not be too old, because connecting to the database requires drivers, and many graphical tools have built-in drivers that cannot be managed manually like DataGrip.
- Connection Test
In the new connection interface, the hostname and port number, as well as the username, are already filled in by default. Specify access to the local database, with the port number set to 3306. The user we connect with determines the permissions we have when operating the database, with the default being the root user (the highest privilege user for MySQL databases), so we need to fill in the password set during installation.
For the connection name part, it does not affect the database connection; it is just a name we can arbitrarily choose to label different connections. Typically, we use information such as host, port, and user as naming references for more efficient management of database connections.
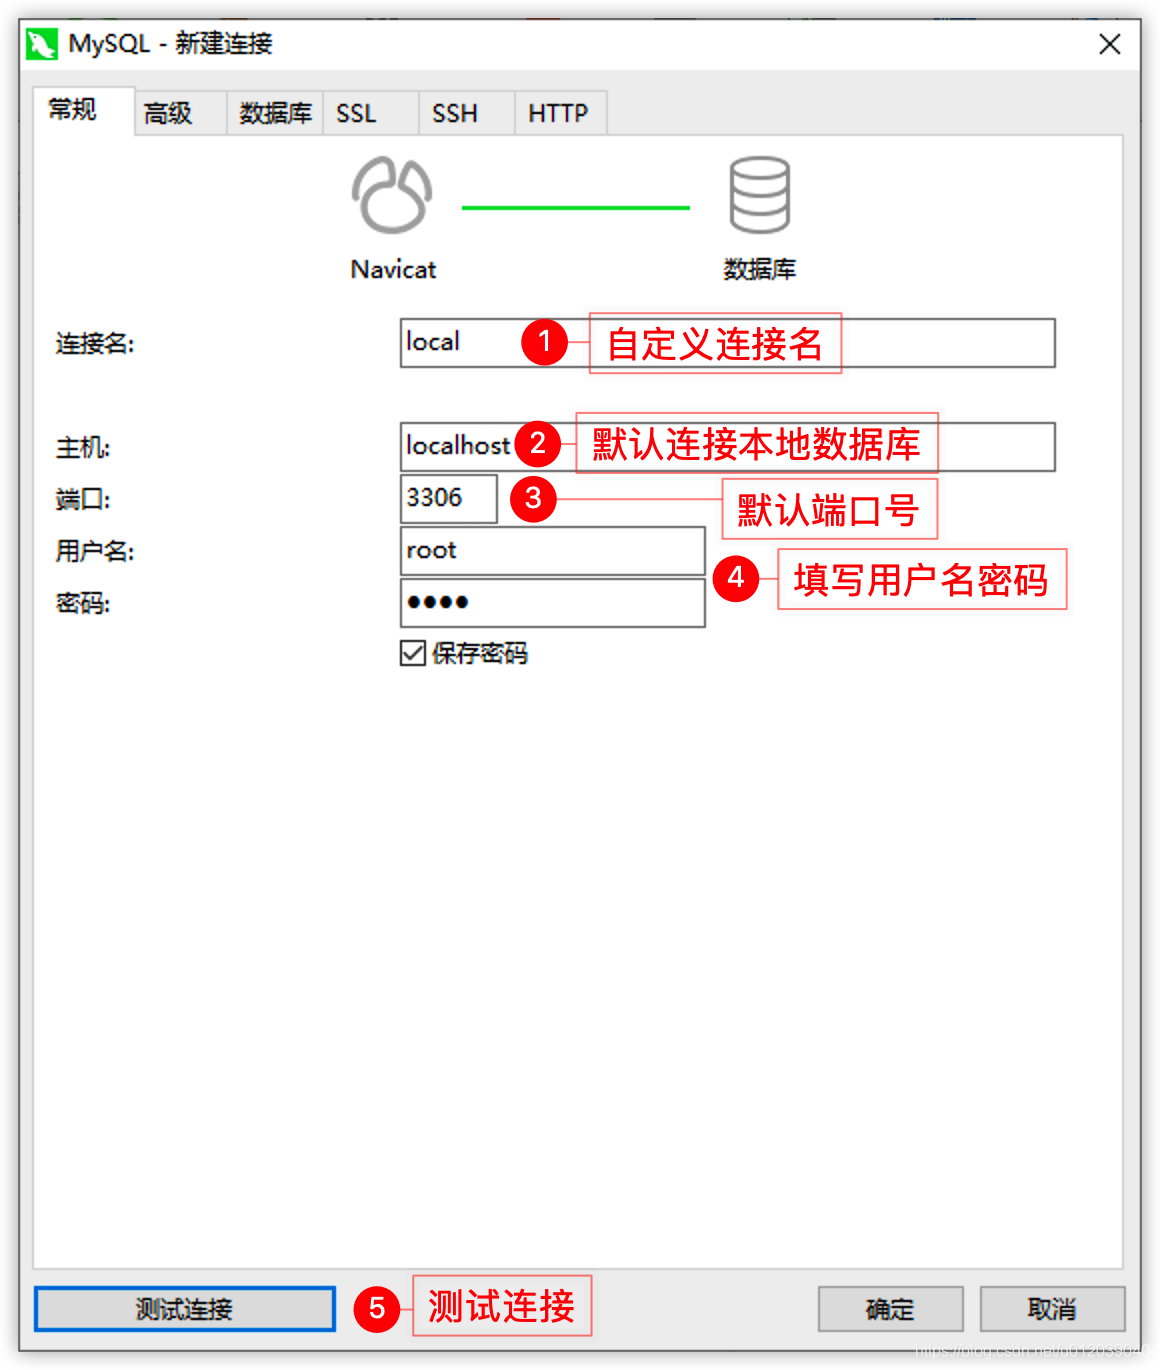
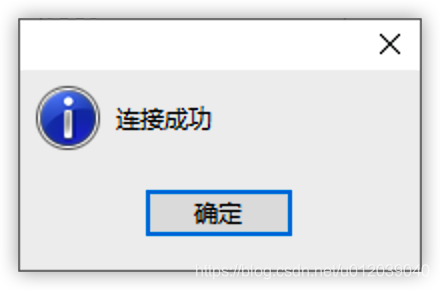
If the information is filled in correctly, the connection can be established normally. After clicking the test connection, a successful connection window will appear.
- Save Connection
After the connection test passes, click the OK button to complete the creation of the connection, which will then appear in the navigation window.
- Connection Management
Right-clicking on an existing connection will show the supported operations, including: open connection, edit connection, create new connection, delete connection, copy connection, create database, create query, command line interface, run SQL file, refresh (database permissions, etc.), manage groups, colors, and refresh.
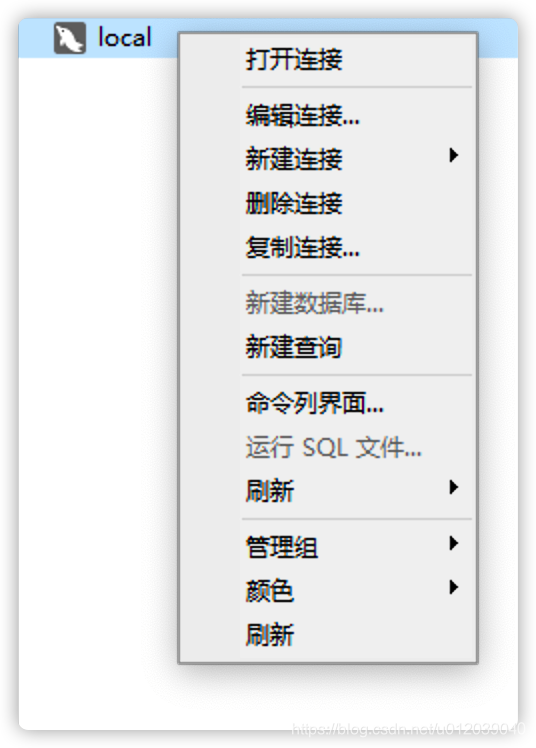
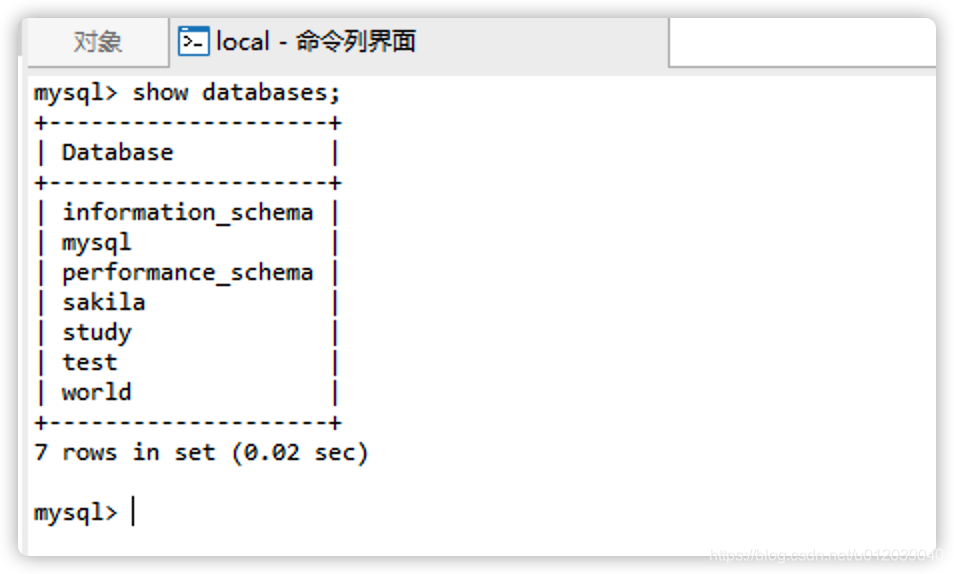
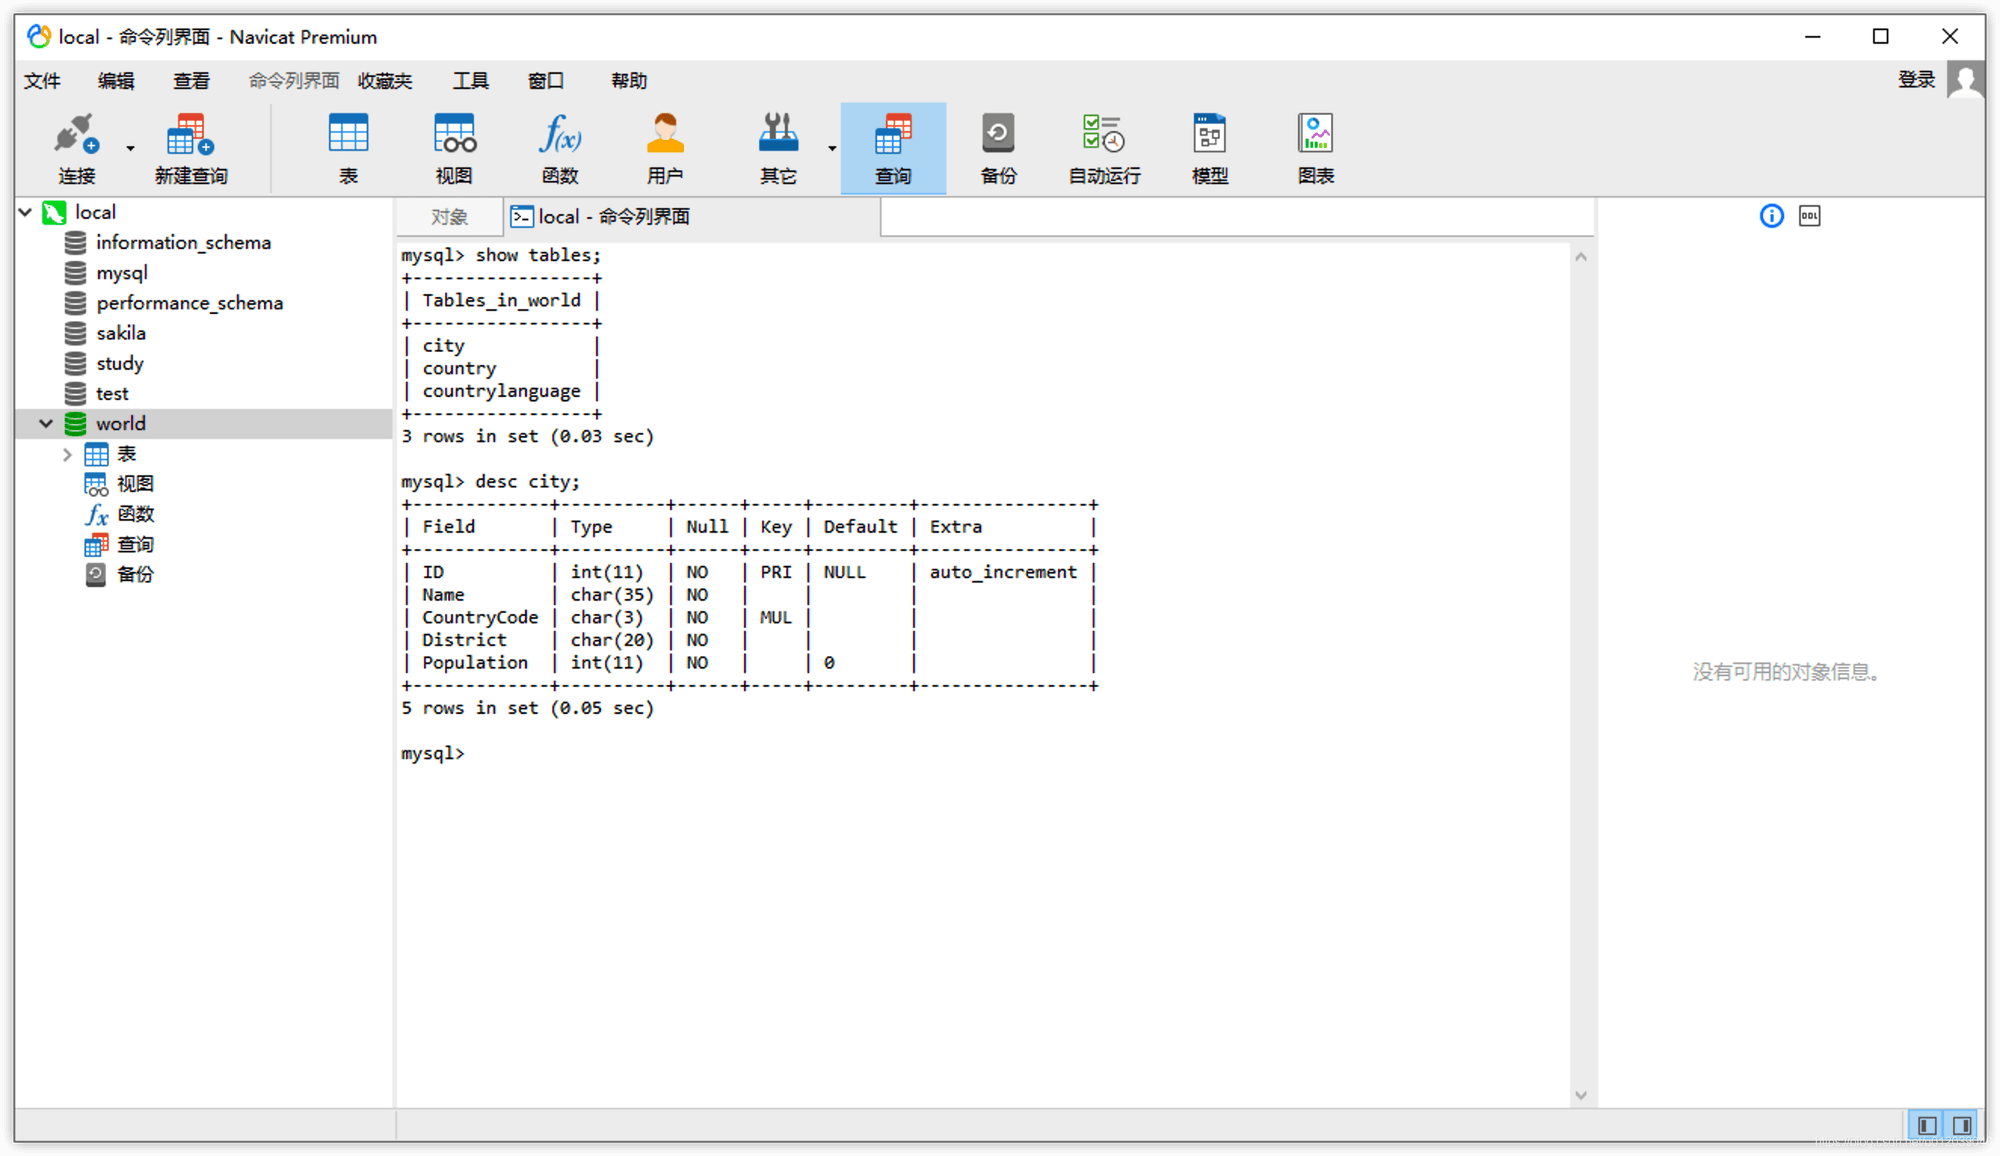
Among them, operations such as creating a database, running an SQL file, and refreshing must be performed after opening the connection. Most of the functions can be tried by yourself, as they are relatively simple. The command line interface will open the interactive environment of the MySQL client, making it convenient for advanced users to operate, as shown below:
3. Create Database
- View Database List
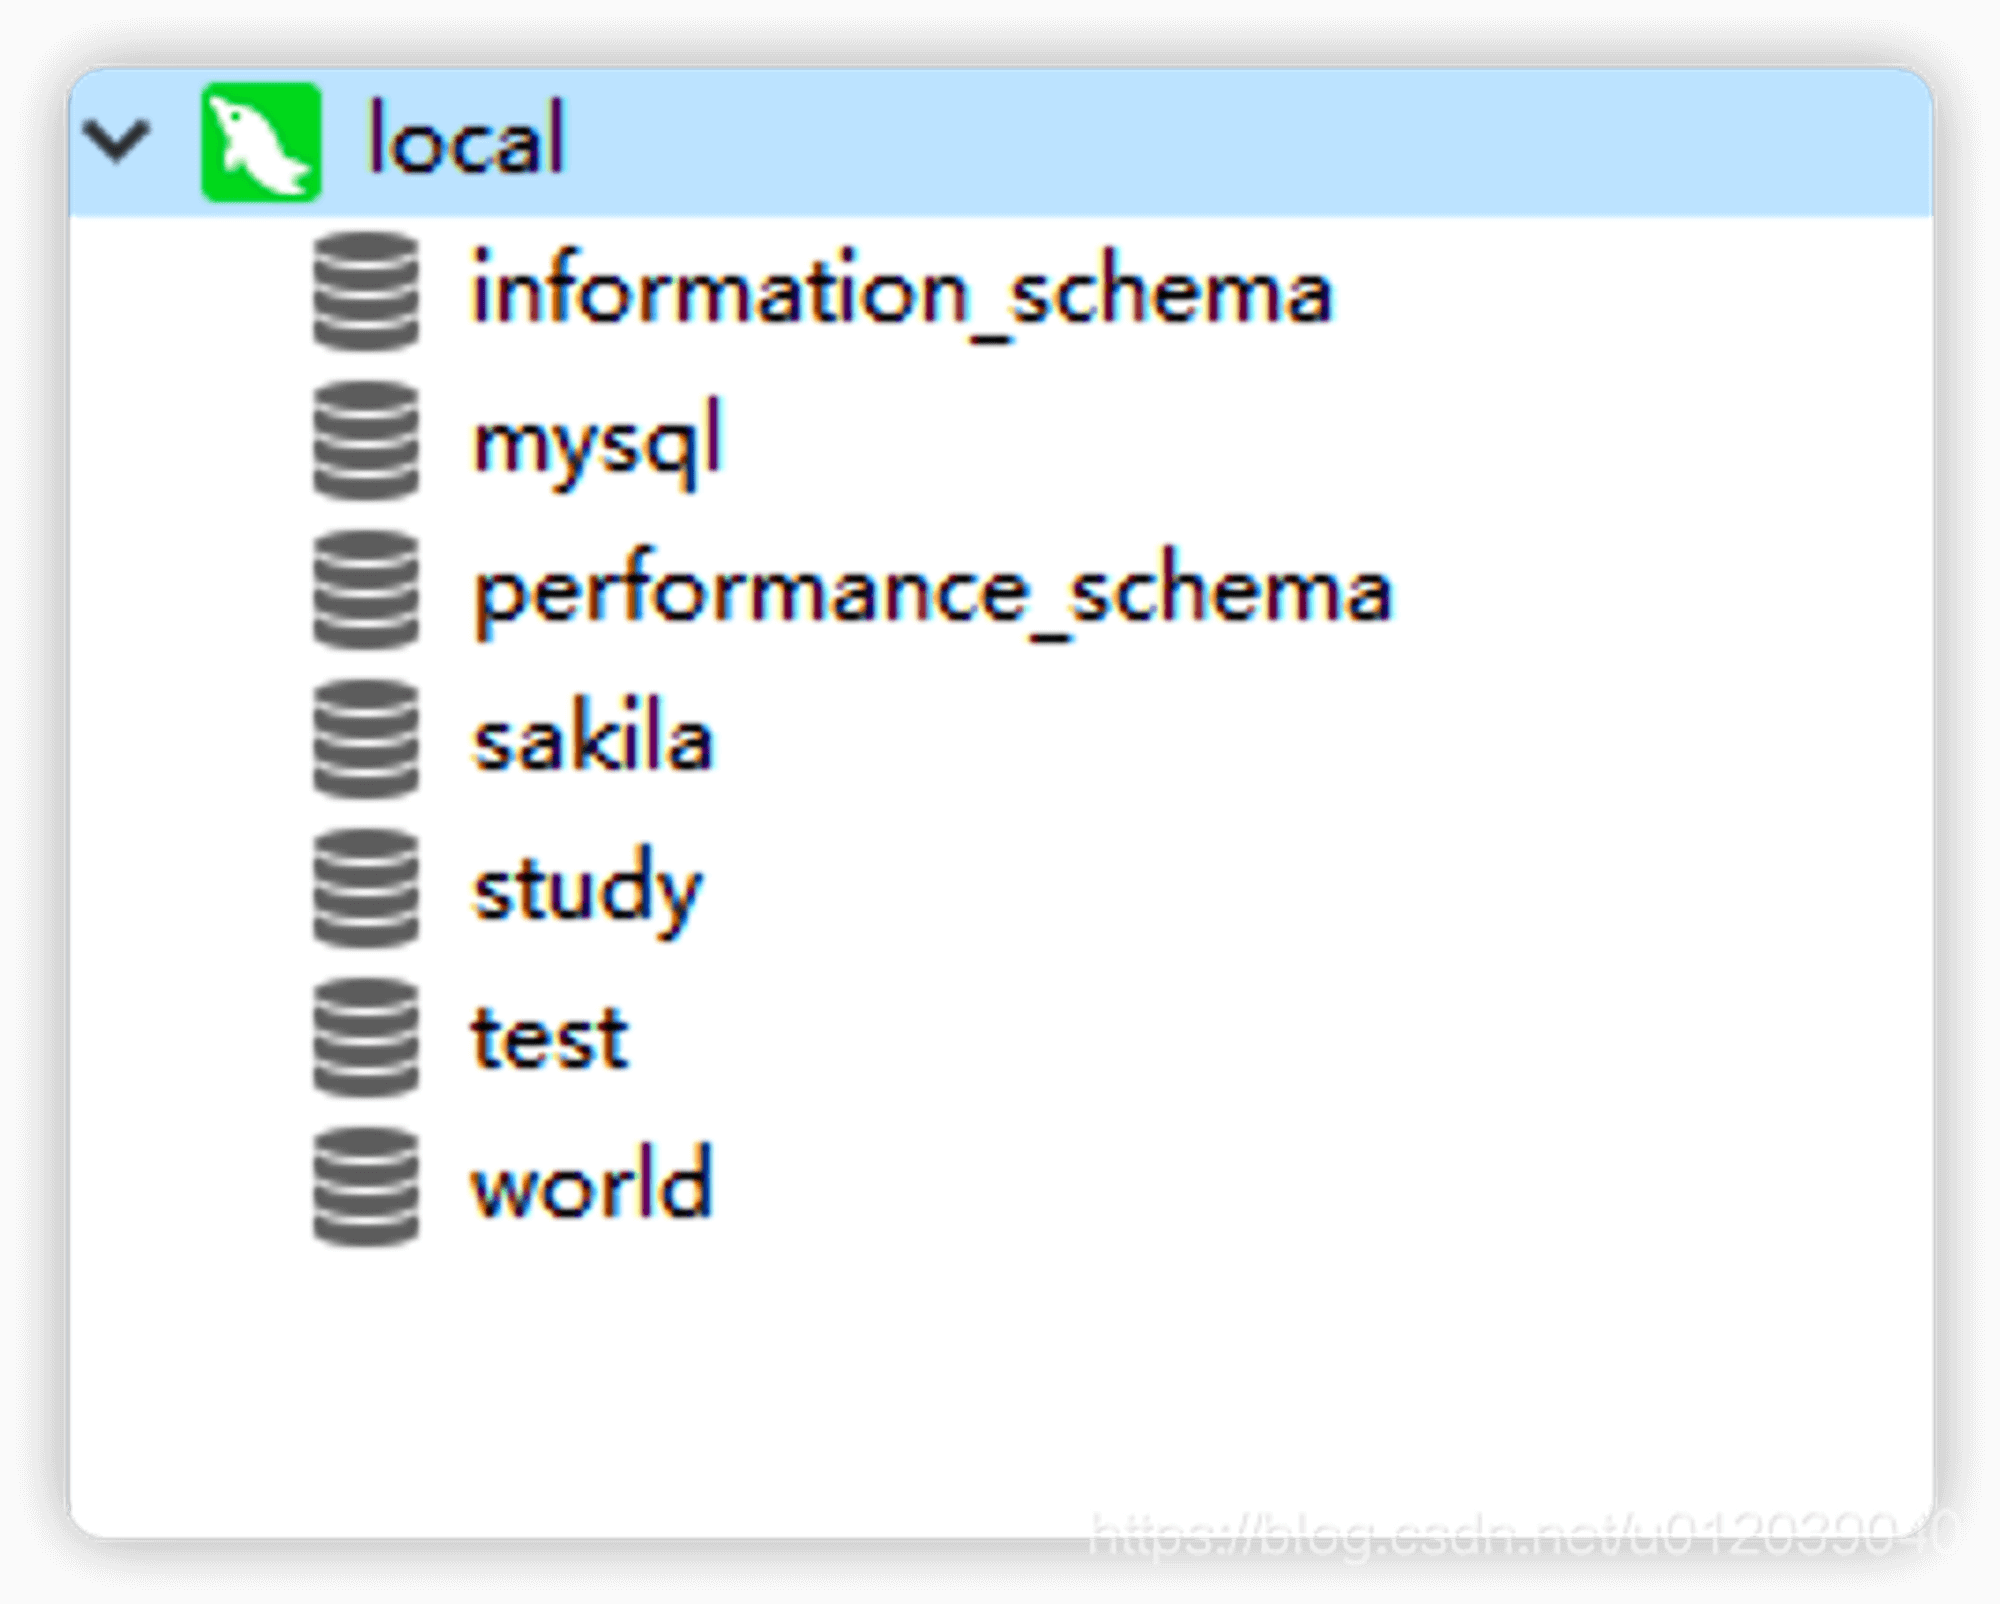
After completing the connection configuration, right-click to open the connection or double-click to connect to the database. Once connected successfully, the list of databases will be displayed (equivalent to the execution result of show databases).
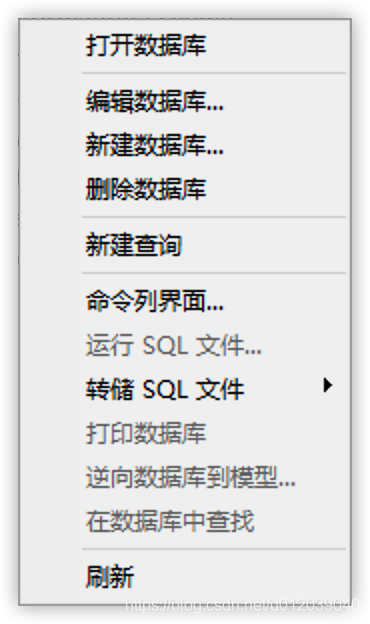
Once we connect to the database, all operations we perform will directly affect the database, so we must be careful when operating to avoid accidentally causing issues. Right-clicking on one of the databases will show the following menu: functions such as running SQL files, dumping SQL files, and printing databases must be used after connecting and will be introduced in other articles.
- Open Database
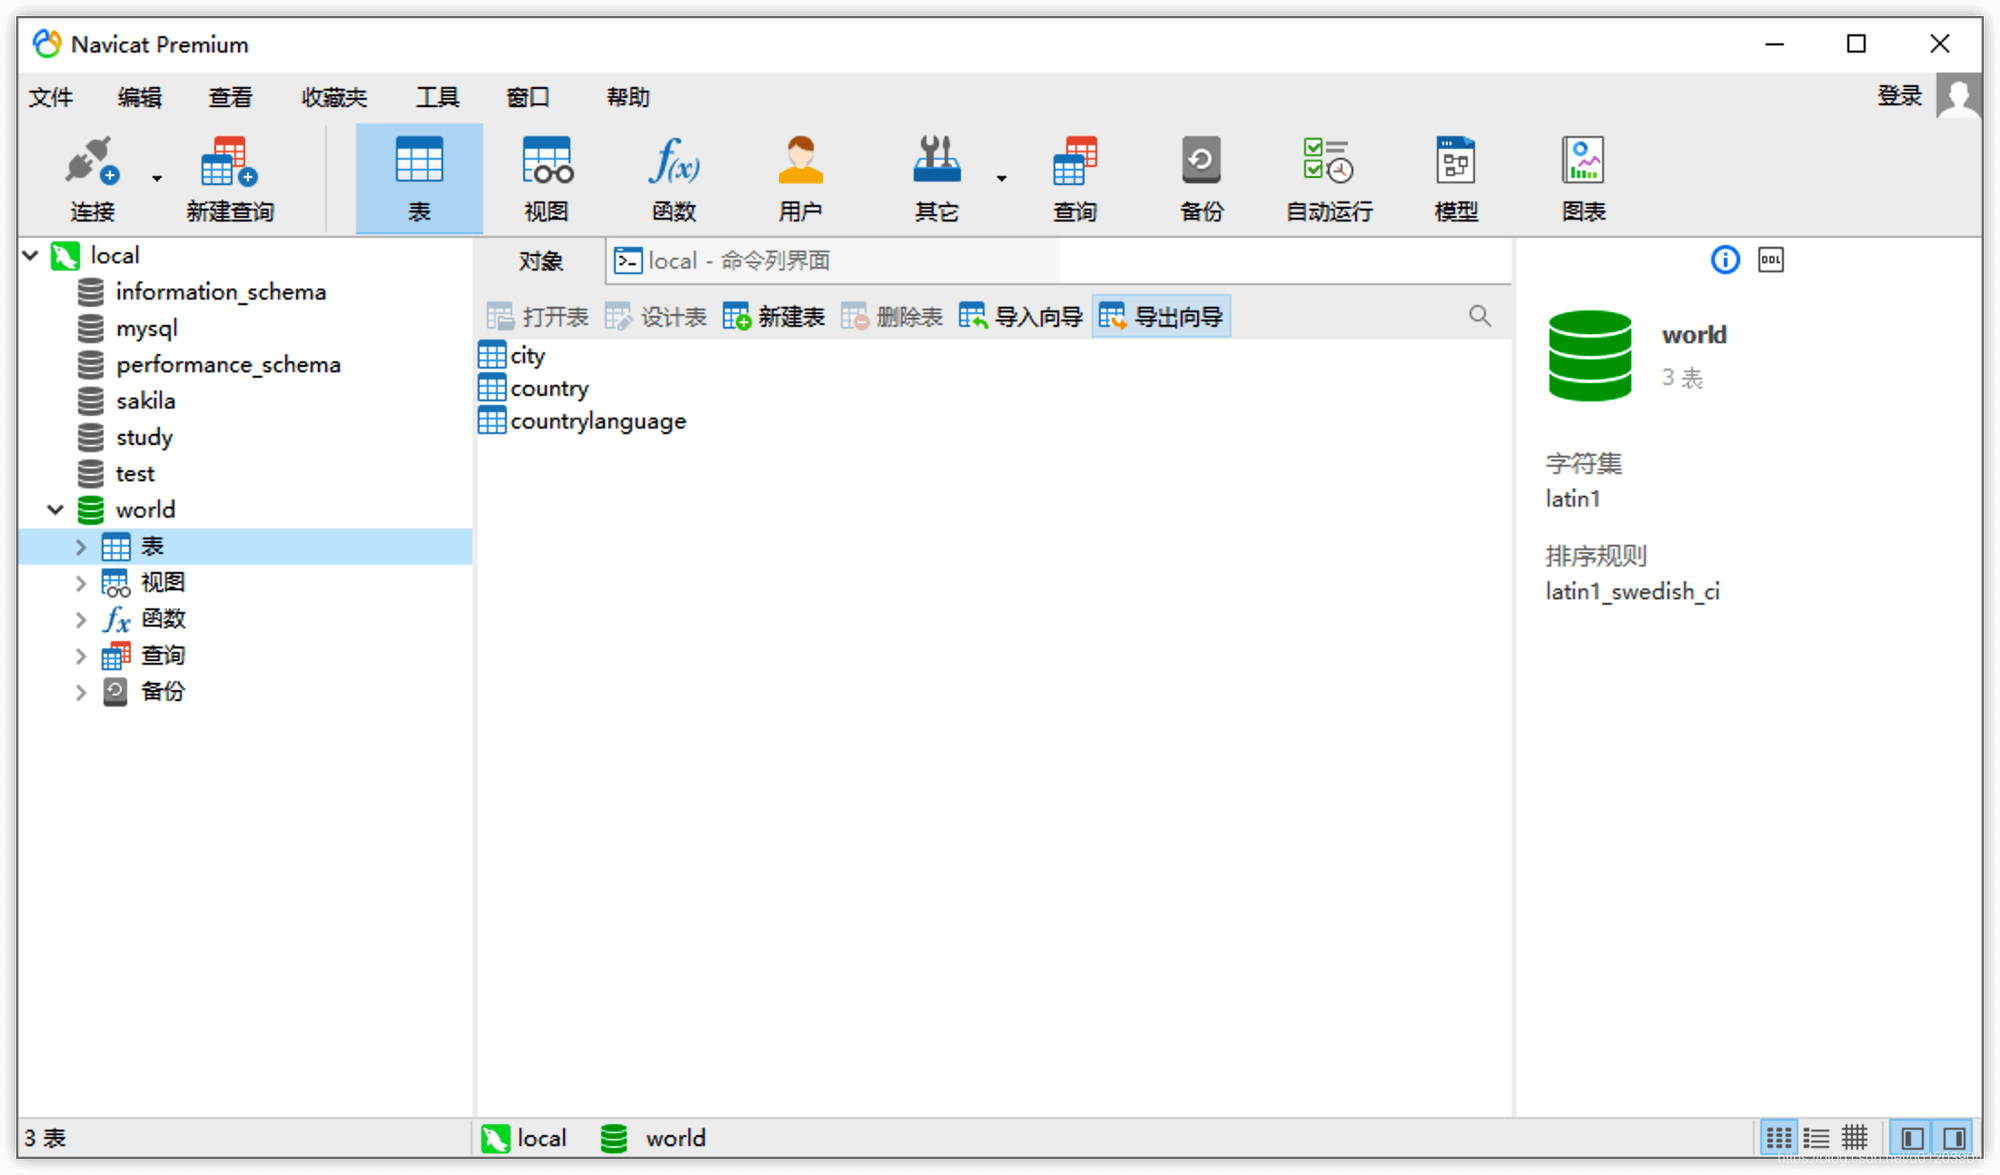
To open a specific database, simply double-click it or right-click and select open, and then you will see the list of tables (equivalent to the execution result of show tables).
- Create New Database
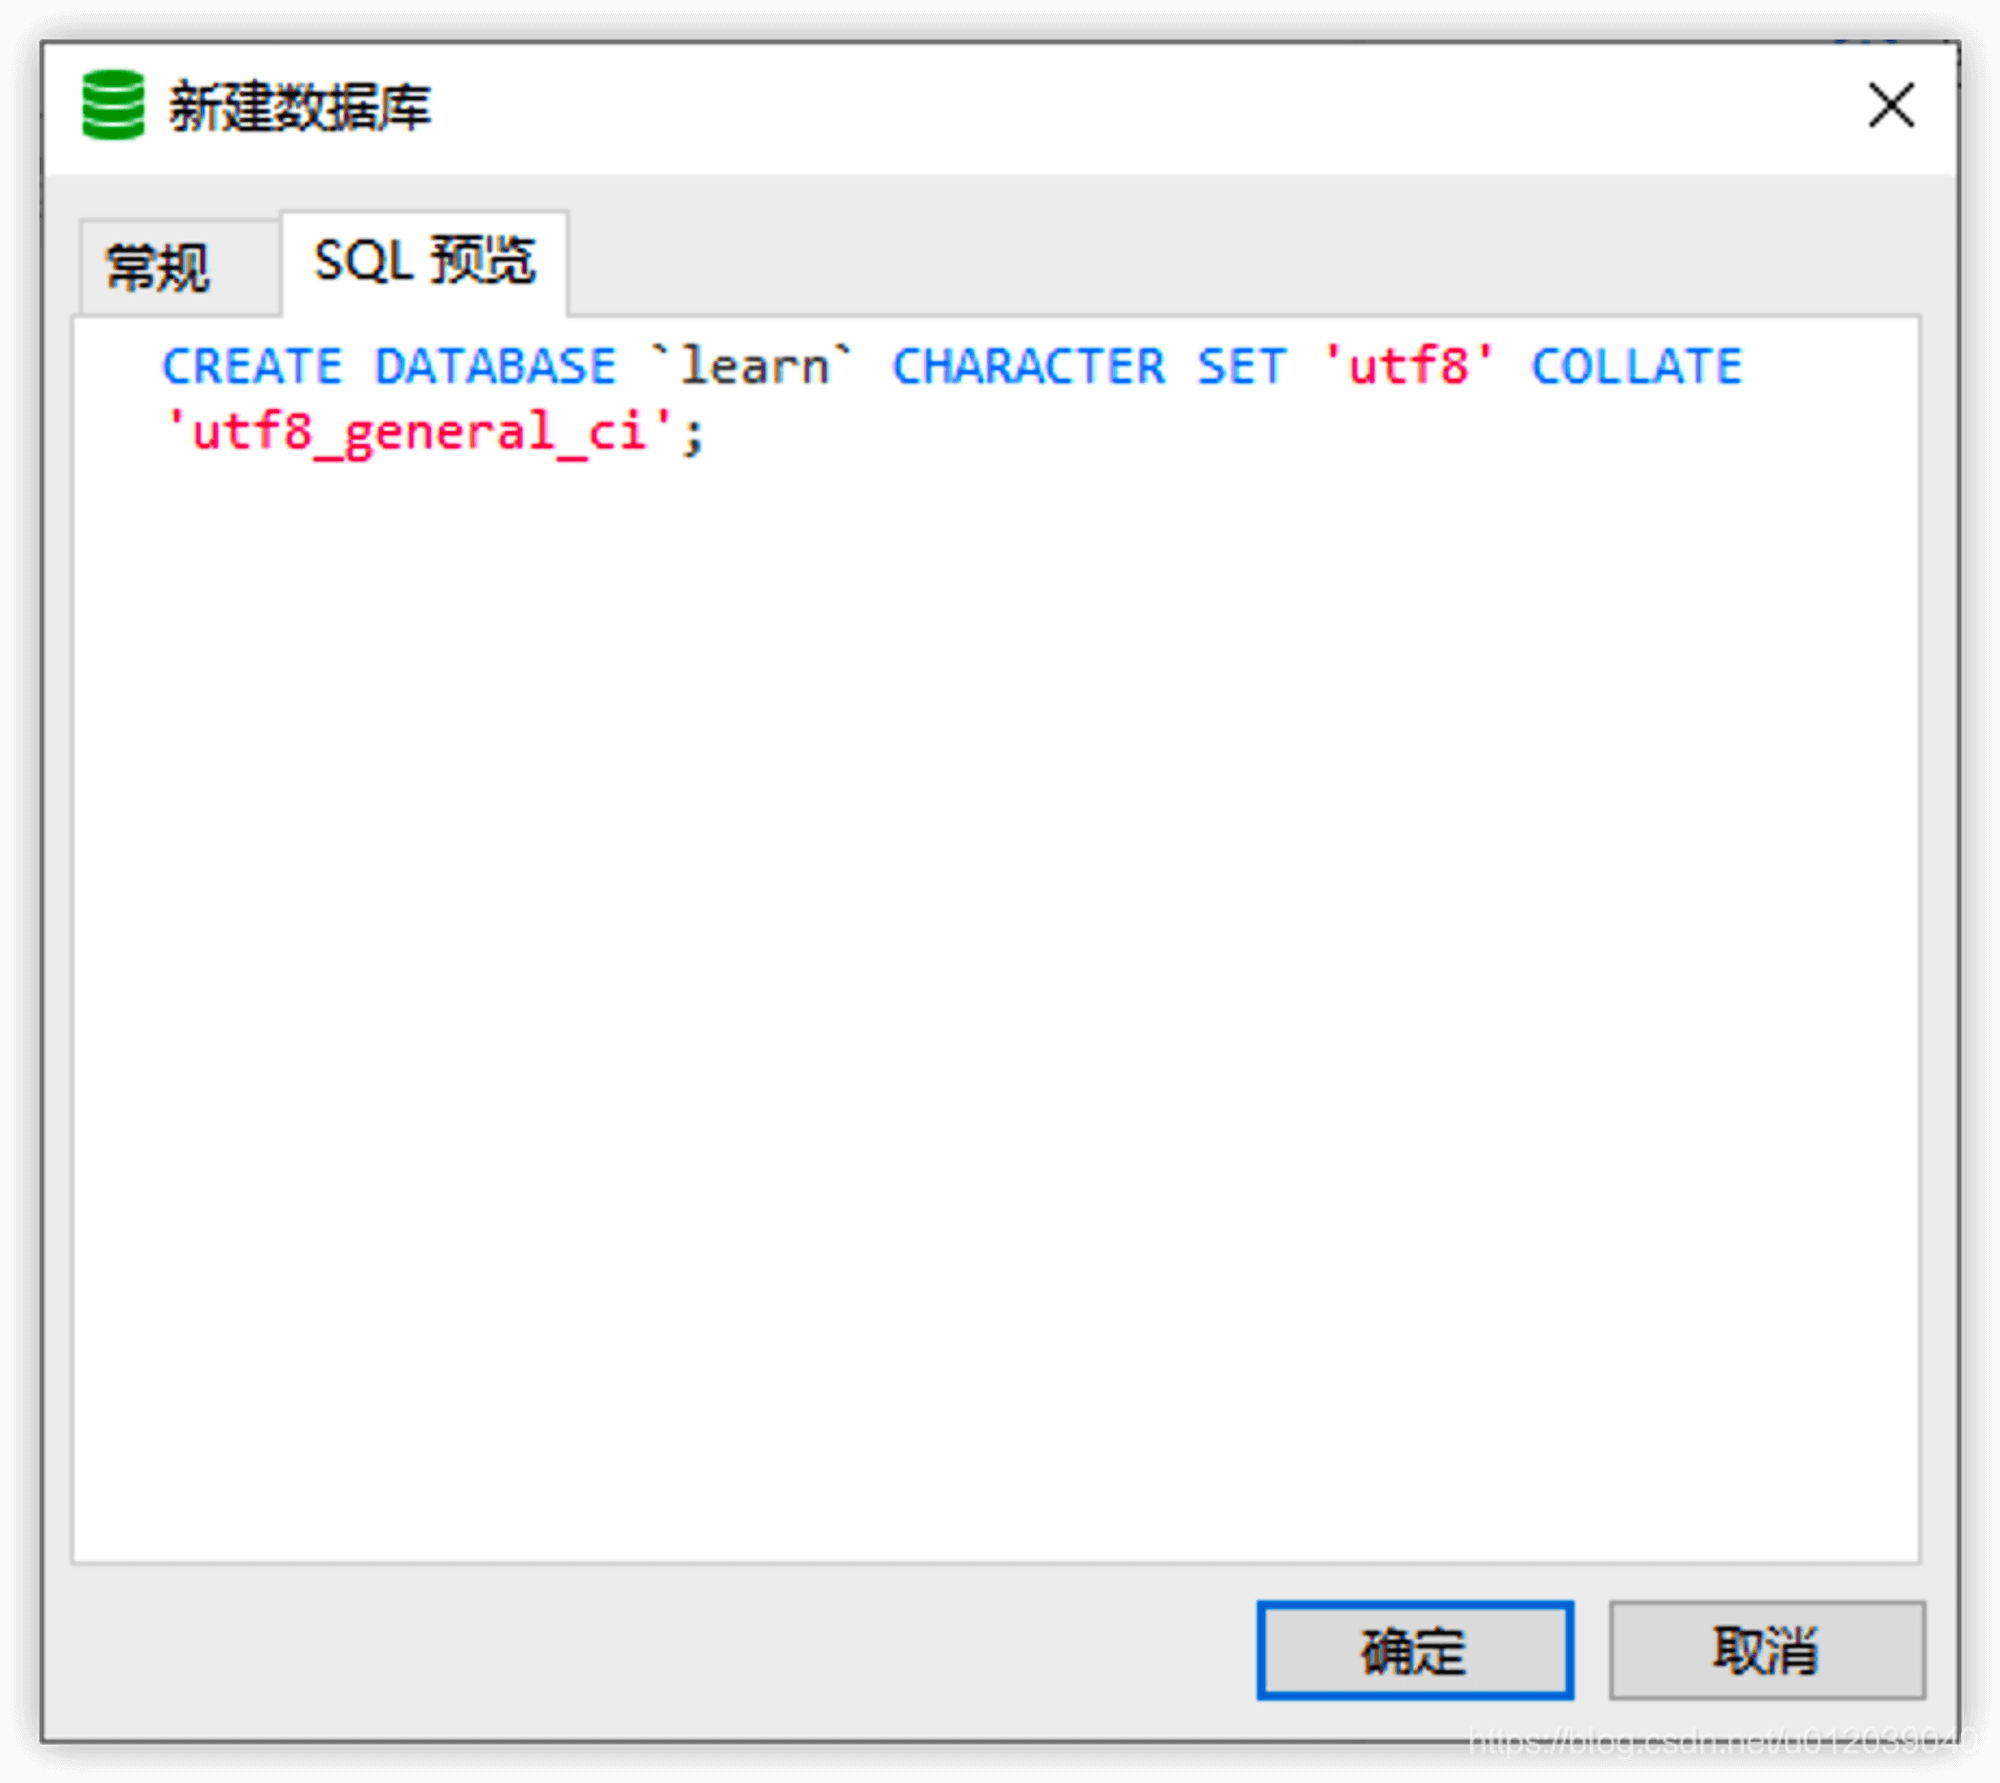
When creating a new database, three pieces of information need to be filled in: database name, character set (corresponding to CHARACTER SET), and collation (corresponding to COLLATE). We can also click SQL preview to see the complete statement.
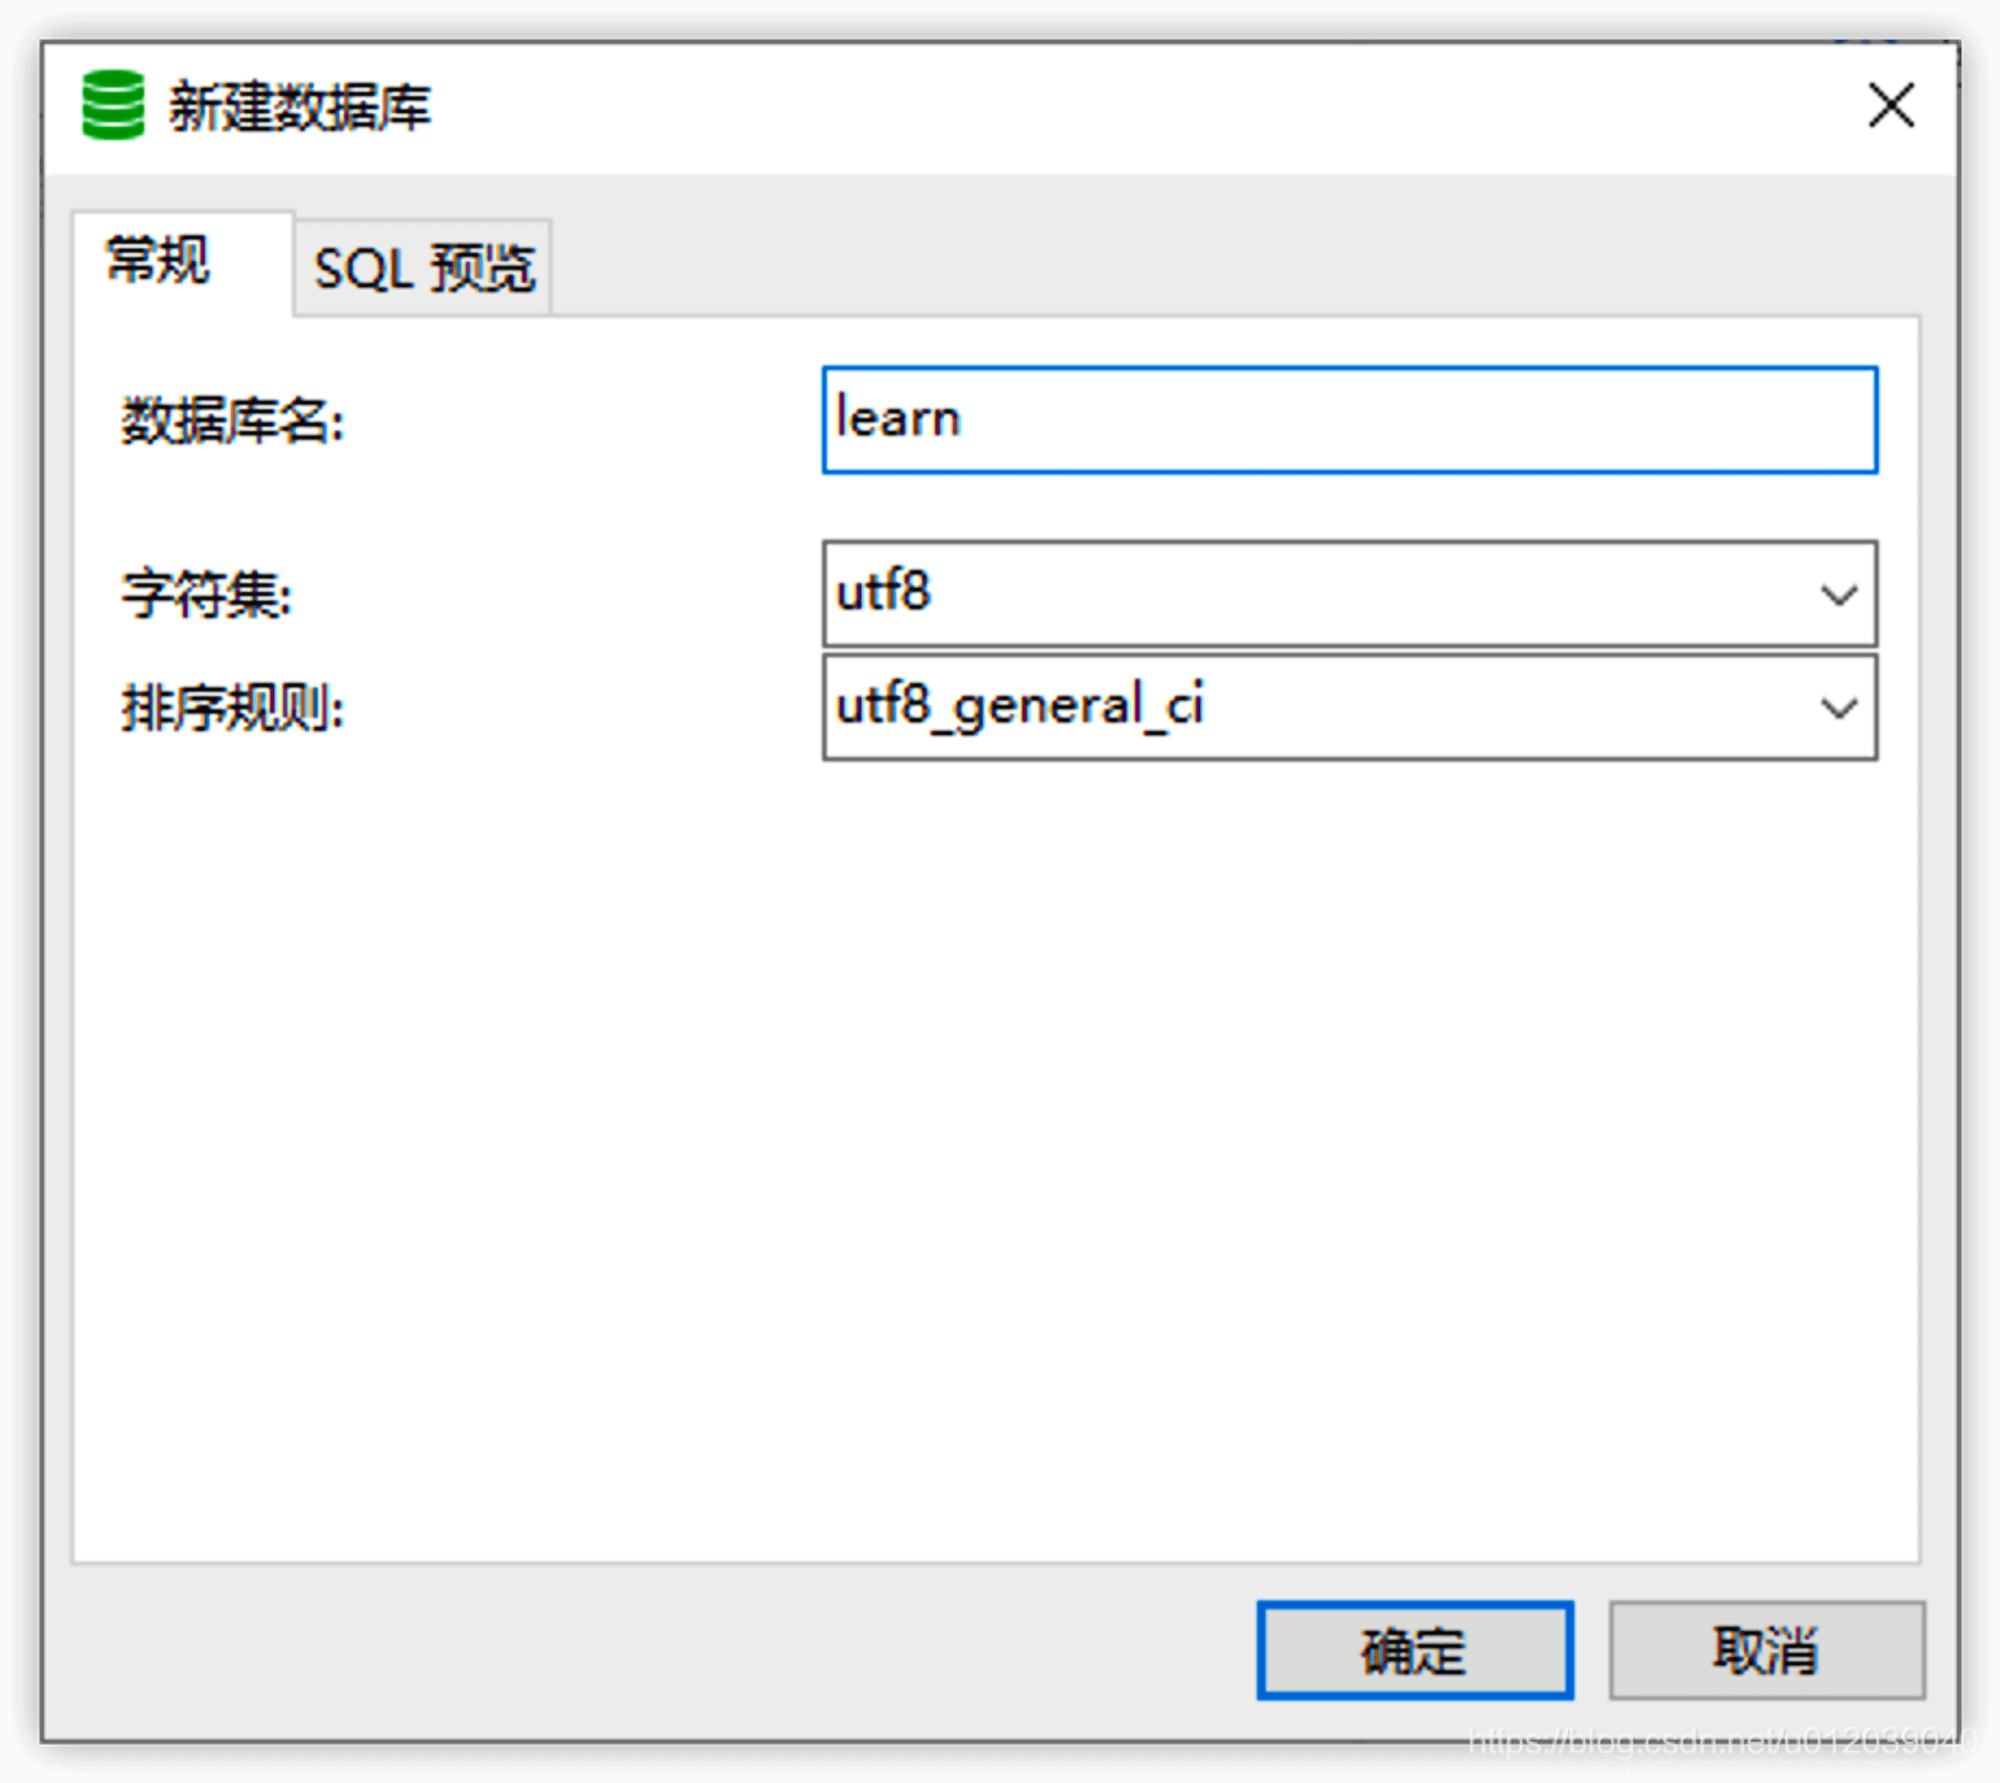
The character set mainly determines the types of characters supported by the database and will also serve as the default character set configuration for tables. The collation mainly determines the rules for storing and querying data, such as whether it is case-sensitive (the default collation for utf8 is utf8_general_ci).
The specific steps are as follows:
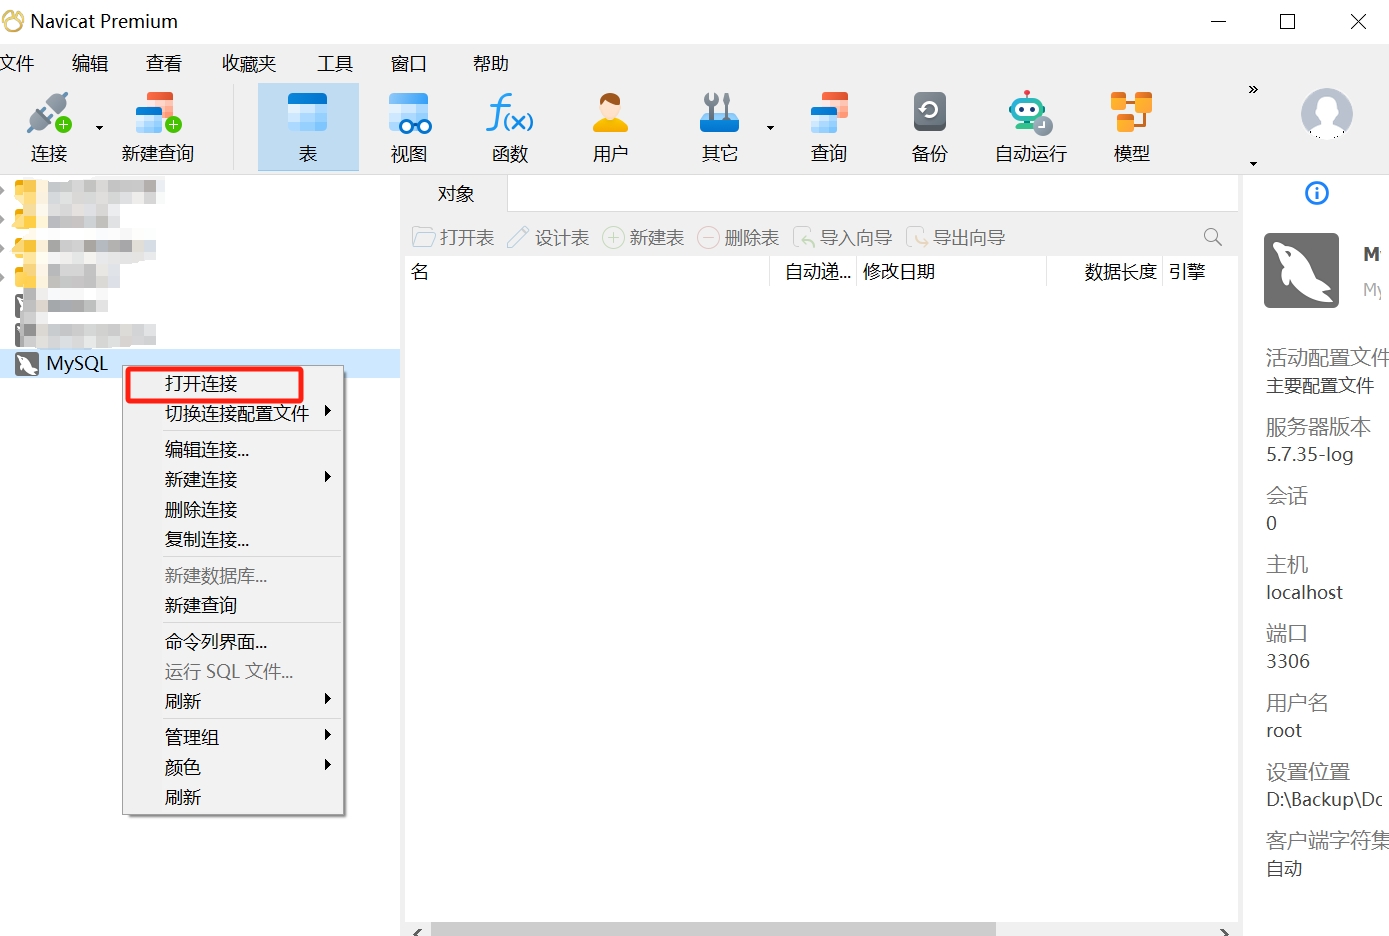
- Select the MySQL database connection you want to open, right-click, and choose "Open Connection."
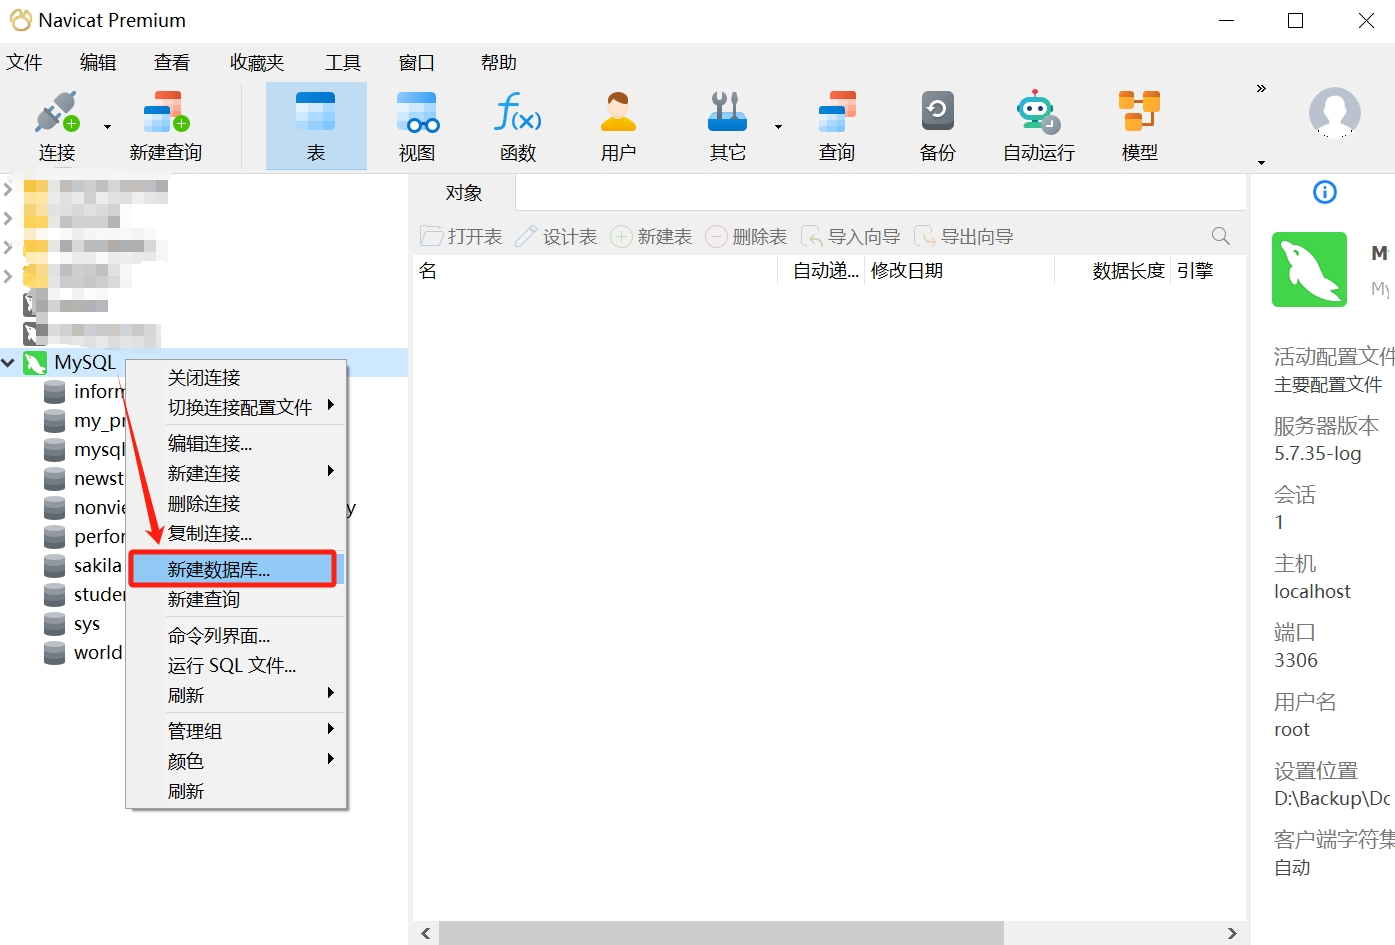
- After opening the connection, right-click and select "Create New Database."
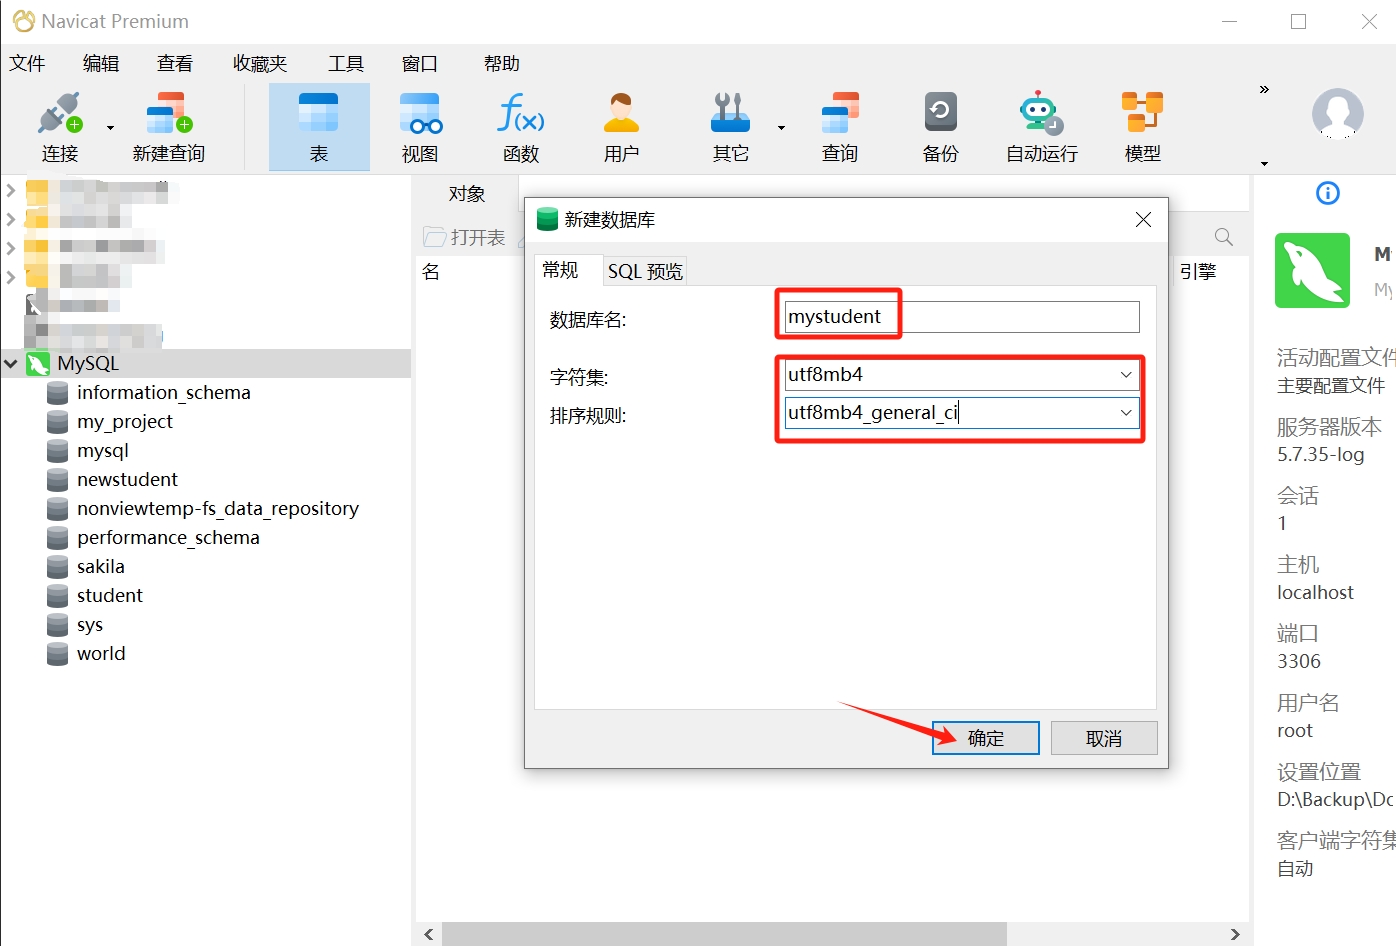
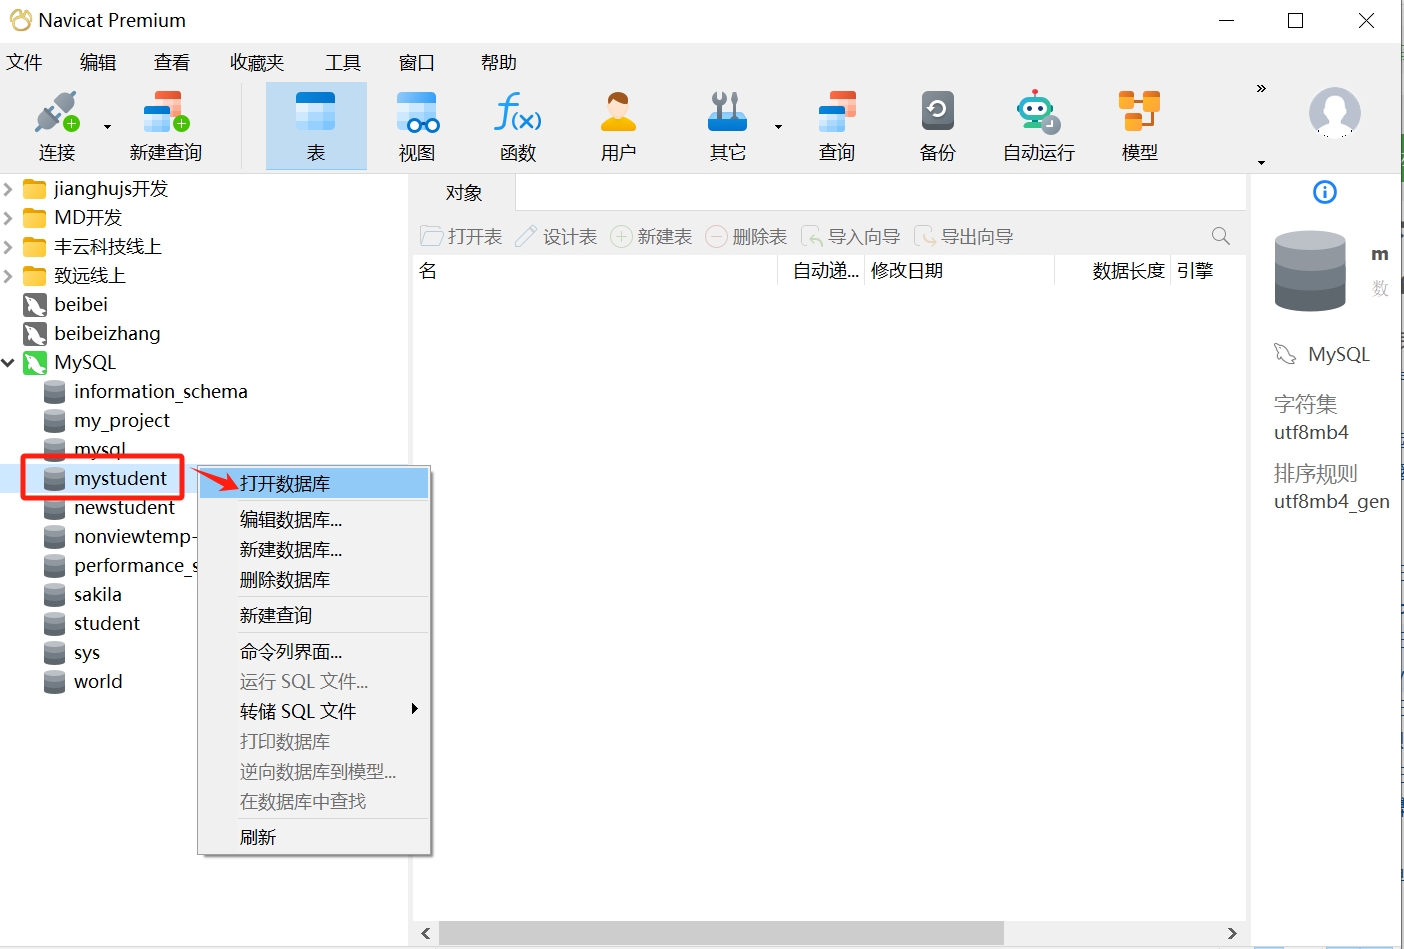
- In the pop-up dialog, enter the database name; here we take "mystudent" as an example; select "utf8mb4" in the character set dropdown, and "utf8mb4_general_ci" for collation; click "OK."
- Thus, your database is created. You can double-click "mystudent" or right-click and select "Open Database" to access it.

- Edit Database
Clicking edit database allows you to modify the character set and collation of the database. If you want to change the database name, Navicat does not support directly renaming it; you can use the data transfer function to achieve this.
For example, if there is an existing database named database1 that needs to be renamed to database2, the steps are as follows: click: Tools -> Data Transfer:
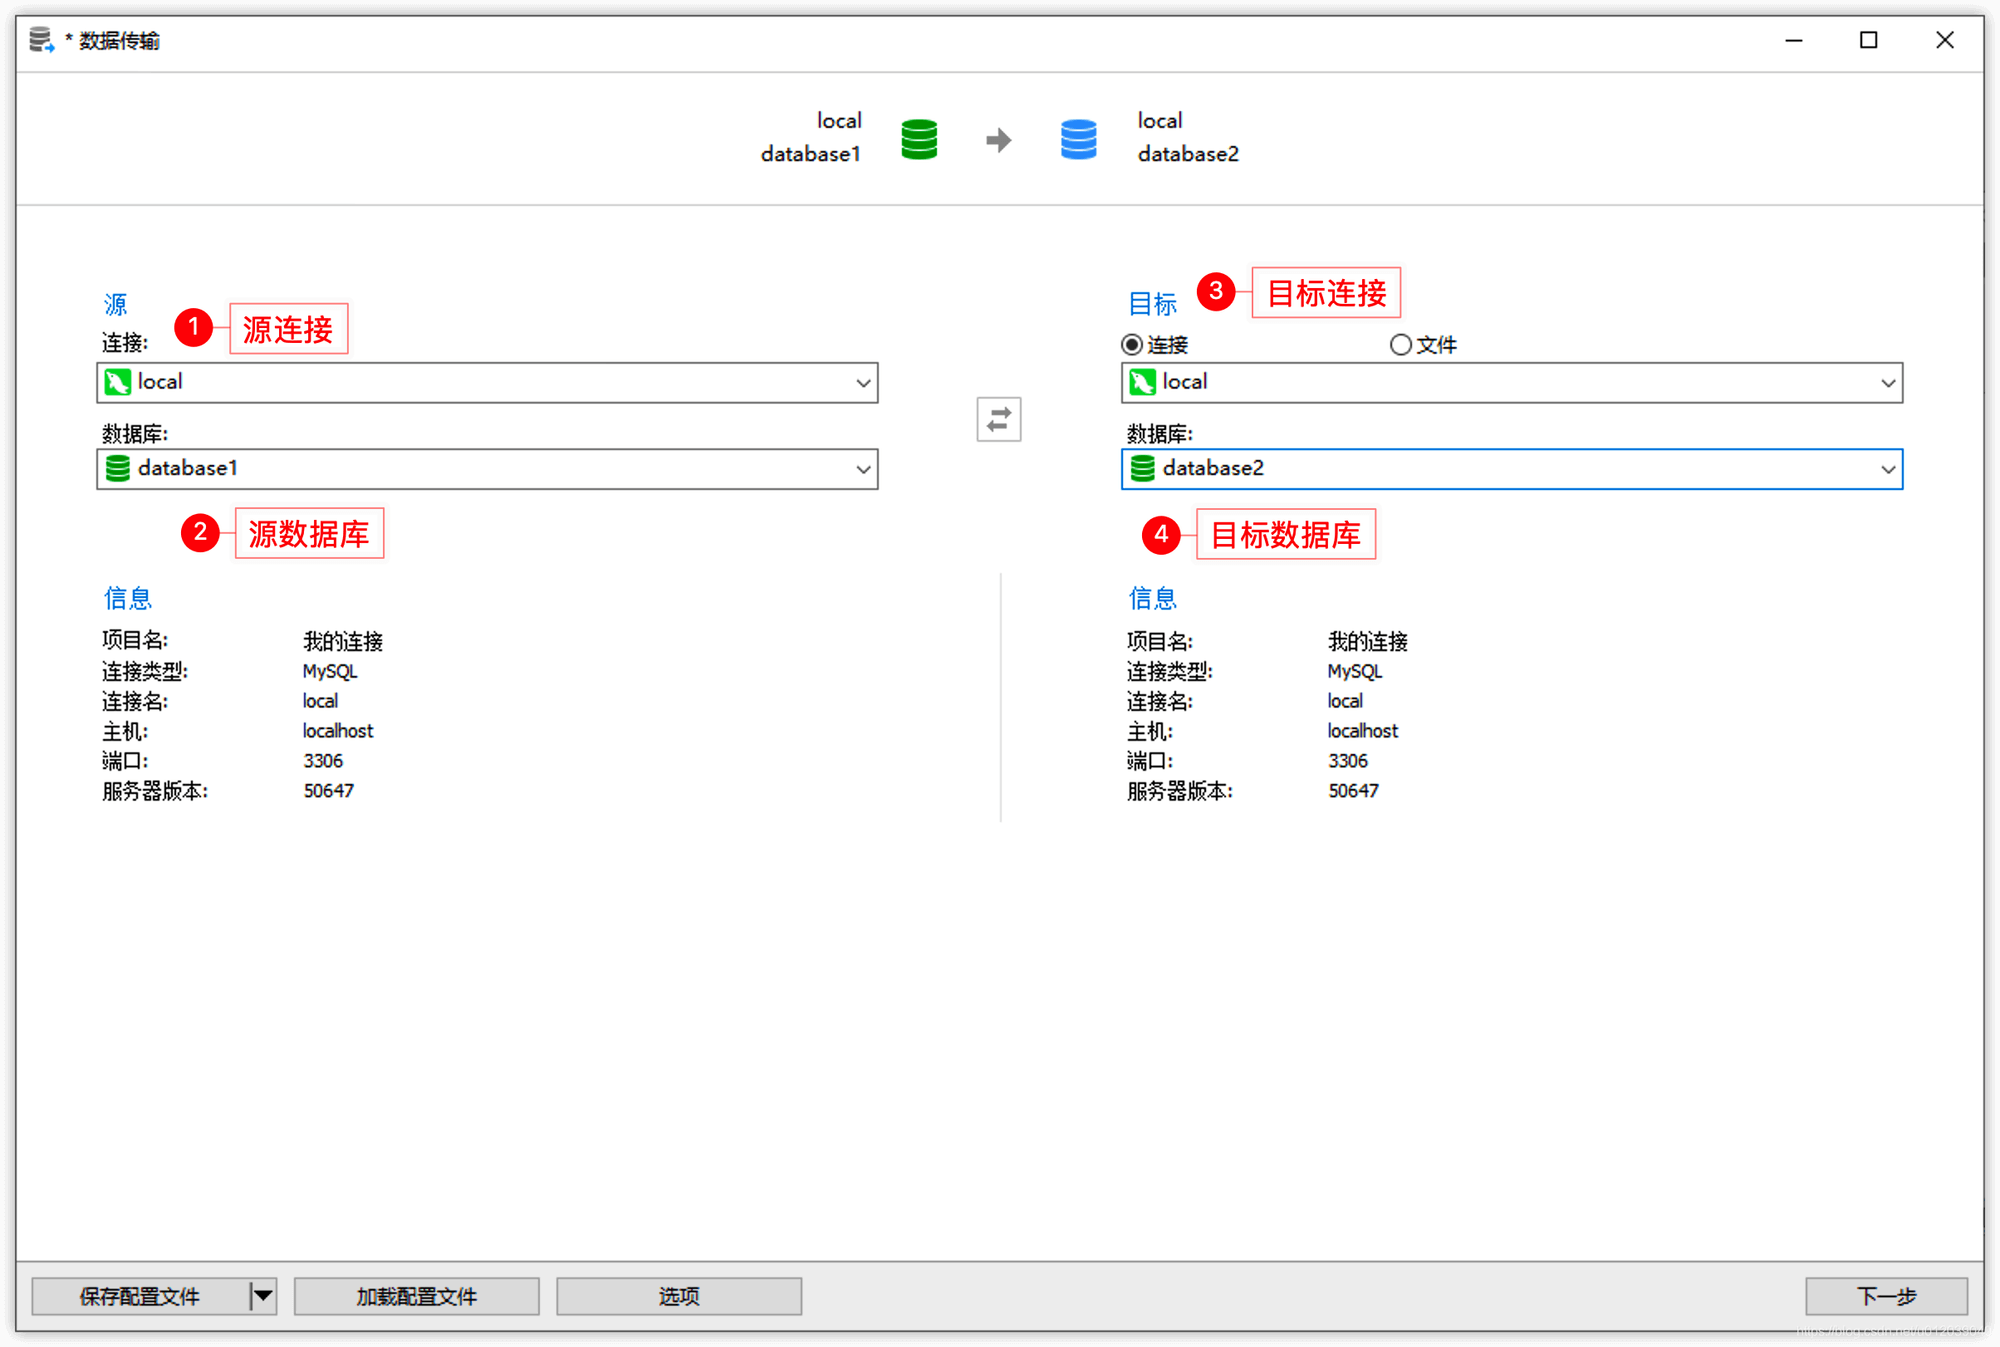
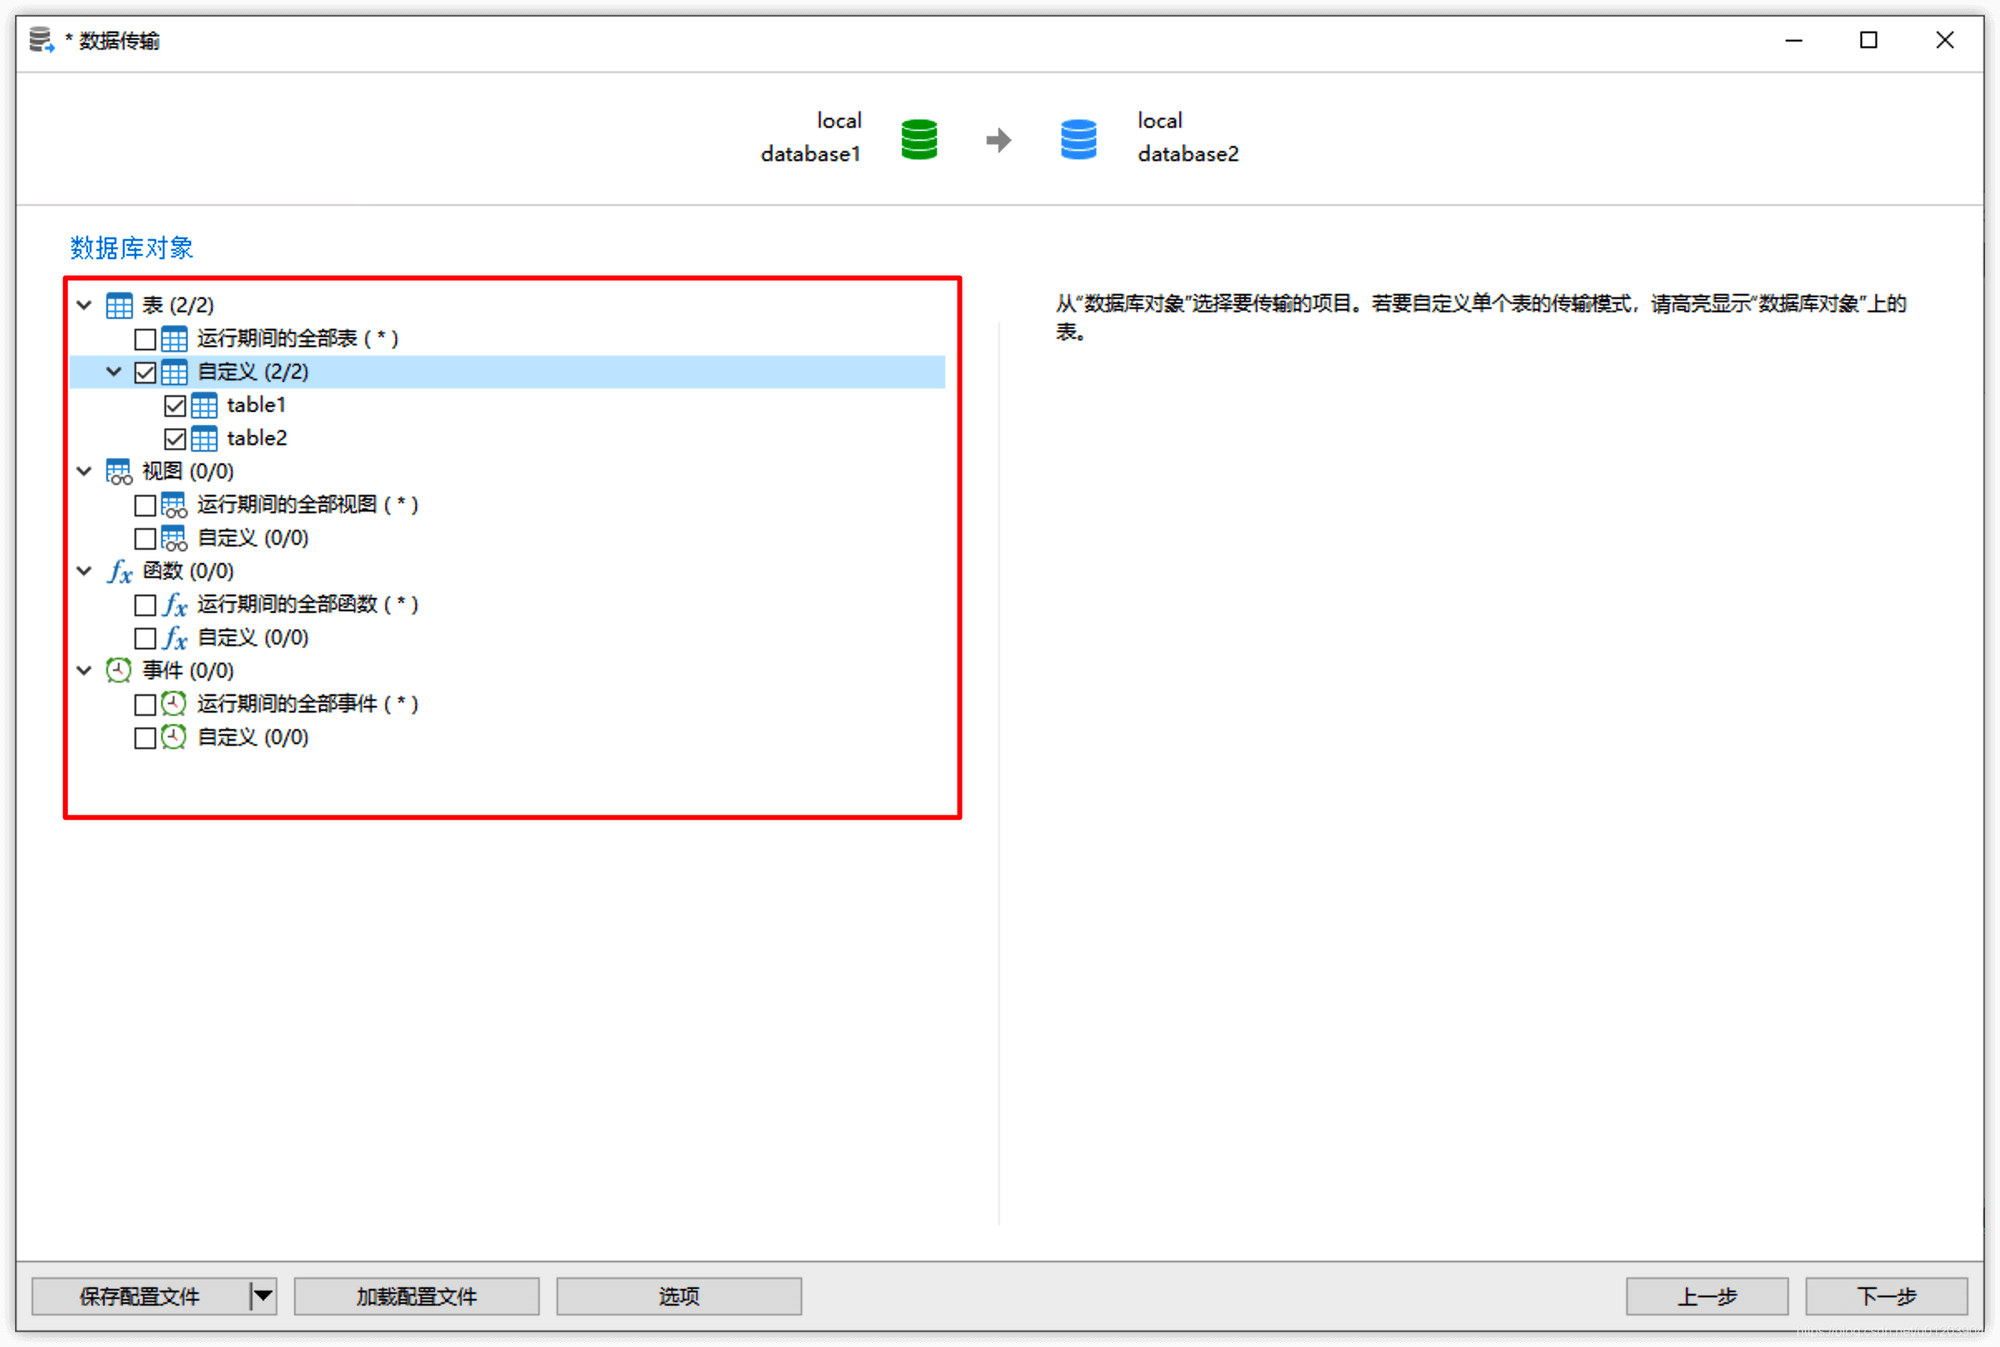
Select all or the required database objects:
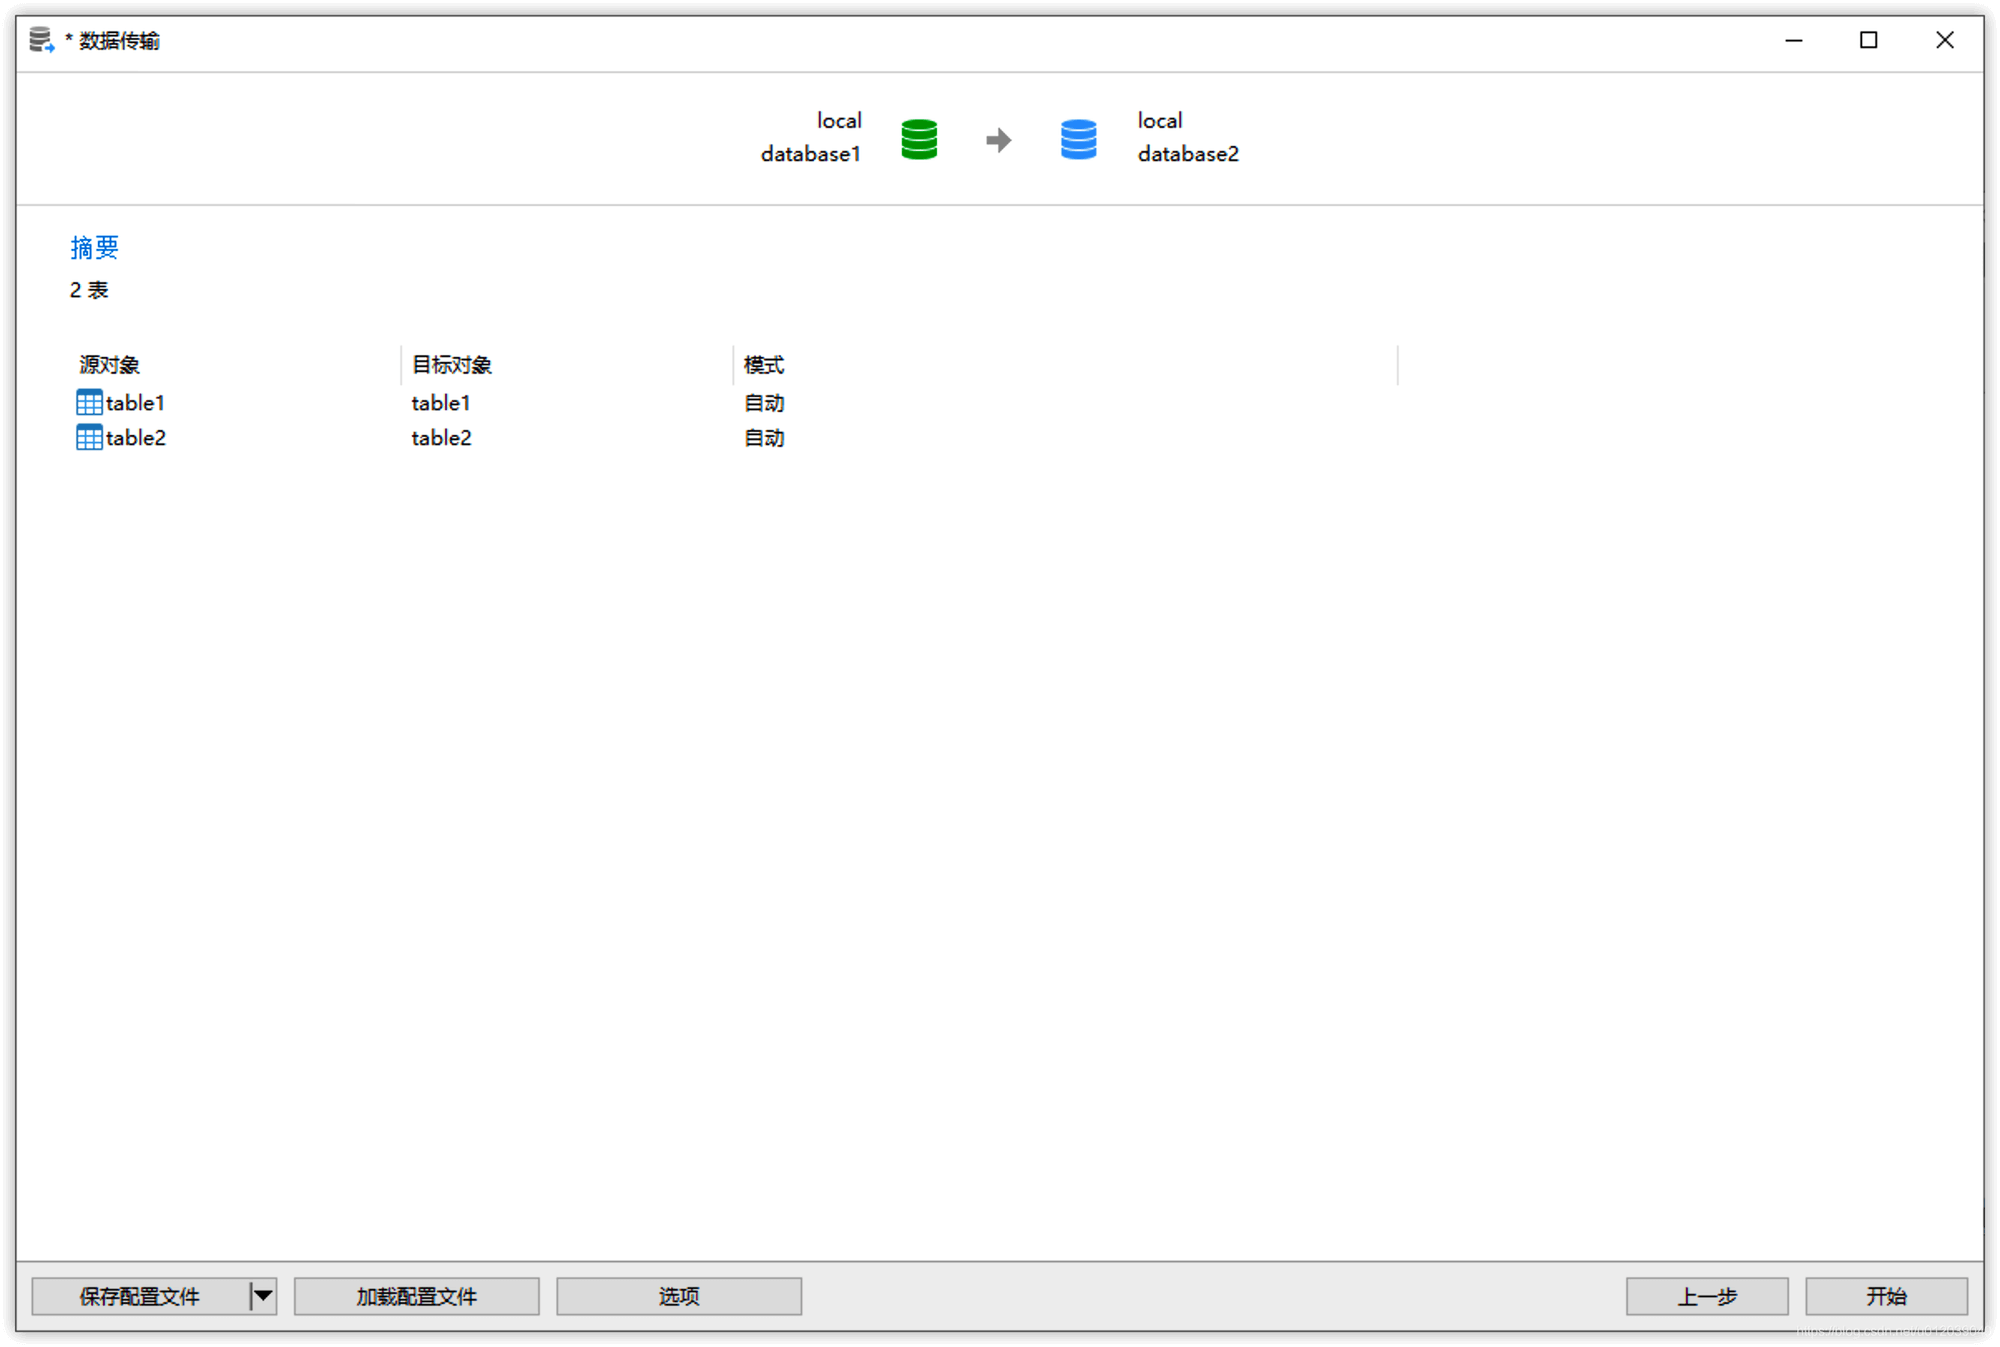
Click the Start button:
Click the Close button to finish:
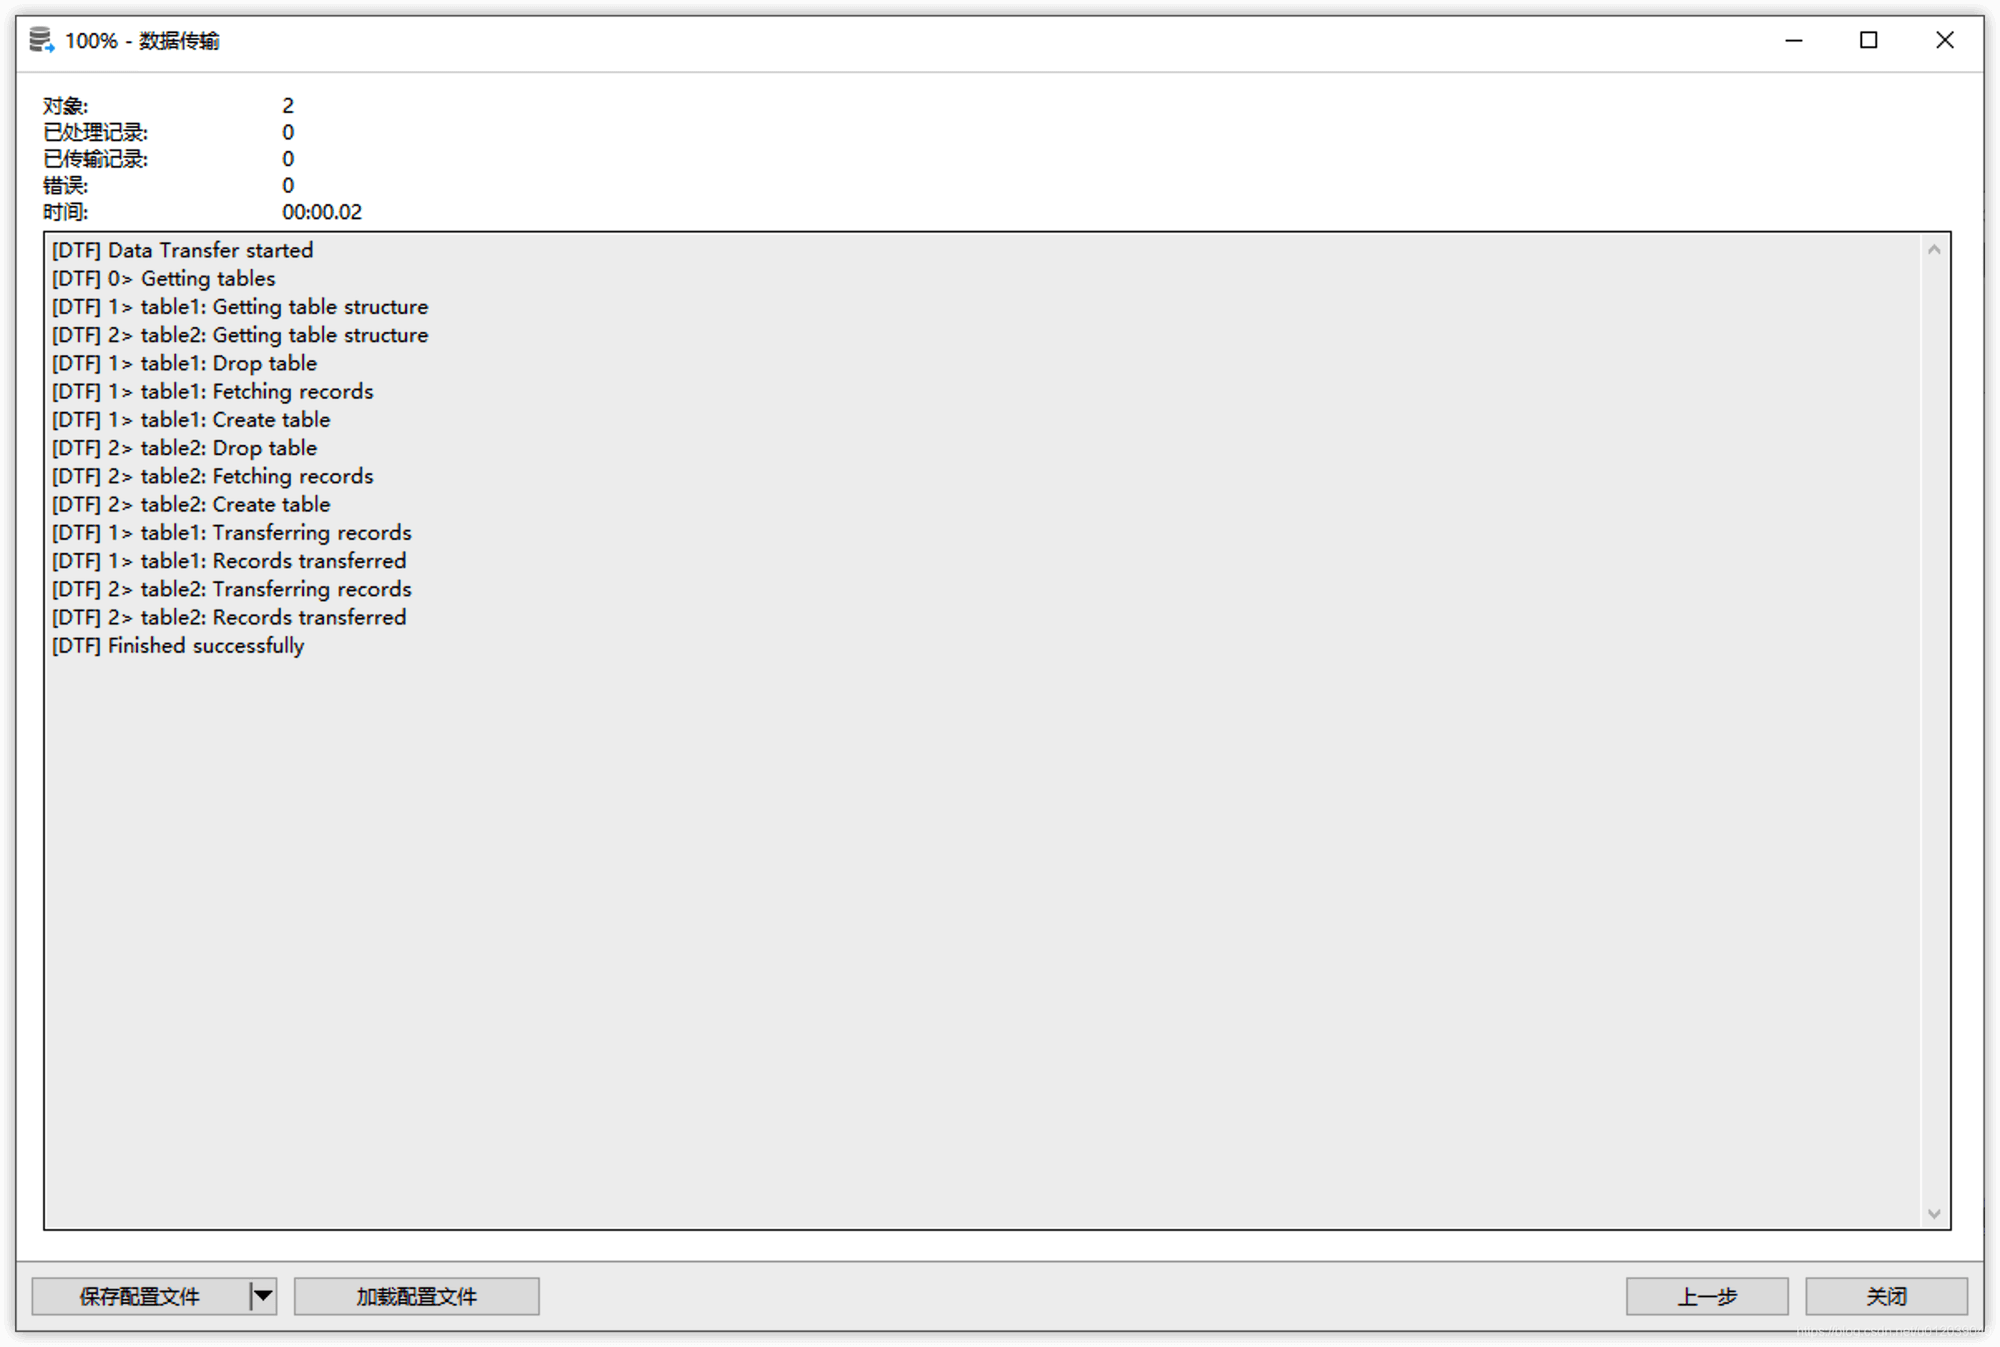
After the transfer is complete, delete database1 to complete the renaming of the database (some other tools provide the functionality to rename databases directly).
- Delete Database
Clicking delete database will remove the database, including all its objects (tables, views, etc.), so please be very careful.
4. Create New Table
After opening a database, click on the object toolbar: Create Table
After completing the field settings, click the save button, fill in the table name, and the table will be created, subsequently appearing in the object window.
The specific steps are as follows:
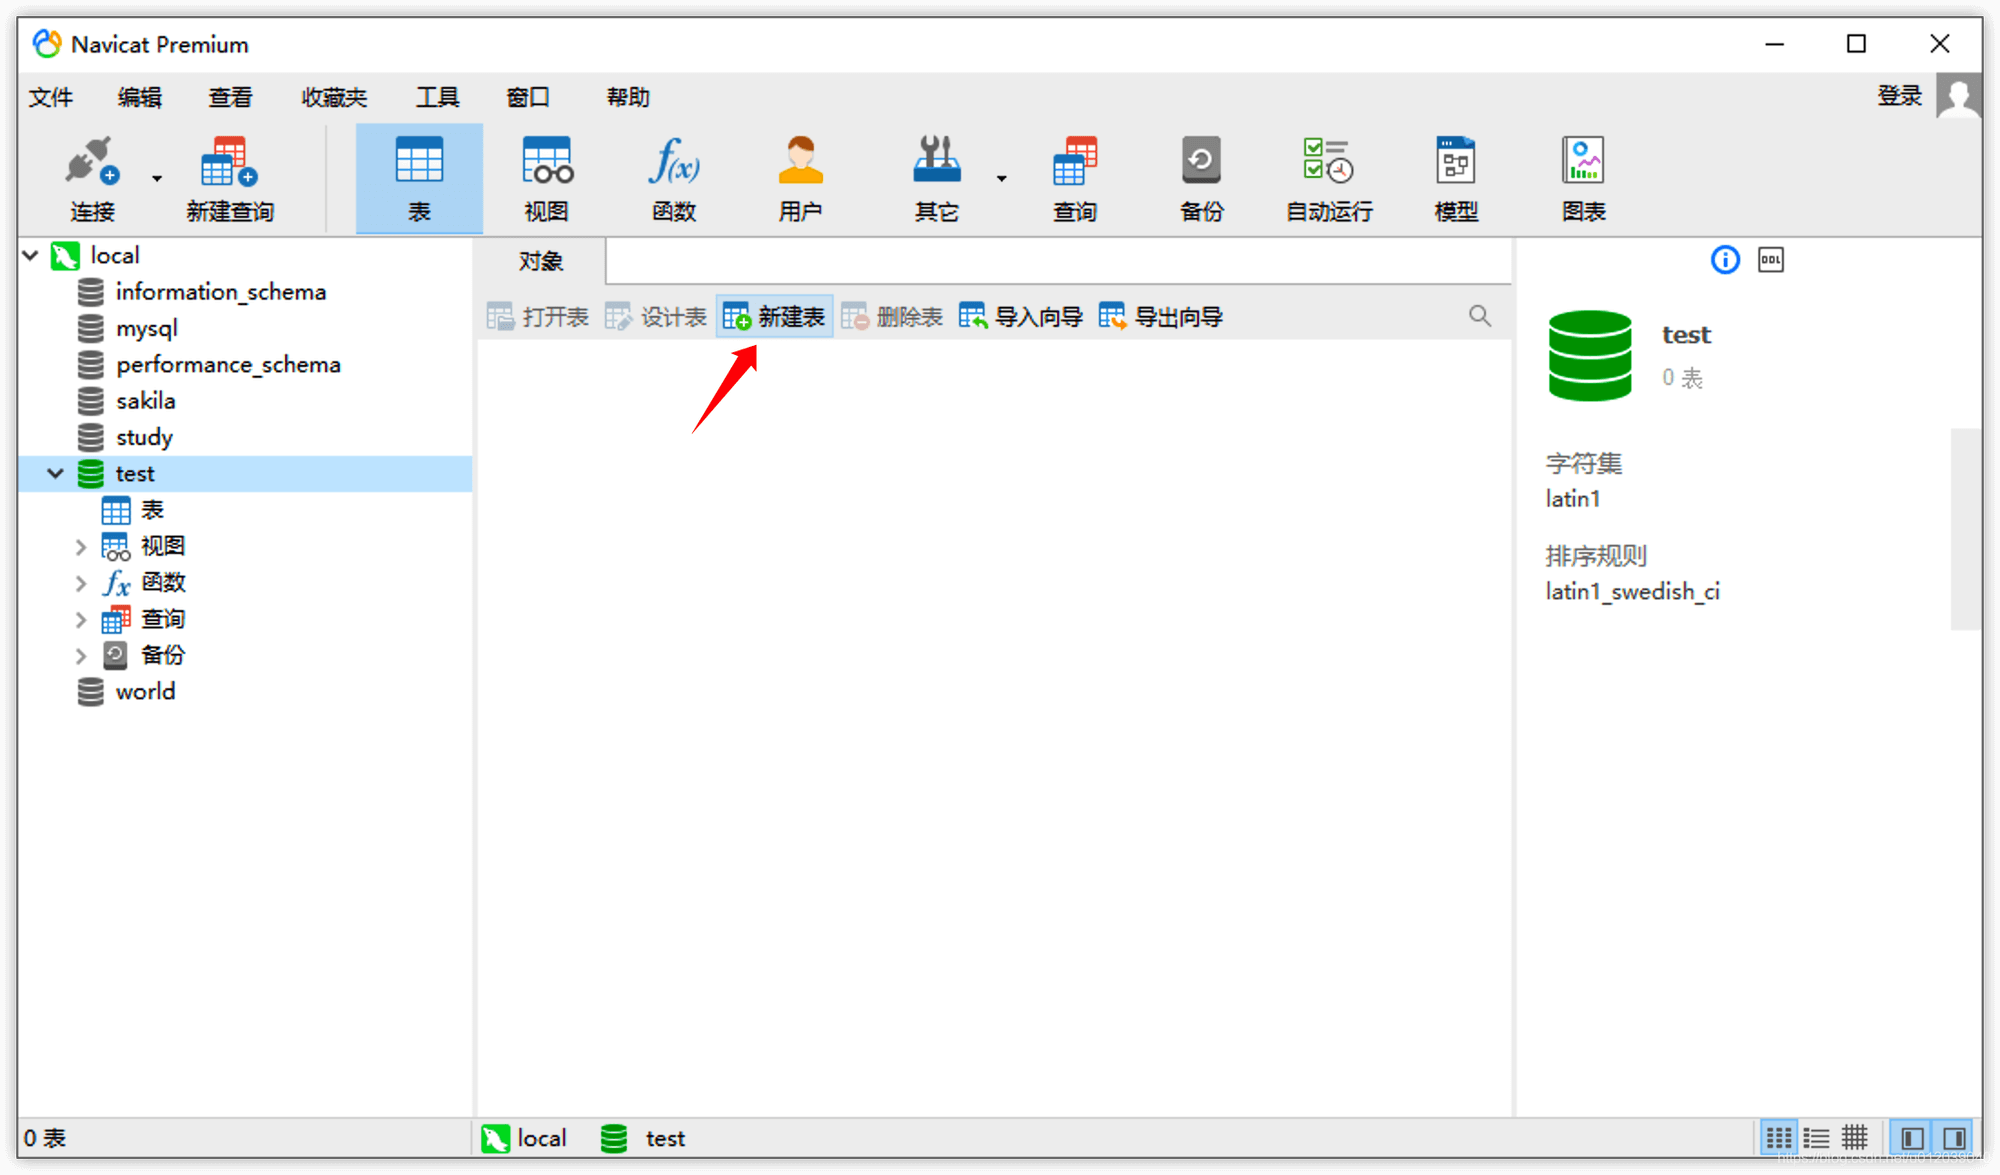
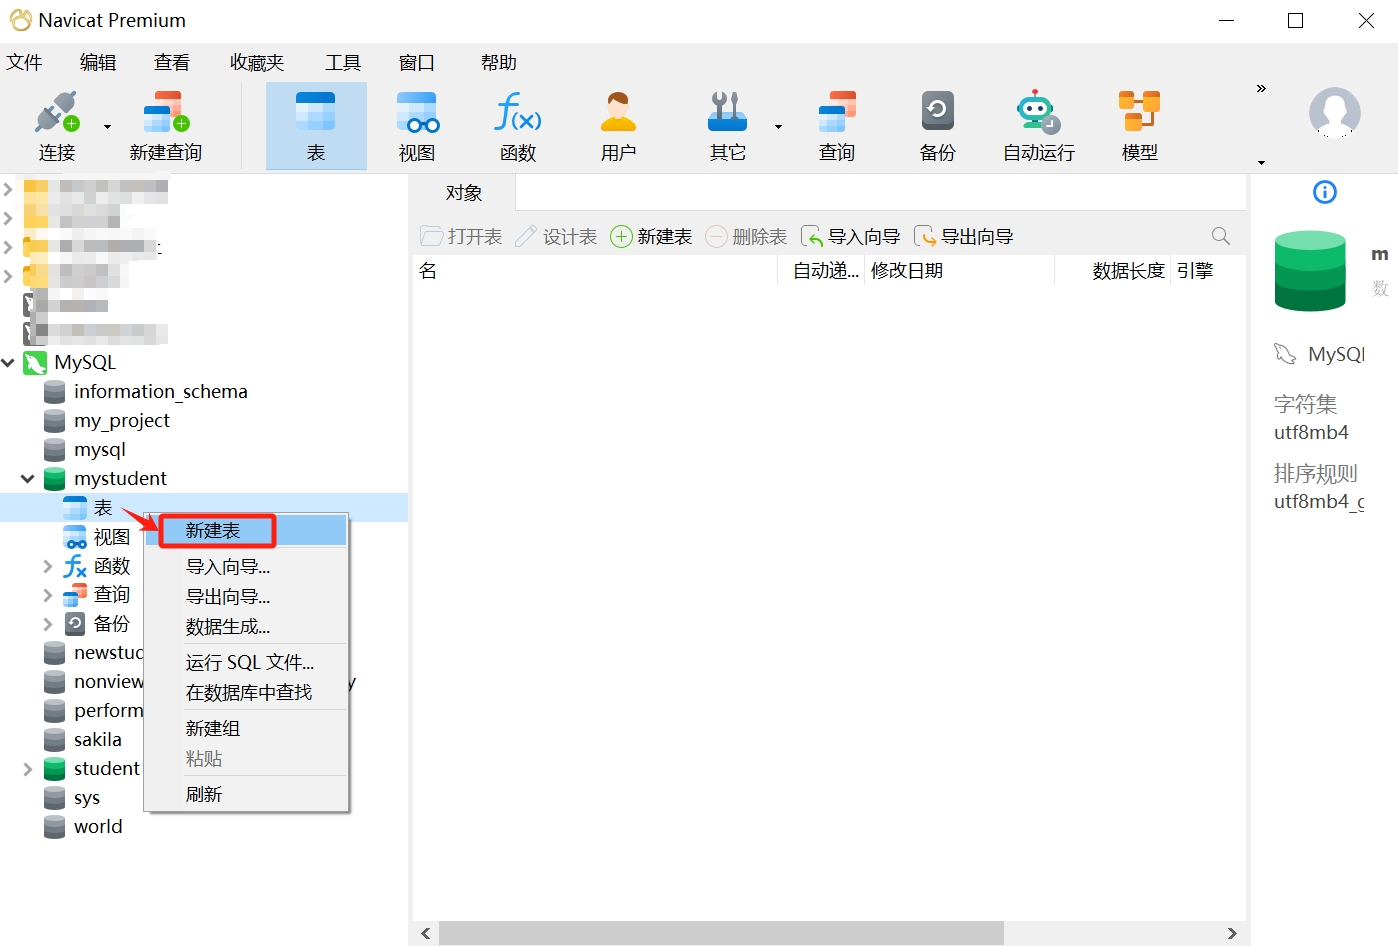
- First, select the database in which you want to create the table; we choose the newly created database "mystudent," select "Tables," right-click, and choose "Create Table."
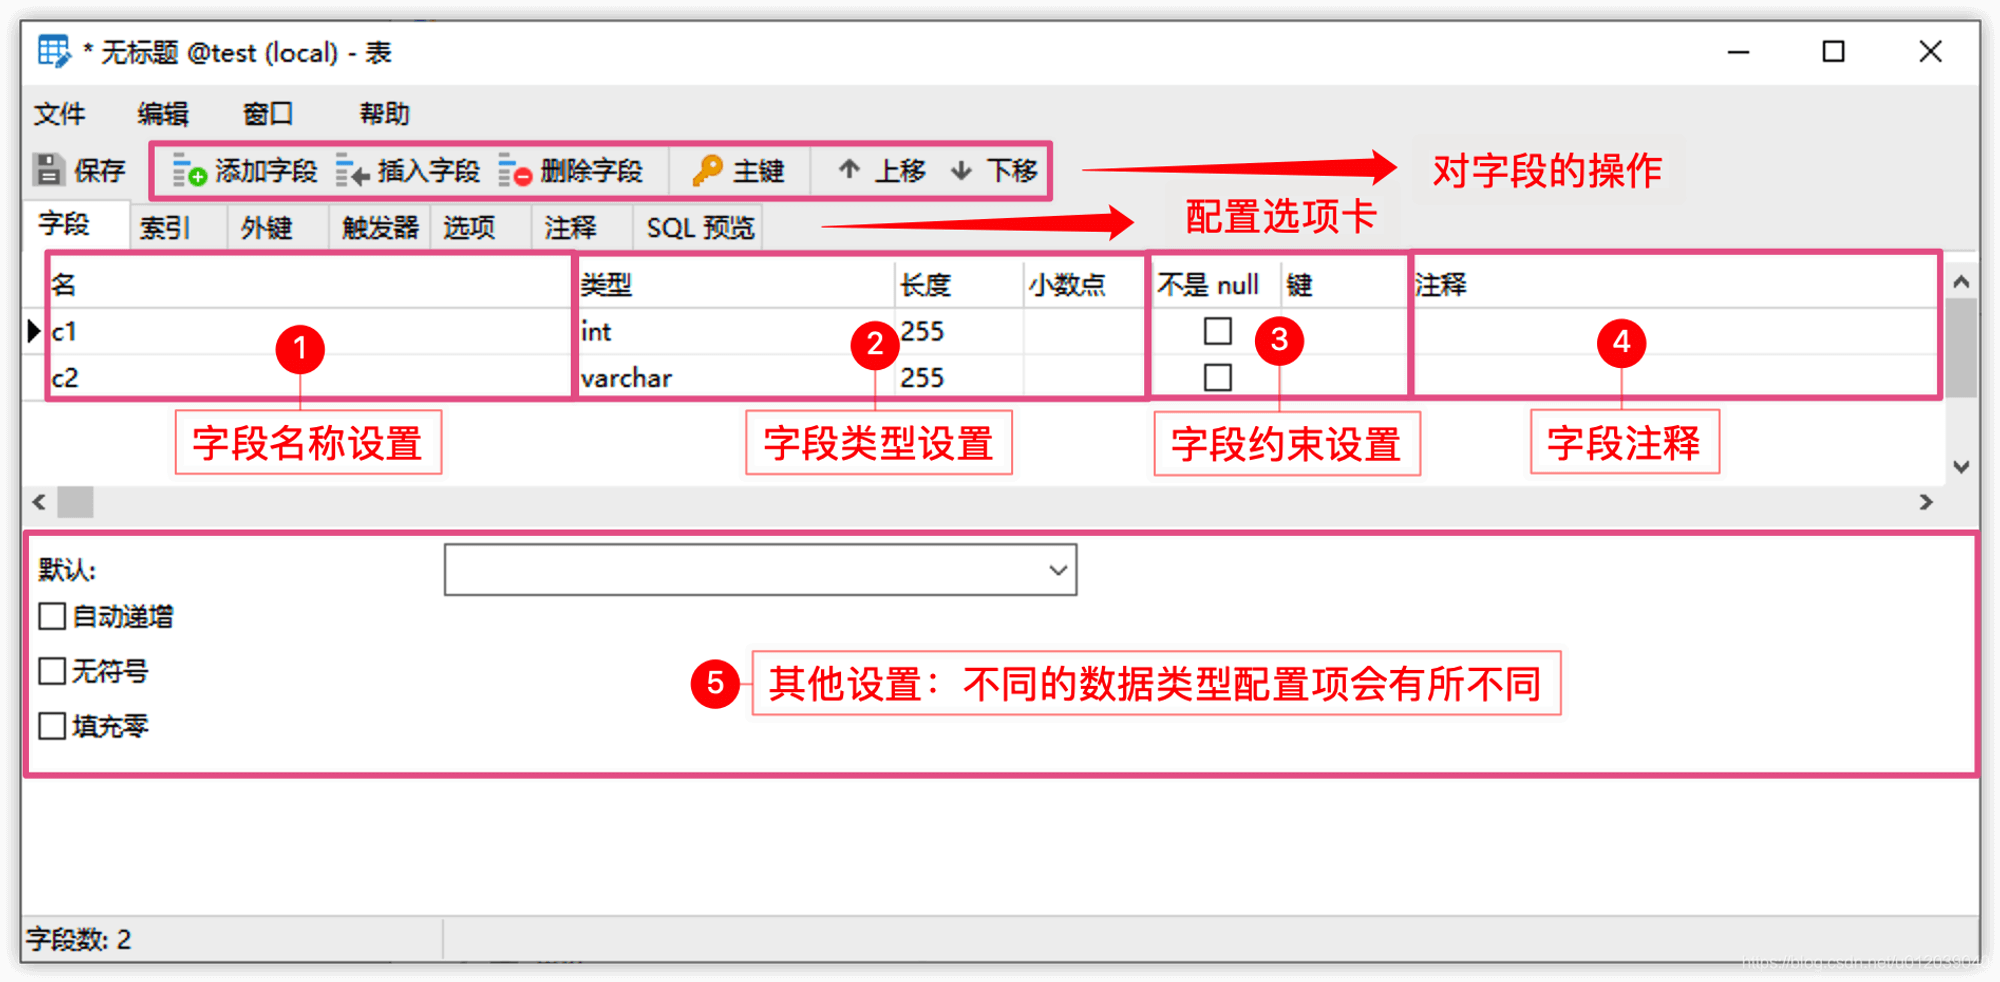
- In the table editing window, first define the columns of the table. Click the "Add Field" button to add new columns. For each column, you need to fill in the name (i.e., field), select the data type, length, and other information. Here we take student information as an example, filling in the following content:
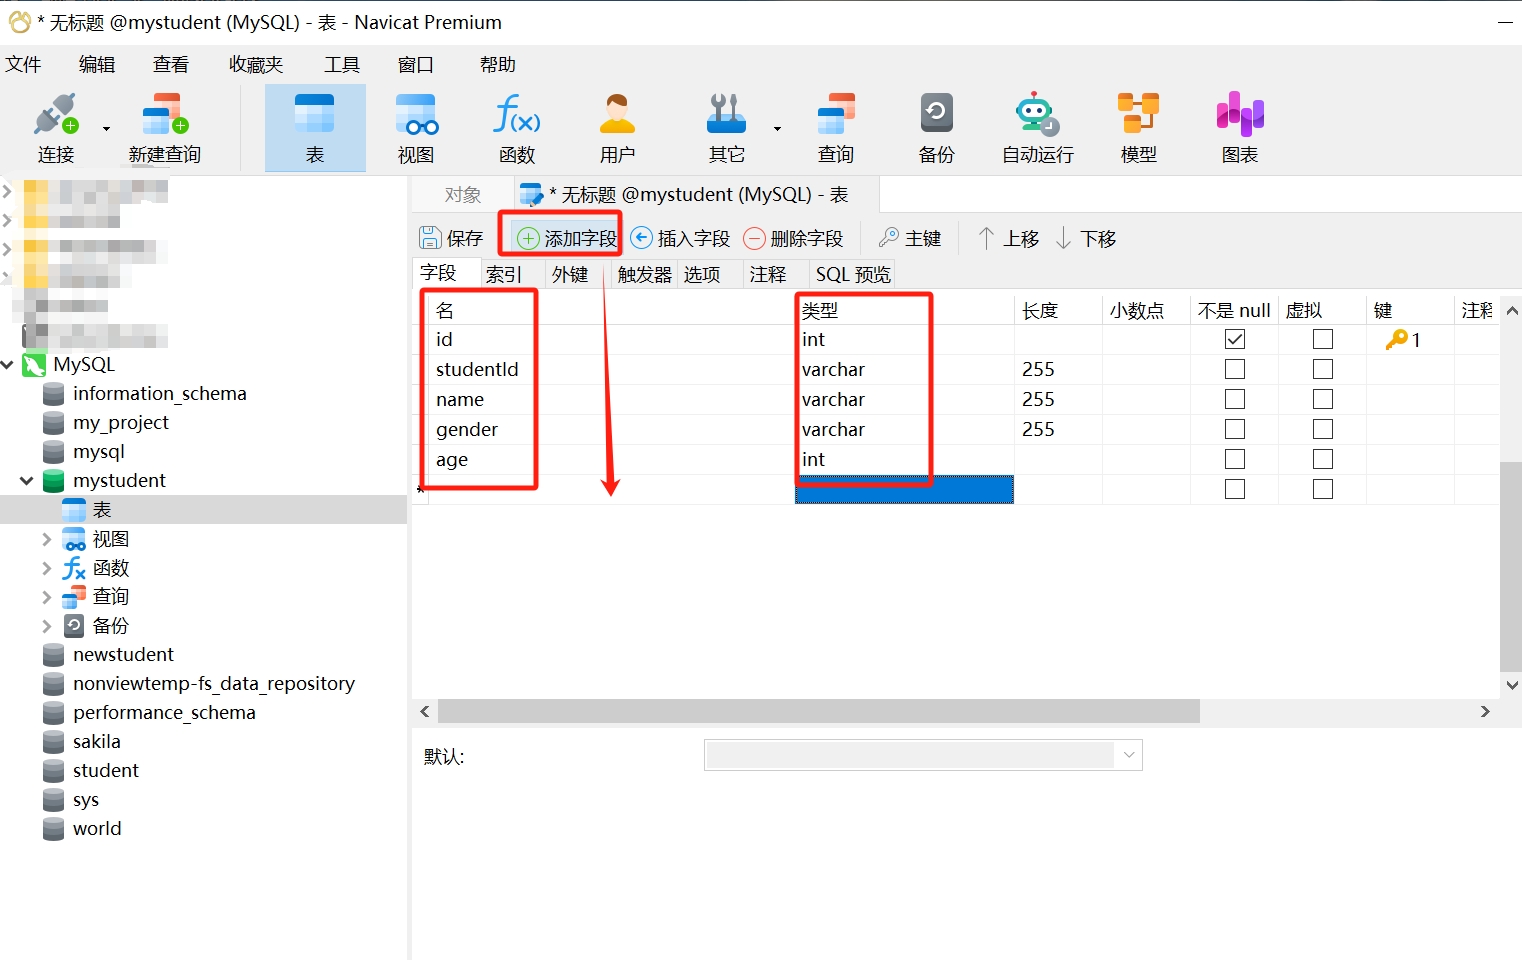
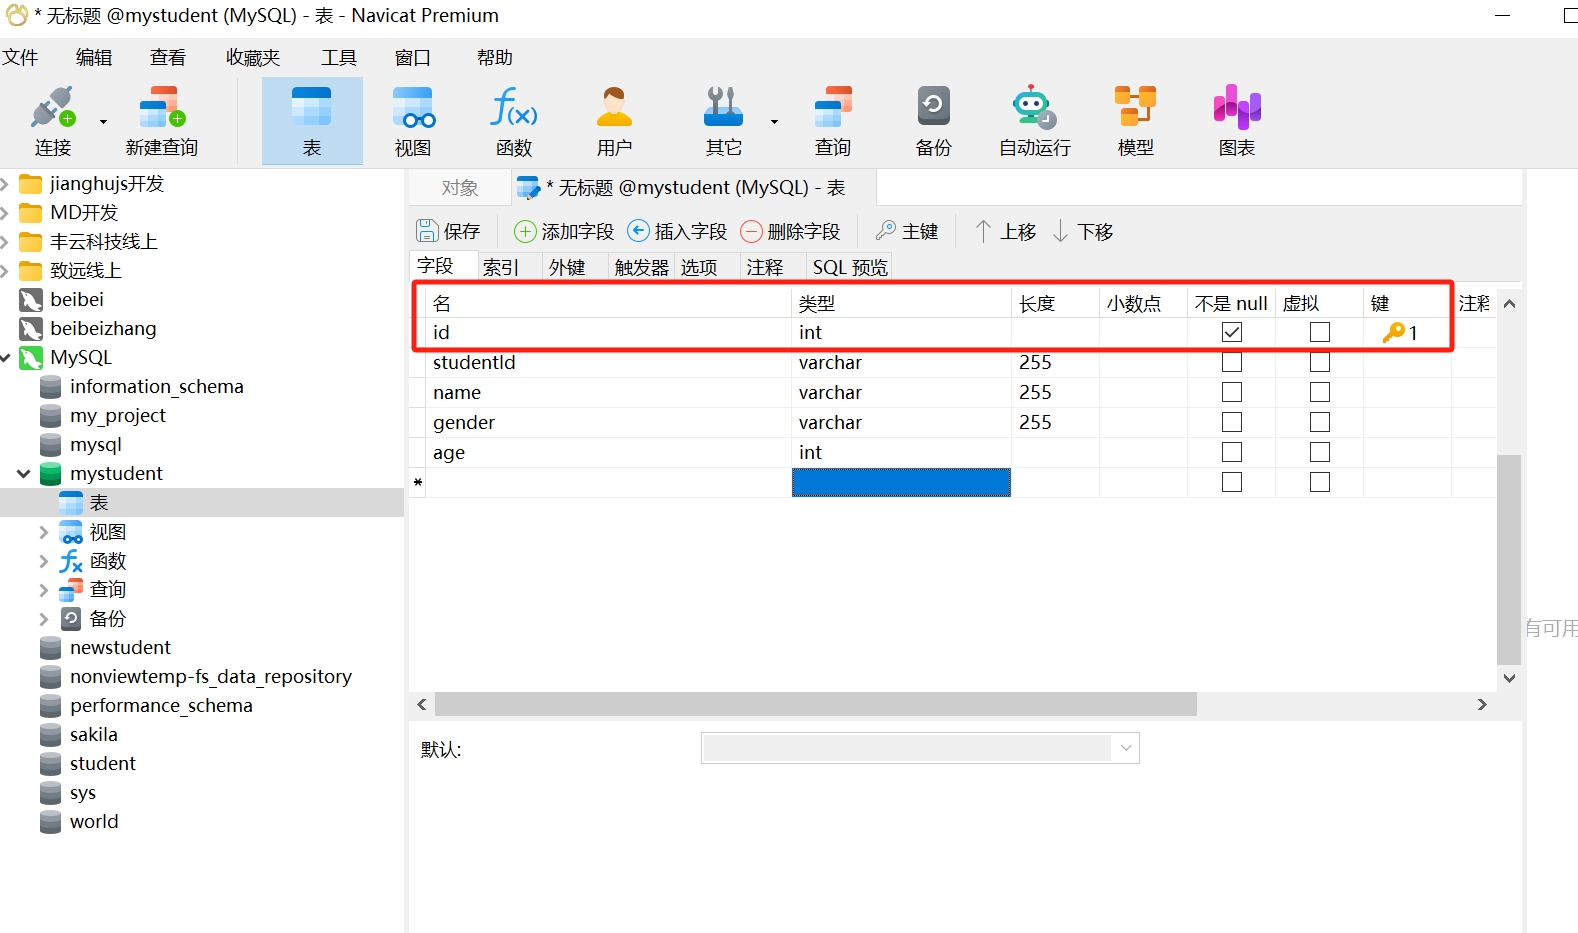
- Set the primary key: If necessary, you can set a primary key column. Generally, we set the "id" field as the primary key to uniquely identify each row in the table.
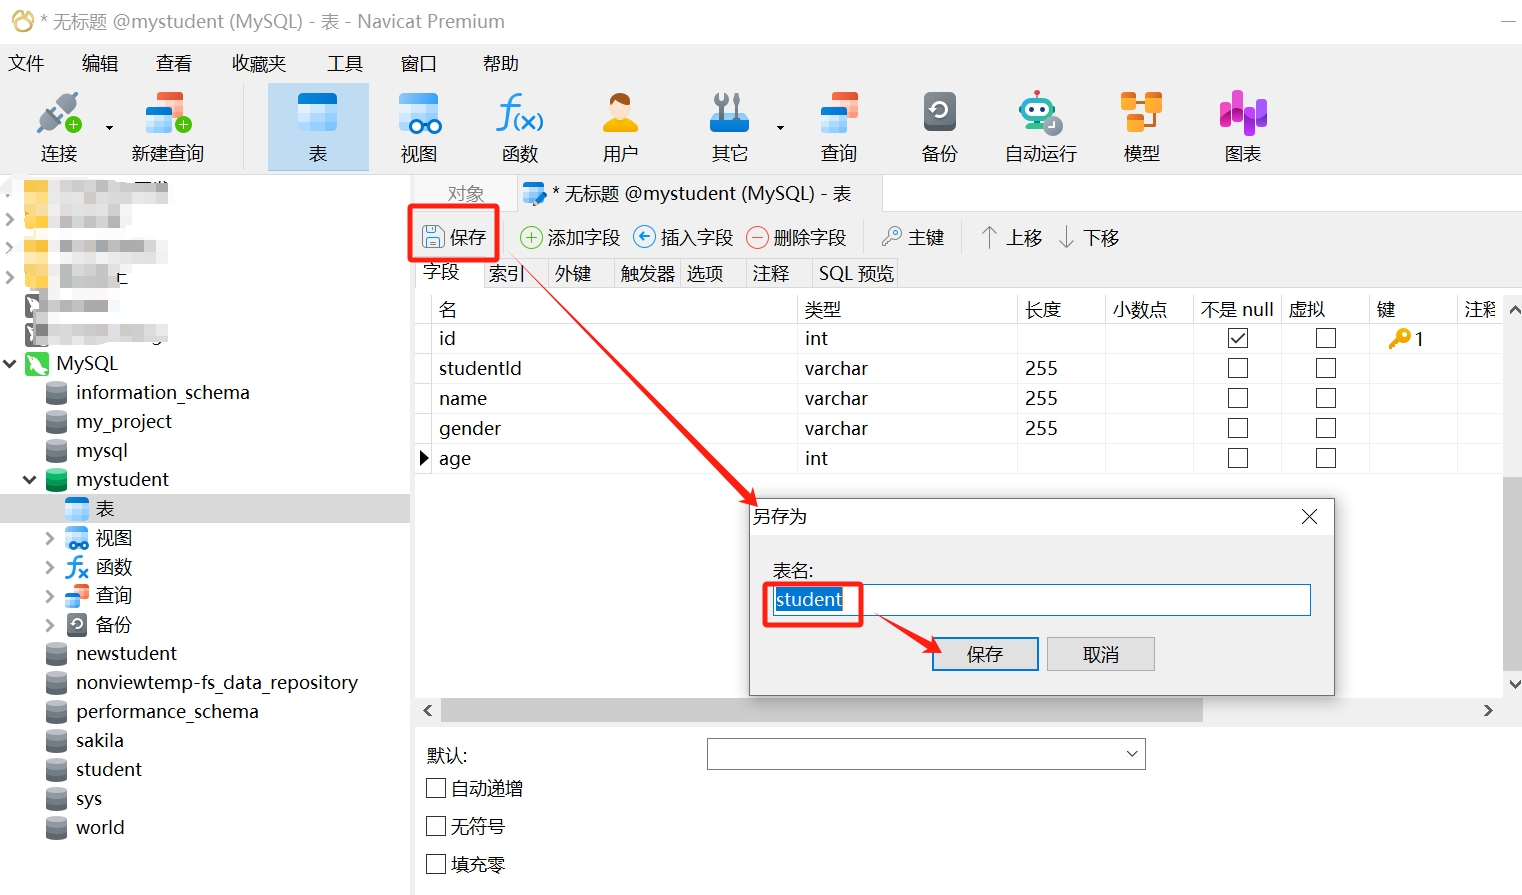
- Most importantly, save the table: After completing the table definition, click the save button to save the table. Specify a name for the table and choose to save it in the current database.
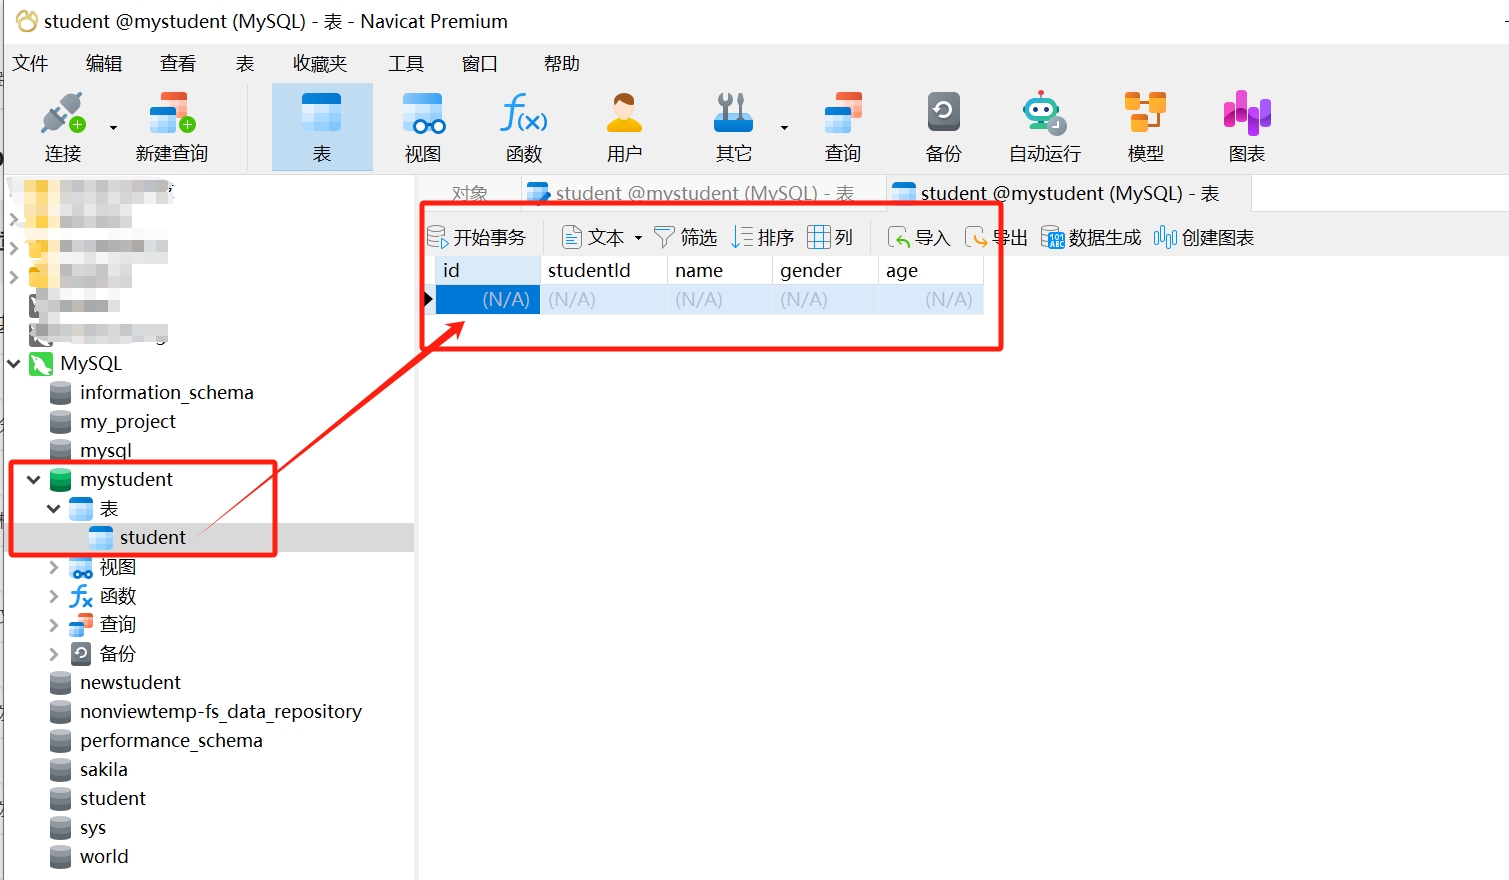
- Completion of creation: Once the table is saved, Navicat will create the table in the selected database, and we can see the newly created table "student" in the database object list.
- Edit Table
Editing a table refers to making modifications to the table structure. After selecting a table, click design table to enter the same interface as above, where you can modify fields. If you need to rename the table, you can right-click on the table and select: Rename.
It is important to note that when modifying the field type of a table, if there is already data in the table, you must ensure that the new type is compatible with the existing data, or delete the problematic data before making the change.
- Delete Table
Selecting delete table will remove the table object along with the stored data.
- Data Management
After the table is created, you can double-click to open it, which will take you to a data editing interface that queries all data (displayed in pages, with a default of 1000 records per page), allowing you to directly add, modify, or delete data.

Click the + and - at the bottom left to insert and delete data, directly select a data column to modify data, and click the checkmark to submit and save. It is important to note that the added and deleted data must conform to the types defined by the table fields.
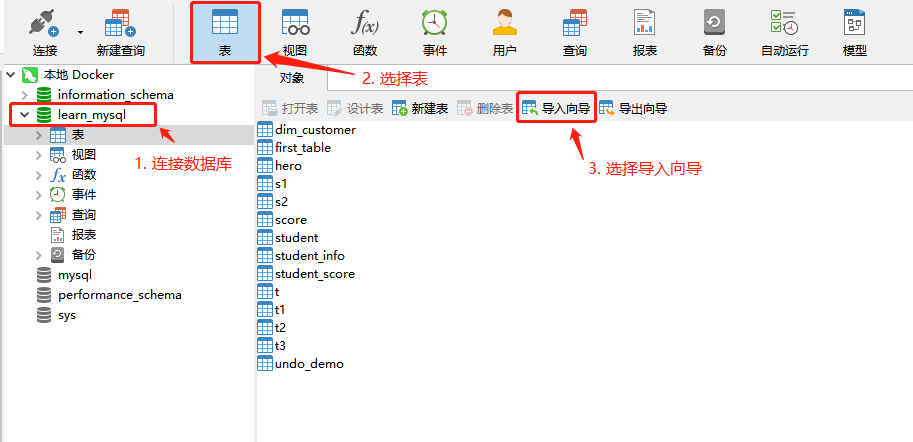
5. Import Database
Navicat provides a convenient data import and export wizard, for example: importing .csv format data (other formats are similar).
- First, connect to the database and open the import wizard.
- Select the import type as CSV file, then continue to select the import path and encoding format (this is very important, please ensure consistency, otherwise there will be garbled characters).
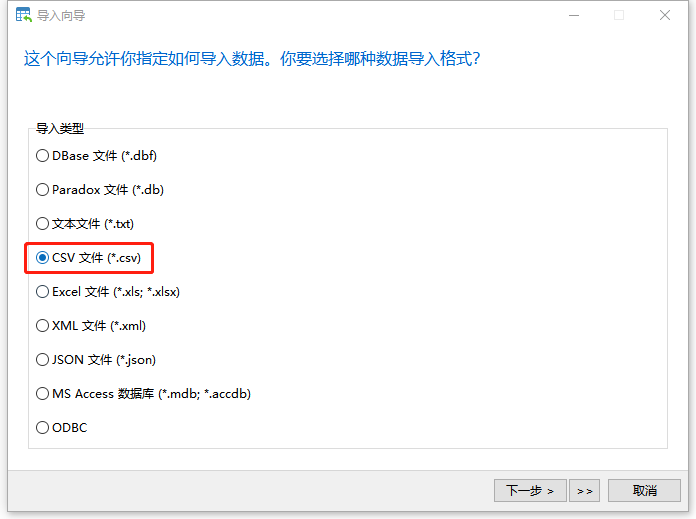
For CSV format files, you need to select a delimiter to define each field; choose according to the actual situation, generally the default is fine.
After configuring other options (configure as needed, generally can use default options), enter the field type adjustment section. At this point, Navicat has made certain settings for the table structure; we can generally keep the defaults, but we can also adjust according to our needs, such as changing field names, field types, etc.
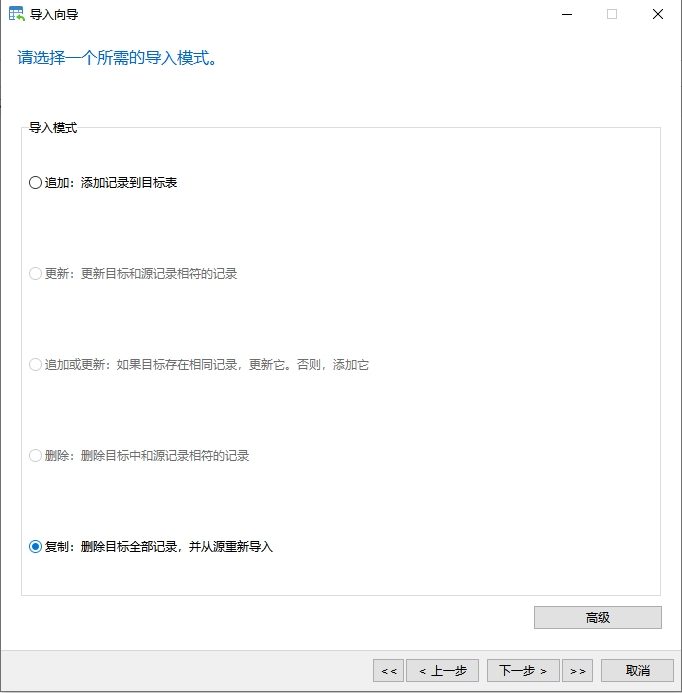
After setting, we need to choose the import mode, as shown below; here we can choose append or copy.
- Enter the next page, select start, and wait for the import to finish. In the window, we can see the current import progress and related information. If we find that there are too many erroneous rows, we can check the relevant import logs to analyze the specific reasons for the errors. The import time varies depending on the size of the imported data, the number of rows, and the differences in the service program's operating environment.

For the export part, the process is similar to the import process; select the export wizard and follow the prompts.
6. Run SQL Statements
If we need to execute our own SQL statements in the tool, we can achieve this in two ways.
- New Query Window
Click Query -> New Query:
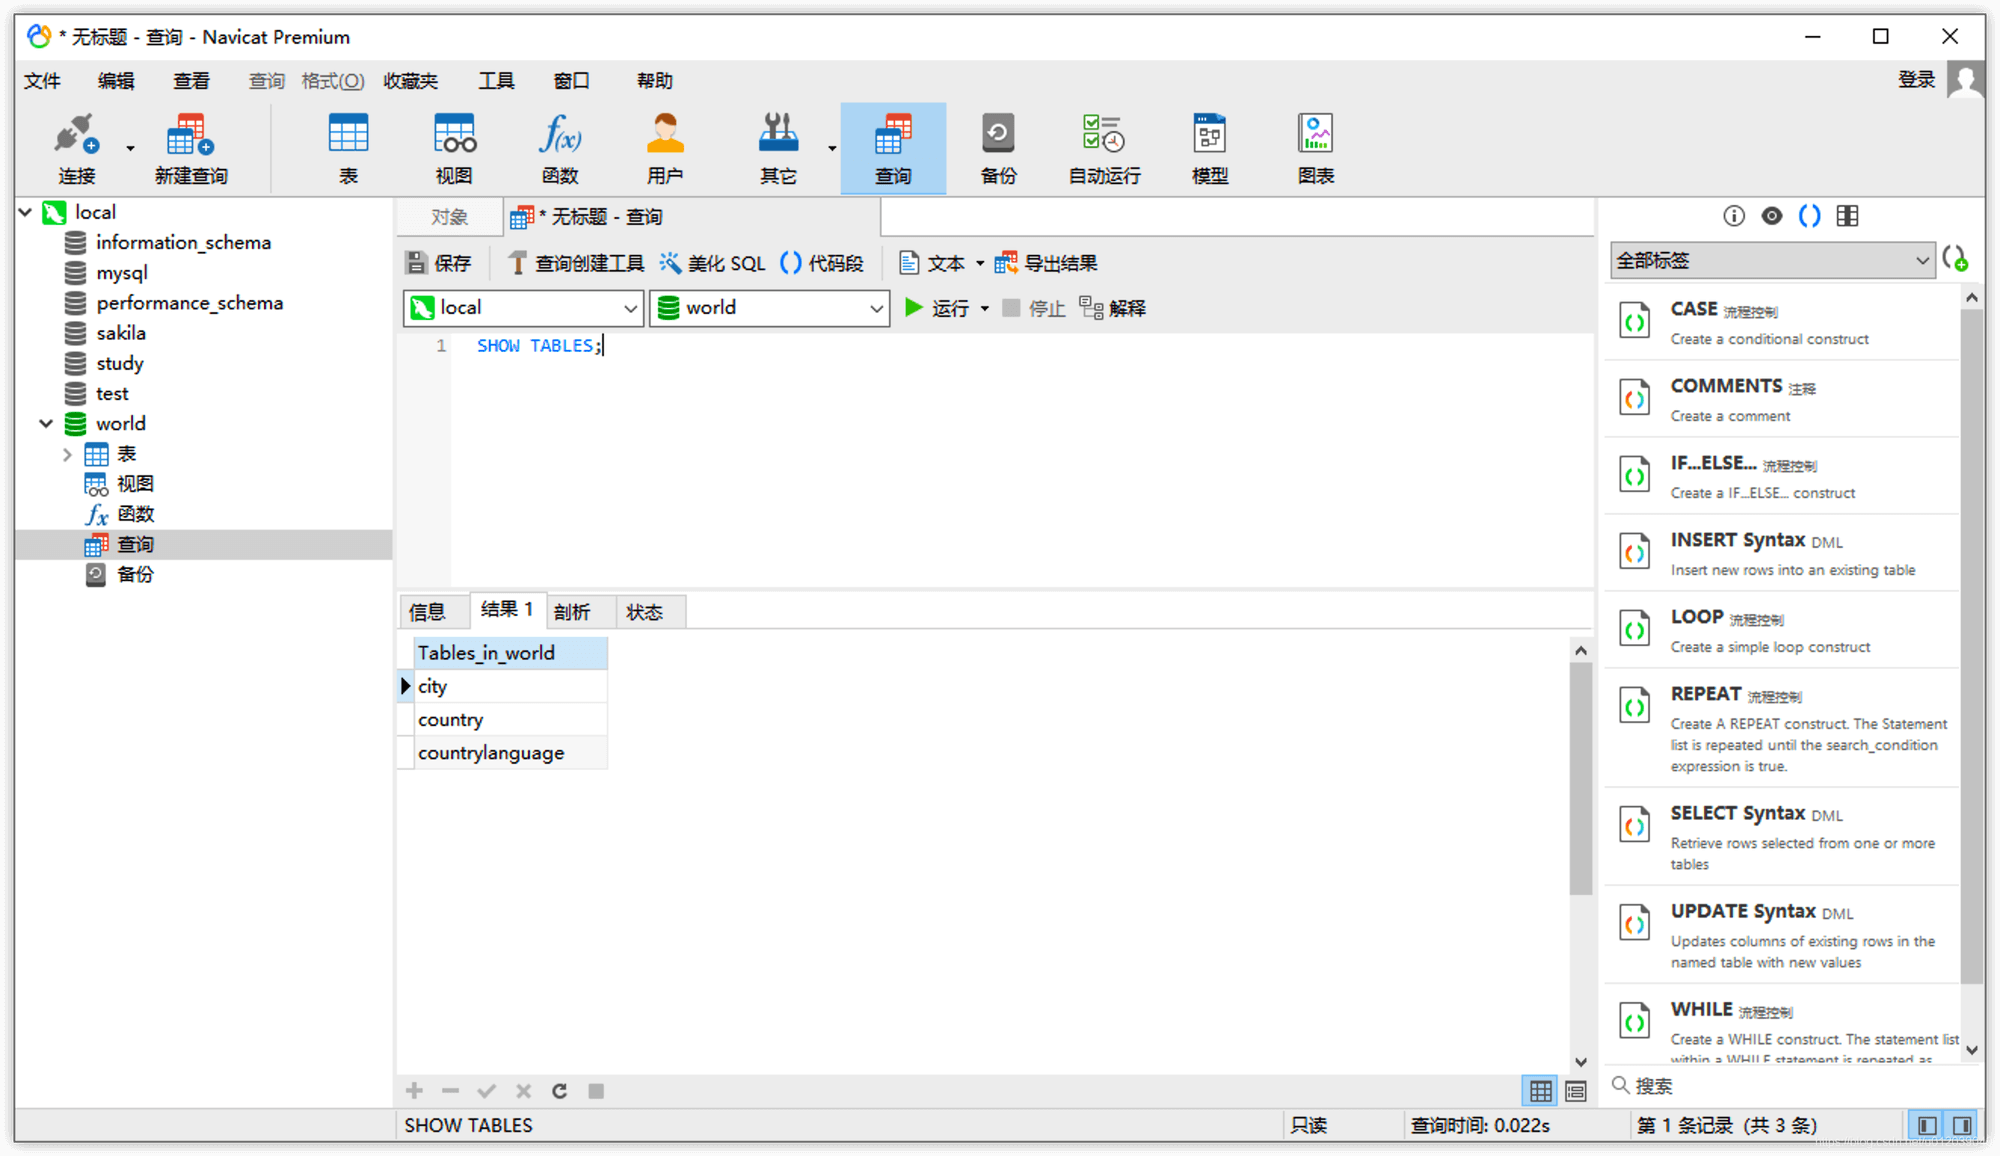
In this way, we can get rich prompts, and all SQL statements can be saved in the form of SQL files, and we can also choose to execute a specific segment of SQL statements.
- Open Command Line Interface
Right-click on the database being used -> Command Line Interface:
In this way, we can execute commands just like in the MySQL client interactive environment, ending each statement with a semicolon, executing them one by one, and we can scroll up and down.